
The following is the first of three articles on using filters. Part One discusses the main categories of filters used in photography, essentially camera filters explained
Part Two will discuss some specialized filters, such as polarizers, enhancers, soft focus, neutral density, and contrast reducing filters. The final part of this series will discuss the advantages and disadvantages of the various types of filter systems that are available to the photographer.
Before we discuss the categories of filters, it’s important for us to understand why a photographer would choose to use filters in the first place. Some photographers believe that a scene should be shot without being altered in any way. Other photographers feel there are valid reasons for using filters.

Filters For Lens Protection
One of the main reasons for using filters is to protect the front element of your lens from being damaged. It’s much cheaper to replace a filter than a lens element. In fact, protection is such a common use that most sales people suggest including a protective filter when you purchase a lens.
Many photographers don’t consider the use of protective filters to be an alteration since protective filters don’t change the scene in a significant way.
However, some still prefer to depend on a lens hood for protection. Personally, I don’t use a protective filter unless the situation warrants it—for example, when I’m shooting in sandy or ocean environments. In Death Valley or the Oregon Dunes National Recreation Area sand is usually blowing about a foot above the land surface no matter how calm the air is.
Similarly, ocean environments are often characterized by sea spray that I don’t want hitting my lens.
Should you use a protective filter? If you’re going to worry that the front element of your lens might become damaged, then use a filter. Worrying about your lens takes your concentration away from image making.
However, if you do decide to use a protective filter, remember to take it off if you use another filter for effect. The second filter will act as a protective filter. Also, purchase only a good protective filter. A cheap one can have a negative impact on your image.

Another reason for using a filter is to allow the camera and your eye to see the scene in the same manner. For example, if you photograph a friend sitting indoors in a chair next to a table lamp, your eye will see the colors as true-to-life.
However, if you’re photographing with daylight film, the camera will produce an image that has a reddish-yellow tint to it. Why? The film records colors based on the color temperature of the light. A table lamp’s color temperature is much lower than the temperature of daylight, resulting in a reddish-yellow tint.
Your eye automatically makes the correction; the camera does not. A filter can correct the color so the eye and the camera see the scene in the same way.
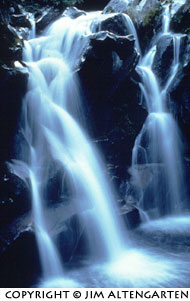
Another example is shooting with daylight film in the early morning shade. This situation has a higher color temperature than daylight, so the film would record the scene with a bluish tint to it. The photo below on the left is a waterfall shot in heavy shade.
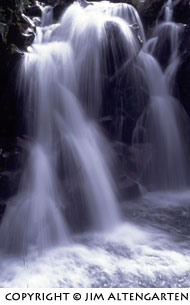
Notice the blue tint to the image. Sometimes this can be used in a creative way to express the cool feeling of the water’s spray as it comes over the falls. The photo below on the right is the same scene using a filter to correct the color temperature.
The most controversial reason for using a filter is to enhance the scene to match the creative vision of the photographer. “Purists” find such a usage unacceptable. What are some ways that a photographer can use a filter to adjust the scene to his/her vision?
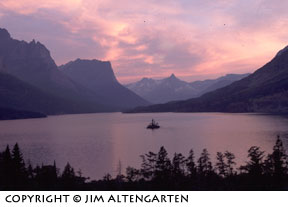
One of the most common ways is using a filter to enhance a sunset or sunrise. There are special filters that will make a spectacular sunset out of a dull one. Consider the two images below. The one on the left was shot “as is.”
The one on the right was filtered using a strange combination–an 85B color conversion filter (see article below to define that type of filter) and a fluorescent filter. This combination adds to the sunset without overpowering it.

Although filters may sound like ideal adjustments, they do come with certain disadvantages. (The Advantages and disadvantages of specific filters will be discussed in Part 2 of this series.) Consider the following general problems:
1) Most filters absorb light. They have a “filter factor” that tells how much exposure you must add for that particular filter. If your camera meters through the lens, it will automatically make the adjustment for you.
However, having a filter means that you’ll be shooting at either a slower shutter speed or more wide open than you would without the filter. To complicate matters, if you use a hand-held meter, you’ll need to adjust manually for the filter factor.
2) They can impact your image. A low quality filter coupled with a low quality lens is an accident waiting to happen. Purchase the best filters and lenses that you can afford. (Some suggestions on filter quality will be made in Part Three of this series.)
Many people believe the more glass you put in front of your lens, the greater the degradation of your image will be. To some extent this is true, but the extent of degradation depends on the quality of the filter, the quality of the lens, and how much you’re enlarging the image.
3) They can cause vignetting. Filters can be stacked. This means that more than one filter can be used at the same time to create an image. If you use a wide-angle lens and multiple filters, the stack of filters can block out some of the image-forming light.
This effect generally means the corners of your image will go black. Some companies make special thin filters to be used with wide-angle lenses to help avoid this problem.
4) They can cause flare. Whether you stack filters or use only one, you’re adding more glass surfaces for the light to go through. This increases the opportunities for light to be reflected off dust, scratches, fingerprints, etc. on your filters.
When the light is reflected, it creates flare in your image. Flare is represented in one of two ways–by circles of light in your image or by a loss of contrast in a section of the image.
5) They are bulky to carry. Photographers usually own multiple filters that can easily take up all the “extra” space in a camera bag–especially if they’re in the plastic containers in which they were purchased. Many people who buy the round screw-in filters carry them in pouches that hold six or eight filters. These pouches save some space.
Once you make the decision to use filters, you’ll find there are several general categories of filters available. (Note: All of the camera filters explained comments below are based on using daylight film in the camera, unless specifically mentioned otherwise.)
Camera Filters Explained – Protective Filters:
As mentioned above, the primary purpose of these filters is to protect the front element of the lens from damage. The two main filters in this category are the Sky (1A) and the Haze (UV) filters. Some companies will designate these filters differently.
For example, Canon calls the UV filter a “Regular” filter; Nikon designates it as a L37C filter. The two filters don’t absorb any light, so there’s no impact on your exposure values. There are some differences, however. The Sky filter has a slight tint to it, so it does help reduce some of the blue tint that you may get when photographing in shaded areas.
Otherwise, the tint is hardly noticeable in a typical image. The UV filter is clear and reduces the excessive blue in haze, marine, and mountain scenes without adding tint.
Light Balancing Filters:
These filters balance light so the film records the scene the way your eye sees it. There are three main groups of filters in this category: the 81 series, the 82 series, and fluorescent filters. (Some companies may designate these filters differently.
For example, B+W designates the 81 series as their KR filter series.) All of the light-balancing filters absorb some light. Remember, no correction is necessary if your camera has through-the-lens metering.
The 81 series of filters reduces the excessive blue when you’re photographing in the shade and adds “warmth” to a scene when you’re shooting in normal light. Like many filters, they’re made in a variety of strengths. The 81A has the weakest effect. As you proceed through the alphabet, the effect becomes stronger.
The most commonly used 81 series filter is the 81B; it’s a good one to have if you want only one in this series. The 81 series is an essential filter for landscape photographers.
The 82 series filters perform the opposite function of the 81 series. They reduce the red/yellow warmth of the early morning or late afternoon. Most landscape photographers like that warmth and don’t want an 82 series filter. Other photographers, looking for a more realistic (the way their eyes see it) image, carry one of the 82 series in their camera bag.
This filter is produced in a variety of strengths similar to the production of the 81 series.
There are two types of fluorescent filters available to photographers. The FLD filter is designed for daylight film. The FLB filter is produced for tungsten film. While both absorb light, it has been my experience that an extra half-stop of exposure is required beyond what the camera suggests.
Without using one of these filters, your image will have a greenish tint if you’re shooting under fluorescent lighting. However, these filters won’t always produce the effect you expect.
There are about six different types of fluorescent lighting, and each one has a slightly different color temperature.
A single filter can’t adapt to that many conditions. There are some films that perform better under fluorescent lighting than others. Fuji’s Reala, a print film, is one of the better ones. (For another way of handling fluorescent lighting, try a CC40M.)
Color Compensating Filters:
These filters are commonly used in the darkroom to filter the light during the printing process. They provide a way to fine tune the color of an image in small increments. Another use of color compensating filters (CC) is during long exposures.
If you’re familiar with the reciprocity failure chart included in your film package, it will reference CC filters. When reciprocity failure occurs, there is underexposure and a color shift. To adjust for the color shift a CC filter is used.
CC filters come in a variety of densities in the three primary colors (red, blue, green), and the three secondary colors (yellow, cyan, and magenta). CC filters are identified by color and density. A CC40M filter has a density of .40, which is medium, and a magenta color.
A CC10M filter has less density and would impact the image less with its magenta color. The CC filters require exposure compensation based on the density of the filter. Incidentally, magenta is a complementary color to green. Therefore, the CC40M is often used to correct for florescent lighting when using daylight film.

Color Conversion Filters:
These filters are used to convert either daylight film to tungsten lighting, or tungsten film to daylight lighting. Remember that people shooting with print film can have these filter effects done during the printing process. All of the Color Conversion filters require some exposure compensation by your camera.
As you know, there are two different types of tungsten film–Type A and Type B. The 80A filter converts Daylight film to Type A tungsten lighting (3200K). The 80B filter converts Daylight film to Type B tungsten lighting (3400K). The 85 series filters accomplish just the opposite.
The 85A converts Type A tungsten film to Daylight lighting. The 85B filter converts Type B tungsten film to daylight lighting. Landscape photographers have discovered an additional use for the 85 series filters. Because they add a lot of warmth to an image, many photographers use them to enhance a sunset or other scene that might need more punch.
There’s nothing like experimenting with various filters. They don’t always have to be used for their intended purpose. Refer to the sunset images displayed above.
The filtered one used an 85B and a FLD filter to achieve its effect. Don’t let your creativity be impeded by rules as to how a filter should be used.
Contrast Filters:
These filters are used for B&W photography. They all require some exposure compensation by your camera. The filter is all one color–such as red, green, yellow, orange, etc. If they’re used in color photography, they’ll tint the entire scene the color of the filter. Actually, there’s one unique technique for using these filters in color photography. It’s called the “Tri-Color” technique. However, that is for another article.
Contrast filters are important for interpreting a scene. Imagine a medium red tulip that has medium green leaves. Shooting this scene without a contrast filter won’t differentiate between the two medium tones. They’ll both be the same tonality in the final image, making it pretty boring.
However, if you use a green contrast filter, the red tulip will be darker than the green leaves. This allows for some interpretation of the scene by the photographer. If you want to make some of the tones lighter or darker in B&W photography, a contrast filter is your best bet.
As a general rule, a contrast filter will lighten its own color and darken its complementary color. Refer to the chart below to see how the main contrast filters affect various tonalities in a scene.
| Contrast Filter | Lightens These Colors | Darkens These Colors |
| Red | red, magenta, yellow | Cyan, blue, green |
| Blue | Blue, cyan, magenta | Yellow, red, green |
| Green | Green, yellow, cyan | Magenta, red, blue |
| Yellow | Yellow, green. red | Blue, cyan, magenta |
| Magenta | Magenta, red, blue | Green, yellow, cyan |
| Cyan | Cyan, blue, green | Red, yellow, magenta |
If you often shoot with B&W film and don’t print your images (contrast can be modified during the printing process), you may want to copy this chart and put it in your camera bag.
Another way of determining how the tones of a scene will be affected by contrast filters is to use Maxwell’s Triangle. Please refer to the sketch below. Some people find this is an easier way to remember how contrast filters impact tones.

Maxwell’s Triangle
To use the triangle, select the color of the contrast filter. That color will always be lightened. The other colors touching that color will be lighter. Colors not touching the filter will be darker. For example, if you use a red filter, it will lighten red, yellow, & magenta (the colors TOUCHING red). A red filter will darken green, cyan, and blue (the colors NOT touching red).
In conclusion, filters, as with most things in life, have their plusses and minuses. Hopefully my Camera filters explained guide is of some help.
There are some reasons for using them, but there are also concerns that must be addressed. Before running down to your local camera store to buy a bag of filters, analyze which ones will benefit your particular type of photography. Determine the filters you’ll want to use often and avoid nice-to- have-for-a-special-occasion filters until you understand more about using filters in your photography. Again, avoid those tempting cheap filters and purchase the best that you can afford.
Most importantly, don’t miss Part Two, when you’ll learn about some special filters.
By Jim Altengarten, exposure36 Photography

Leave a Reply