
What is the primary function of a camera lens? It collects light. If there is no light, you have no image being captured by the image sensor. Here I’ll attempt to define aperture in reader friendly terms.

APERTURE
Aperture is a unit of measurement that defines the size of the lens opening which allows a certain amount of light to enter, based on the size of the opening—the larger the aperture opening, the more light that is allowed to get through.
It is defined by the focal length* of the lens divided by the diameter of the lens, and is recorded in “f-numbers” (f-number = focal length ÷ lens diameter).
*Note-Focal Length: It is the distance from the middle of the lens to its focal point (convergent point when parallel rays of light strike a lens focused at infinity).
Normal lens is considered: 50-55mm
Less than 50mm: a wide-angle lens (small focal length with a wide angle of view)
More than 55mm: a telephoto lens (long focal length with a narrow angle of view)
It is not measured in “units” of measurement like inches or millimeters, but rather it is a relative number.
For example: f/8 represents a number that is 8 times the “effective” aperture diameter, which is called the “entrance pupil”.
Put another way, if you have a 100 mm lens (100 mm focal length), with an aperture of f/8, the “entrance pupil” will be 12.5 mm. (100mm ÷ 12.5mm = f/8)
Compare that with a 150 mm lens (150 mm focal length), with an aperture of f/8, the “entrance pupil” will be about 18.8 mm, but both lenses will give you the same exposure at f/8 when photographing the same subject (150mm ÷ 18.8mm = f/8).
f-stop or EV Sequences: The difference between one f-number and the next f-number in the sequence is known as a “stop”, which is a unit that quantifies ratios of exposure. One stop represents a factor of two, or it can represent one-half. It is also referred to as an EV (Exposure Value).
Lenses today use a standard f-stop scale based on the square root of 2: f/1.4, f/2, f/2.8, f/4, f/5.6, f/8, f/11, f/16, f/22, f/32, f/45, f/64, etc.
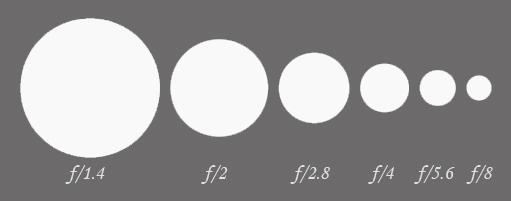
When you increase the f-number by one stop, you double the amount of light that enters through the aperture, and when you decrease the f-number by one stop, you cut in half the amount of light that enters through the aperture.

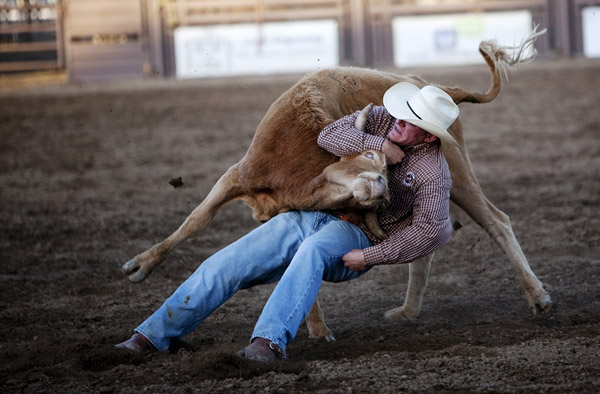
Brad Sharp
1/1250 sec. @ f/4.0 ISO 100.
The priorities for this photo were:
1.) ISO 100–since there was plenty of light, an ISO of 100 would allow me to choose almost any combination of shutter speed and aperture.
2.) f/stop–I wanted to make the background blurry, yet keep the subject sharp.

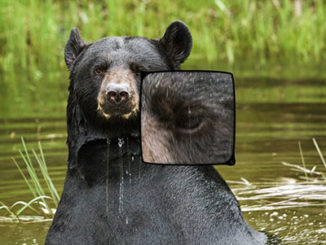
Brad Sharp
For this image, I adjusted the aperture for a teaching example. I increased the f-number from f/4.0 to f/45 (7 stops smaller), so the shutter speed had to decrease from 1/1250 sec. to 1/10 sec (7 stops slower). This resulted in the background being more defined and in focus. The ideal setting for this shot would be 1/400 sec. and f/5.6. This will provide a shallow depth of field, and a sharp, crisp focal point.
“Sweet Spot” / Optimal f-number:
All lenses have an aperture setting, or range, that is called a “sweet spot” for sharpness. Each lens is different, but as a general rule of thumb, the sharpest images are taken with the aperture 2 f/stops down from the widest opening. So if your camera has a lens which is wide open at f/2.8, then the “sweet spot” will be two stops down to f/5.6.
But what many photographers don’t realize is that you will also get “softer” images with the aperture at its smallest opening, due to diffraction (light rays get slightly “bent’ as they squeeze through very small apertures, resulting in you getting progressively less sharp images beyond a certain aperture). When you use smaller apertures (larger f-numbers) to achieve a greater depth of field, at some point the aperture size will cause some softening due to the effects of diffraction.

For this shot I was able to use the “sweet spot” of the aperture and of the zoom. The subject was stationary, so I didn’t need to worry about the shutter speed, other than to have it fast enough for a hand held shot. The lighting was good, so I didn’t have to worry about opening the aperture wide open, and I was able to easily distance myself so that I didn’t have to use the zoom at either extreme. The subject, light, and positioning allowed me to get the best “tack sharp” image. You will find that you don’t always have all of these options available, but if and when you do, you will now be able to take advantage of them.
Most lenses will not give you their best performance when wide open, and thus will generally give you sharper images at the area of “critical focus” – the point of focus, not factoring in depth of field, when stopped down about 2 stops. Once you reach a certain point your images do not get any sharper as you continue to use smaller apertures. If you go too far, then diffraction becomes a significant problem. This is the reason that again, as a general rule, the “sweet spot” for most lenses in the f/4 to f/11 range. This of course is dependent on the quality of the camera and the lens. Having said that, some of today’s quality pro lenses perform optimally when wide open.
LENS QUALITY
Top quality lenses are vital to creating “tack sharp” images. This usually means buying the Pro-grade lenses by the manufacturer of your camera. There are a lot of good third party lenses out there and some will give you some good results. But if you are looking for better than good, then your best bet is to go with the camera’s brand name. There may be a few exceptions, but very few.
Top quality lenses are much more expensive and there is a very good reason for that–they are that much better. They will generally give you better image quality, faster auto focus speed, better detail, sharper focus at all apertures and focal lengths (if it is a telephoto lens), minimal image distortion, better quality of color, flare resistance, vibration correction, and build quality.
It is always a good idea to read the reviews about a lens before you buy it. You can get very good reviews and sample photos for most all lenses at photozone and dpreview.
Most lenses, from the least expensive to the most expensive, are sharper in the middle of the image than they are on the edges or the corners. Pro lenses will give you better results, but the sharpness will still drop down in the corners, even if it is dropping from exceptional down to excellent. So if you have an image that requires the entire photo to be “tack sharp”, you may want to consider leaving extra room on the edges so that you can use your photo editing software to crop off the portions of the image (edges and corners) that are not “tack sharp”.
Zoom lenses also have a “sweet spot” when it comes to focal length. I talked about a “sweet spot” with regards to the aperture, but it also applies to Zoom lenses, which tend to be “softer” at the longest and shortest focal ranges, and sharpest in the middle range of the zoom. Towards the shortest focal length the lens will have the largest amount of distortion, although it may be minimal in some lenses. At either end of the focal range, the lens will be more prone to chromatic aberrations (see Wikipedia for further explanation of chromatic aberrations) than in the middle of the focal range.

Testing Your Lenses
When reading many of the lens reviews on line, the one thing that stood out to me is how often two of the same exact lenses will have widely different results. While manufactures all have quality control standards and tolerances, they are still mass produced and are subject to variations. So, if you think that your lens may not be as sharp as it should be, the only way to tell for sure is to test it to see if it meets the norm. You can then compare your results to the manufacture’s test results for that lens, which can be found on the lens review sites mentioned in this article.
One test that not only allows you to test the lens, but also the camera is the LensAlign Focus Calibrations System, which comes in a Pro version ($249), and a Lite version ($179). You can purchase it from a number of photography retail stores.
Other charts that are free, but don’t test the camera as well as the lens are: Regex (this site also recommends the LensAlign system) and Northlight Images.
Of course there are limitations to these tests and some may be more sensitive than others. Being exact is a must. I would hate to see you send in your lens for re-calibration only to find out that there was no problem, other than your tests were not set up to the exacting specifications required.
Micro-Adjust Your Lens
If you find that your tests do not meet your expectations, you can use an adjustment feature that is found on many newer, high to medium end cameras (including Nikon D3, D3x, D300, Canon 1D, lIII, 1DIV, IDsMkIII, 5DMkII, 50D, 7D, D700, Pentax K20, and Sony A900), called AF Micro-Adjustment by Canon and AF Fine Tune by Nikon. When you focus on a subject, but the image is actually focused a little behind the subject, it is called “back focus”. When you focus on a subject, but image is focused a little in front of the subject it is called “front focus”. When this happens, the AF Micro-Adjustment on your camera may help fix the problem. Each of your lenses may be off by the same amount or they may be off by a different amount for each lens.
Have Your Lenses Calibrated
If you find that your lenses are off more than can be corrected by the Micro-Adjust feature, you should send your lens in to the manufacturer for re-calibration. I know it’s hard, but you should also send the camera with the lenses so that they can be calibrated together. If you have the results from the tests you took, send those along as well.
Time to Test & Practice
If you have your lenses calibrated or feel comfortable with their existing results, it’s now time to practice more. Work with the various f-stops and see what kind of results you get. Be sure to take notes on each of your shots, so you’ll know what the camera settings were—what worked and what didn’t work for each of your shots.
Again, enjoy the learning experience.
Photos by Brad Sharp
Copyrights on Text and Photos: © 2015 Marla Meier, Apogee Photo Magazine, LLC. All rights reserved.


I have been taught so much from this practical blog page. Your content material is pretty interesting. Keep up the awesome work as well as keep going to motivate:-)
Absolutely fantastic article! Your content is captivating and interesting, I even learned a few things. You have some great photographs too, love the truck!
Josh