
 Running water. The sight and sound of it conjure up many different, divergent concepts–peacefulness, power, serenity, soothing, calmness. There’s something about it that makes you feel good, and Nature has provided us a dynamic version through waterfalls. Whatever the magic is, something lures people to waterfalls, whether they be large, powerful ones like Niagara Falls or small cascading ones hidden in a forest. People will go to great lengths just to stand and gaze or listen. Because so many people are drawn to waterfalls, they’re one of the most photographed of all subjects. They seem to be easy targets because they’re easy to find and don’t go away, but waterfalls are also complex subjects to capture.
There are many ways to approach waterfall photography, depending on the effect you wish to convey and the subject itself. Quite often, when you visit a waterfall, you see a variety of equipment, ranging from point-and-shoot cameras to large format 8 X 10 cameras–and everything in between. They can all produce an image the maker will enjoy. “Preference” is the key word. One person may say it’s better to shoot them using longer exposure times to make the water look silky, while another may say shoot faster to stop the action. Neither approach is wrong and both are right. Whichever image the photographer wishes to portray is the proper one. If your choice is a long exposure shot, exposure times should be at least 1/2 second or longer. Also, use as small an aperture as your lens allows. This selection has a twofold purpose: One, it allows for slower speed settings, and two, you want as much depth of field as possible to have the maximum amount of the composition in focus. In either instance, long or short exposure, a tripod is an essential piece of equipment to take along when doing waterfall photography–especially if you’re taking longer exposure photos. It may seem a bit cumbersome to carry when reaching the waterfall entails a hike up and down rough terrain, but the extra weight will be well worth the inconvenience when you pick up your images from the lab.
 What makes waterfall photography tricky, whether using short or long exposures, is getting the proper exposure. Taking pictures of fast-moving water is quite different from shooting a lake or an ocean. The white, bubbling water you see can fool your camera’s meter as easily as snow does. Whoever advised that the best days for photography happen when the sun is shining brightly didn’t have waterfall photography in mind. One way to help tone down the bright white of the frothy water is to shoot on an overcast day. If you do go on a sunny day, try to wait for a cloud to pass overhead to block out direct light and subdue the light on the scene. This will lessen the extreme contrasts you’ll get from the bright whites to the darks in the scene. The time of year also plays a part in the intensity of the white, bubbly water. Waterfalls located in areas that get a good amount of snow will have more bright water in the spring as the snow begins to melt and make its way down the river, than later in the year when not as much water is flowing over the drop.
There are several ways to get a correct exposure of a waterfall, whether it be in bright or subdued light. One is to take a reading of the two extremes you’ve composed in the frame and set your meter between the two. Another option is to find something in the frame–usually a large rock or tree trunk–and take a reading off of it. The subject you choose should be receiving the same amount and angle of light as the waterfall. These two subjects provide a good rendition of the neutral 18% gray your camera will try to make when metering off the water.
No matter which style you choose to use, it’s always a good idea to bracket. Because you’re not going to spend the time and effort required to reach the waterfall, only to take one picture and leave, take a couple of shots of each composition–going either one-half to a full stop on either side of the reading you think is correct. While you may think it an inconvenience, take along a pen and paper and note what readings you used for each frame and refer to them when you get your film back. This way, you’ll see what you like most and can work from that reading when doing waterfall photography in the future. The exposures you may like best with one waterfall may not be what’s best for another because of different factors–including whether or not the fall, or cascade, is in the woods; whether the fall faces the sun; and what the intensity of the running water and the whiteness it reflects is. These readings are just guidelines that give you a place to start.
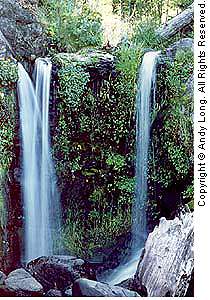
 Another element to keep in mind when doing waterfall photography is composition. No matter if you want to take a picture of a full waterfall or just a portion of it, composition is a key factor. If you want to include the entire waterfall, several steps need to be taken. Lens selection and positioning go hand-in-hand. How far you are from the falls determines which lens you can use to include all of it in the frame. Once you choose the lens that works best, you can move forward and back a bit, if possible, to clean up the edges of the frame. There are some instances in which you can’t move one way or the other because of your location, so a zoom is a good lens to have with you. Because there may be many different objects around a waterfall, it may be difficult to get a full shot without a distracting element included. Even though you may not be able to eliminate the objects entirely, try to diminish their appearance as much as possible so they don’t become an eye-catcher within the frame.
While most of the pictures you see of waterfalls feature it in its entirety, look for small parts of it that make an interesting composition. A group of rocks near the bottom with the water quickly running over them can make as nice a shot as the whole waterfall. Cascades are good for this, as they provide many different parts to the whole picture. If the waterfall you’re shooting is in a location in which you can move around, look for other elements you can work into a picture. With so much water going into the air, some of it doesn’t necessarily find its way back into the river. Look around the ground for a small puddle, and see if you can catch the waterfall reflected in it. When doing this, there are a couple of types of pictures to look for. If you can see the whole waterfall reflecting in the puddle, try a composition of that. If not, see if you can see the top of the falls where the water is rushing over the edge. The results of these and other pictures you can discover when you explore can be quite pleasing.
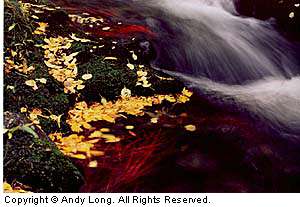
Time of year plays a greater role in waterfall photography than just the amount of water running downstream. Subjects other than just the waterfall or cascade can be the main part of your composition. For example, during the fall color change, a stream tumbling quickly through a forest of many-colored trees offers countless photo opportunities. In addition to a picture of the entire scene, look for a lone leaf or a couple of leaves on a rock in the moving waters, and try some longer exposure shots. In most instances, your experimentation may mean stepping into the cool water and getting your tripod wet, but the results will be well worth the extra effort.
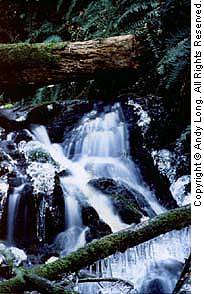
Winter provides a completely different look to the area surrounding a waterfall. While some falls completely freeze over, others continue to flow. In regions where the weather is cold enough and the waters continue to run, objects around the waterfall or cascade may very well become covered in ice, especially in wooded areas.When approaching this type of subject, try to find objects in the foreground encrusted in ice. While you want the running water to be the main subject of your composition, try to use the iced-over objects, such as branches or leaves, as a framing element.
In locations where it’s possible, don’t hesitate to step into the water to improve the angle of your photograph. Many times the view of the waterfall from on land may not be the best. Getting into the water, even if you advance only a foot or two, may greatly improve the picture. Your tripod can easily be dried off and an extra pair of shoes and socks fit easily into a pack. Also, even though you’re at a waterfall, take the time to look for other subjects. Because every day is a rainy day around a waterfall, plants grow well next to them. In spring, an abundance of wildflowers can be found in these areas, and no matter what time of day it is, the flowers usually have a mist on them. Besides these plants, the moisture in the air allows algae and moss to grow on trees and rocks in unusual places. As a year-round source of water, waterfalls attract a wide variety of wildlife. They act as a fly-in shower for birds and a drinking fountain for many other animals. Just because you intend to photograph a waterfall, and you think you don’t need a lens normally associated with scenic nature shots, take it. You never know what you may find at your destination.
by Andy Long
Leave a Reply