

While placement may be different for each image, I put this copyright watermark in the middle of the image so that it would be more difficult for someone to easily clone the text out in order to use the photo for themselves.
Talk to a group of photographers and you’ll get mixed opinions on the necessity of placing a copyright watermark on photographs that will be posted on websites and within social media platforms. The fact is that it’s a way to prevent your images from being copied and redistributed without attribution.
Although several photo-management programs such as Lightroom and Aperture have built-in watermarking, Photoshop doesn’t and this guide will show you how to quickly automate the process.
Step 1 – Choose your design / position
Open a photo typical of the size to which you plan on adding a watermark. Do a little bit of testing of the font, size, color, opacity and everything you want to include in the watermark. You’ll want to try to utilize one of the three legal forms of copyrights, such as, © YYYY Your Name (© 2013 Andy Long), Copyright YYYY Your Name, or even © YYYY Your Name / Business.
To create the copyright symbol on a Mac, type Option G, and on a PC use Alt 0169.
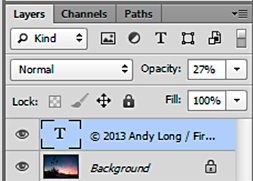
This screen shot shows the Opacity can be adjusted in the Layers window and was set at 27%. You want the watermark to be vague on your image so as not to take away from the beauty of the photo.
You can also decide where you think the watermark should be positioned in the frame. You can always move it and change things once it appears on a photo. Some people always like putting their watermark in the middle of the photo, but it’s not a bad idea to move it to other areas within the image frame, so it appears across a prominent area.
Step 2 – Create a New Action
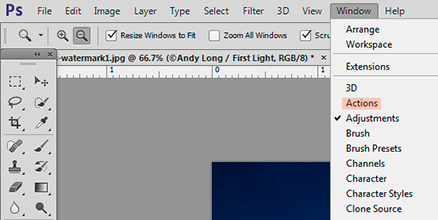
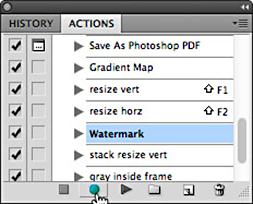
Open the “Actions” panel if not already visible. It should be visible towards the right of your screen – if not, click Window > Actions to open it.
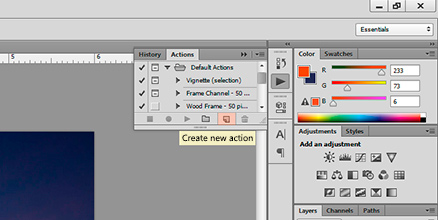
Along the bottom of the panel are a series of icons – select the one that looks like a page with the top right corner folded over; the one to the left of the trash can.
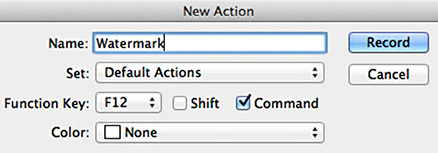
When the New Action window opens, give it a name – Watermark or Copyright would be the best choice. You can also create a keyboard shortcut if you desire.
Click Record to start recording the action.
Step 3 – Create and Format the Watermark
Select the Text tool from the Tools Palette. Click inside the image and type in the text as you’d like it to appear based on your Step 1 design. Format the text as you’ve tested it – font, size, bold, italic, color, opacity etc. When done, just click another tool to finish editing the text layer.
Click the Begin Recording button to start creating your watermark.
Step 4 – Position the Watermark
Let’s assume that you want the watermark to appear in the lower right corner of the image. To do this, take a look at the Layers Palette and select both your photo layer and text layer (Ctrl-Click or Command-Click both layers to select them both).
Next, select Layer > Align > Right Edges, followed by Layer > Align > Bottom Edges. Your watermark should snap to the lower right-hand edge. You’ll need a little space around it so select only the text layer, then just nudge it several pixels left and up with the keyboard arrow keys.
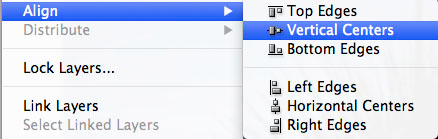
If you want the watermark centered in the photo for putting on social media to help with any photo theft, instead of the above alignment, use Layer > Align > Vertical Centers, followed by Layer > Align > Horizontal Centers.
Step 5 – Stop Recording
Click the square button below your current Action to stop the recording process. You should now be left with an Action that you can use over and over. Open a new image, select the Action you created and hit the “Play” button. If you’d like to automate the process for a folder of images, you can do so using File > Automate > Batch.
Batch Process
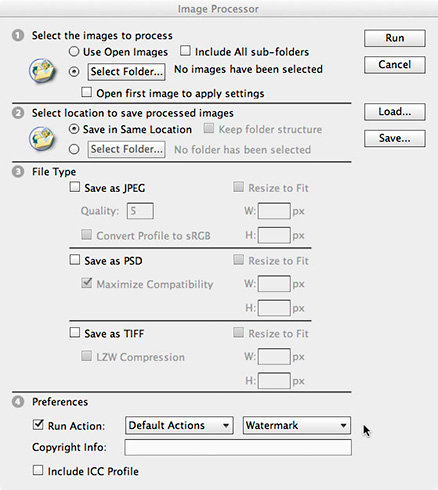
If the watermark is to be applied to a large selection of images, it can be added using a batch process in either Photoshop or Bridge. In Photoshop use File > Scripts > Image Processor or in Bridge use Tools > Photoshop > Image Processor. The saved Action will show up in the Preference section of both as the final window is the same for both programs.

In the Image Processor window, select the folder of images you want to use
in step 1 and select your Action in step 4 and click Run.

Not all copyright watermarks are created equally. For this watermark, I ran the Action but then selected the Layer and changed the Opacity to 50% and edged it down and to the right.
by Andy Long
First Light Photo Workshops
All text, screen shots & photos: © 2013 Andy Long. All rights reserved.


Leave a Reply