
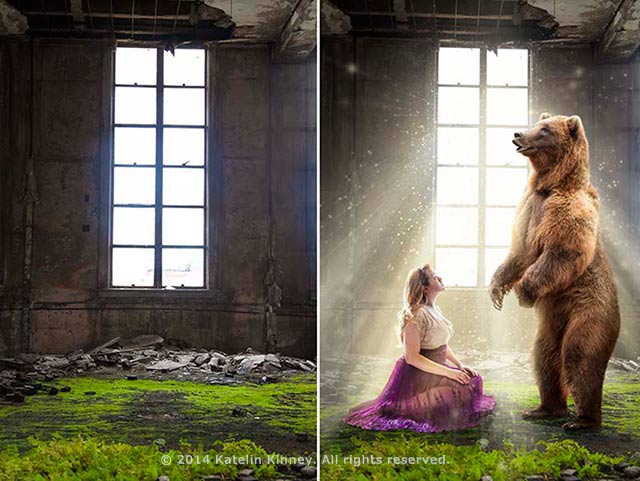
A composite image is one image made of multiple photos placed and blended together. Whether you are blending a model’s photo on a blank backdrop into an outdoor scene or creating special effects by placing crashing waves in an image there are a few key points that need to be addressed when you want to create a natural looking scene from multiple photos.
The goal here is to create a visual illusion – create a scene that looks as though it existed even though it was not in front of your camera.
Let’s Look at Creating A Composite Image
To get a natural look through advanced techniques of blending, use these bullet-points as a checklist. Some may not be needed in your specific image and some may be necessary.
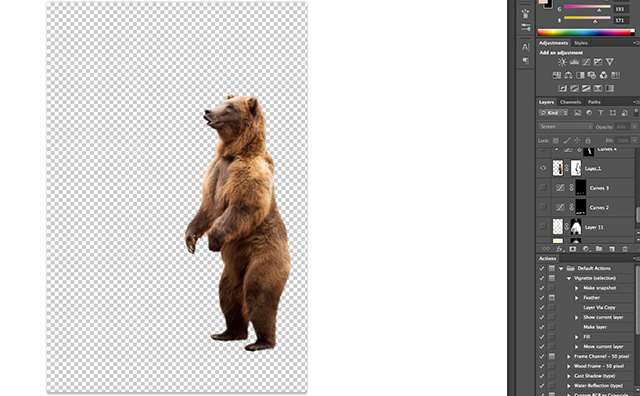
1. Cutting Out and Placing an Image
When creating a composite image in Photoshop, you can easily take one image and place it into another file. All you need to do is have the image tab pulled in front of your other opened files, grab the image layer you want to transfer, and drag and drop it into the file you desire.

Drag and Drop an Image into Another Image File
You can either drop the entire image into a new layer or you may decide to make a rough selection of the general area of the photo you need, create a new layer of just that part (Right click -> select LAYER VIA COPY), and then drag and drop just that layer.
2. Layer Masks
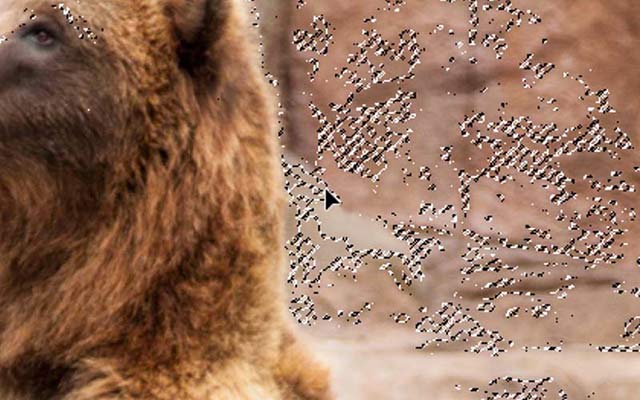
To rid your new layer of the background and keep only the part of the image you desire use a layer mask. A layer mask can be edited and only covers up part of the layer instead of deleting the unwanted part.
To Add a Layer Mask: Select the part of the image layer you want to keep showing with one of the many options of Selection Tools, such as
Lasso,
Magnetic Lasso,
Quick Selection Tool,
Magic Wand, or
Color Range Selection.
MAGIC WAND QUICK TIP: When selecting a certain color all over the image instead of in one area, UNCHECK the Contiguous box at the top.
Selection Tool
Edges of Selection: Once your selection is ready you should address the EDGES. Often times it is helpful to expand your selection by 1 or 2 pixels to assure that there is not a thin outline of the unwanted background around your cutout subject.
1. While your object is still selected go to: SELECT> MODIFY> EXPAND.
2. SMOOTH your edges so that you do not have a jagged stepping line of pixels around your selection. Go to: SELECT> MODIFY> SMOOTH. Usually 2-5 pixels will suffice.
Mask Button: Once your selection is exactly how you wish (this can always be changed on your layer mask later) you will go to the bottom of the Layers Window and click the layer mask button. This will automatically create a mask out of the area you have selected.
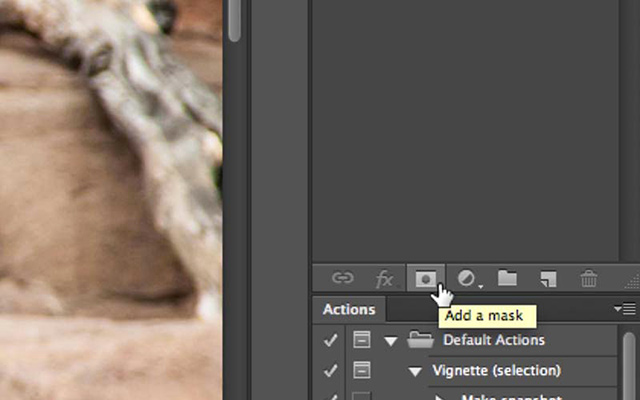
The Mask Button to Add a Mask
Note: You can easily invert this selection back and forth by clicking Command + I.
Once this layer mask is created, you can paint black or white directly on the layer mask in order to affect the area of the image layer that is visible.
3. Adjustment Layers
An important part of blending objects into scenes that were not originally photographed is to match the color and light of the subject to your new background. This takes a bit of a sensitive eye and some tweaking and experimenting before finding that perfect balance. For instance, in my example photo the female model has a blue cast to her and is a bit darker than what she naturally would be in this brightly lit scene.
Color and Lighting Changes: To adjust the color and light of your subject you will need to use adjustment layers and lock those layers onto your new subject’s image layer. Try different adjustment layers.
For Color Adjustments work with Color Balance, Hue & Saturation, Vibrance, or even a blank layer painted with color and changing the blending mode.
For lighting changes work with Exposure, Levels, and Curves.
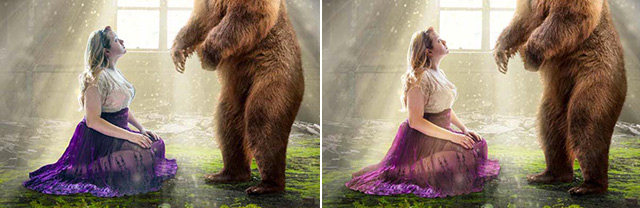
Color Changes: Before and After
TIP: If you have trouble finding these, simply type the term into the search box at the top and Photoshop will direct you to the location of these adjustments within the menu options.
Locking the Adjustment to the Layer: It is important to LOCK a chosen adjustment to the layer you want it to effect.
Simply have the side panel open (double click the adjustment layer) and click the Layer Lock button at the bottom of this panel. An arrow symbol should appear on your adjustment layer indicating that it is locked to the layer underneath it.
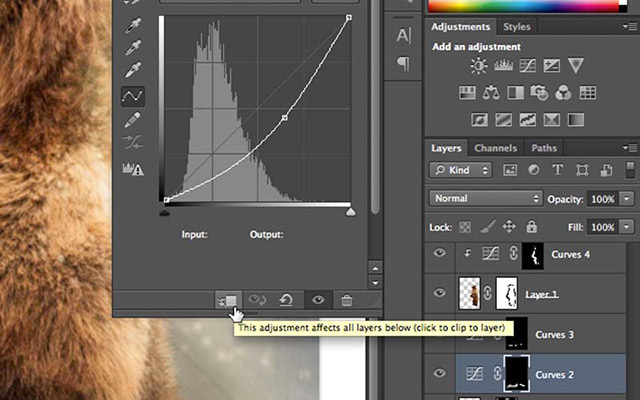
Locking an Adjustment to a Layer
You can apply more than one adjustment layer since the locked layers will simply stack on top of one another and all will affect your original image layer.
4. Clipping Mask
A last touch for naturally blending in your subject is to add a clipping mask. This is an advanced technique and yet is very simple to accomplish. In our example image some atmosphere was added with a yellow burst of light coming through the window and some specs of dust. Naturally light will bend around a subject and start to pour over the edges. This also will at times affect the color.
Blend an Object: A good way to blend an object to its new environment is to create a new blank layer on top of the subject layer (and any other adjustment layers you’ve just created and locked to it).
1. Right click on this new blank layer and select CREATE CLIPPING MASK. This will lock this new blank layer down just as we previously locked our adjustment layers.
2. Paint around the edges using the brush tool. Select a color from the background that is close to your subject’s edge color. In this composite photo I selecting light yellows and whites and some greens at the bottom of her dress.
A quick way to select those colors is to hold ALT while you’re using your brush tool. An eyedropper icon will appear allowing you to select whatever color is directly under your mouse.
Blending Mode: After you have painted the surrounding colors onto the edges of your subject you will change the BLENDING MODE on the layer to Soft Light. This will allow some of the color and value of our painted layer to be added to our underlying image.
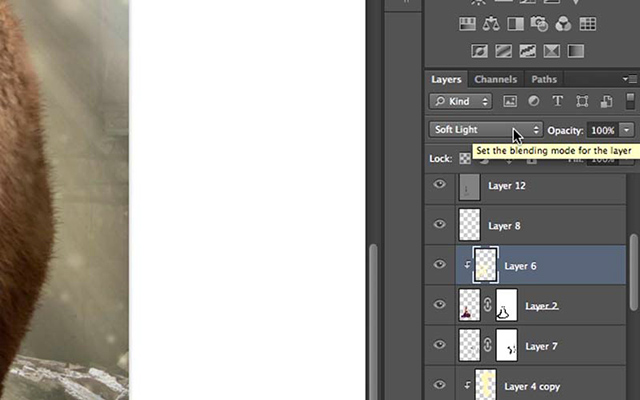
Blending Mode
You can also try other blending modes such as Screen or Lighten, and then even lower the opacity of this new clipping mask layer to get the desired effect.
You can see the difference created here. Before, our female model looked a bit “cut and paste” and now with our clipping layer I have blended her into her new scene.
Clipping Mask: Remember, you need to think of the image as a whole when compositing images together. If the light in my background is warm and bright, you need to make sure your new subject is warm and bright as well.
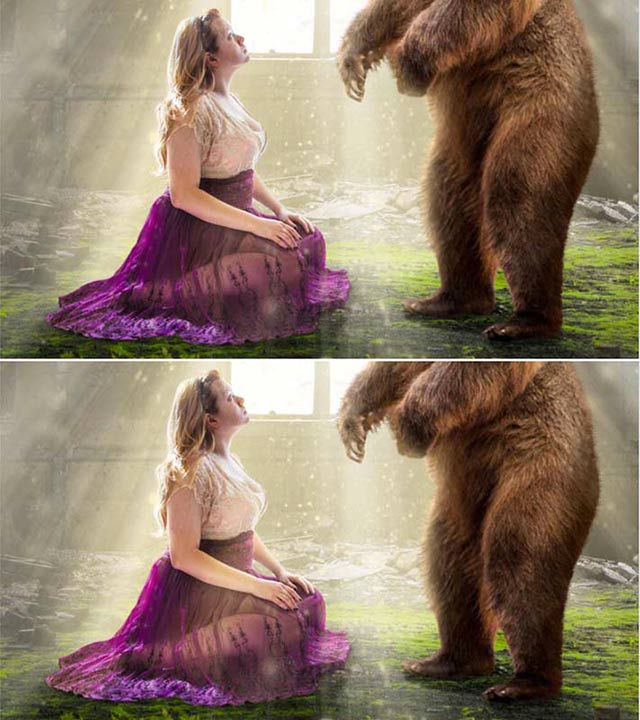
Clipping Masks Matching Lighting and Colors
Match the Lighting and Coloring: Tweak your new adjustment layers back and forth again and again until you’ve hit that perfect point where everything begins to blend seamlessly.
TIPS:
1. Layers work in a hierarchy format, so that whatever adjustment is on top will affect everything below it unless you LOCK it to a specific layer.
2. It is better to lose some of your subject’s edges than to have a thin outline of your previous background showing. Expanding your selection and smoothing the edges helps to keep that outline clean.
3. Lastly clipping masks help to seat your new subject back into its new scene by painting in light and color that is curving around the edge of your subject.
Remember these steps to creating a composite image and points and creating surreal and natural scenes out of images photographed at different times and locations will be very easy to accomplish!
By Katelin Kinney
All photos and text: © 2014 Katelin Kinney. All rights reserved.
I love this as it lays out clearly step by step. Is there a way to get the images to work along?