
Overview
Thanks to the digital camera’s CCD chip, infrared photography has never been easier. Traditionally, working with infrared film has been difficult, at best. Infrared film requires loading the camera in total darkness, extensive exposure bracketing, special developing, and–at times–a bit of luck. With a digital camera, infrared filter, and a tripod, anyone can explore the near-infrared spectrum photographically with ease, repeatable results, and no guesswork.
The Infrared Spectrum
Infrared is light radiation with wavelengths longer than visible light (beyond red) and shorter than microwave radiation. For infrared photography, we’ll be photographing by “invisible” light with wavelengths between 700 and 900 nanometers. (For the metrically and technically inclined, a nanometer is one billionth of a meter.) Infrared light is invisible to the naked eye, but most digital cameras’ CCD chips are sensitive to both the visible spectrum and the near-infrared spectrum.
Testing Your Camera
Use the “TV remote test” to determine if your digital camera is sensitive to infrared light. Television remote controls use infrared light to turn the TV on and off and to change channels. Aim your TV remote control at the lens of your digital camera from a few inches away, push a button on your remote, and view the image on the LCD panel (not the optical viewfinder) of the camera. If you see a white flash of light coming from the TV remote on your camera’s LCD screen, you’ve just determined that your camera is infrared-sensitive. Now all you need is one specialized piece of equipment, and you’re ready to begin making infrared pictures.
Infrared Filters
In order to make photographs by “invisible” infrared light, you must first filter out all visible light–thereby allowing only infrared light to make the exposure. You’ll need an infrared filter such as #87, #87B, #87C, #88A or #89B. The least expensive of these filters are Wratten Gelatin Filters. Since these aren’t commonly used, they might not be stocked by your local camera store. However, they can be special-ordered or obtained by mail order from professional photographic equipment suppliers. (I found a Hoya #R72 glass infrared filter at a used camera show and use it for all my digital infrared photography.) Infrared filters are visually opaque. If you look through an infrared filter, you won’t see anything except for bright light sources that will appear to be a dim red.
Special Considerations with Filters
If your camera has a lens threaded for filters, all you need to do is to buy the correct thread-size glass or gelatin filter holder and mount the filter normally. However, since most point-and-shoot digital cameras don’t have threaded lenses, you’ll have to do a little creative engineering to mount the filter. Gelatin filters can be cut to size with scissors and taped in place. (I constructed a durable slip-on filter adapter for my Canon G1 using a pair of step-down rings and a rubber gasket.)
Infrared Photography Subjects
When making infrared pictures, you’ll discover that some subjects depict the infrared effect more than others. Green foliage and human skin are two favorite subjects for infrared photography. Leaves, when reproduced in infrared, show a nearly white glow. Skin also takes on an ethereal appearance. If you photograph people in infrared, their skin will have a white, porcelain-like quality that minimizes freckles and imperfections. In infrared, sky and water are reproduced as nearly black. For your initial infrared experiments, I suggest photographing leafy, green landscapes or people in bright sunlight.
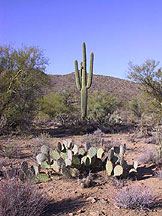
Unmanipulated color photo of cacti.
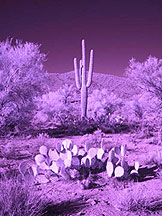
Unmanipulated color photo shot through the infrared filter. (This is what the image looks like on the LCD viewer of the camera with the infrared filter in place.)
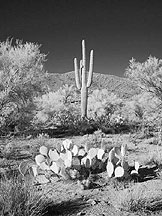
Infrared image on left after desaturation in Adobe Photoshop. (All B&W images remain in RGB mode.) (See “Post-Exposure Image-Manipulation” below)
Making the Digital Infrared Exposure, Step-by-Step
Besides your digital camera and filter, a tripod is an absolute necessity since exposures through the infrared filter can be long. For long exposures, some cameras will automatically fire the flash to light the scene, because the camera’s “brain” thinks it’s dark. But you don’t want to use flash. Be sure to turn off the flash so the camera will make the exposure by infrared light. Also, certain fully automatic functions of some cameras might not work as desired when you’re using long exposures through the infrared filter. Check your camera’s manual for specific instructions. (I use my Canon G1 in the Av [aperture-priority exposure] mode, so I can stop the lens down for maximum depth-of-field. This mode has given me accurate exposures.) Use a slow-speed ISO setting–such as ISO 50–to avoid digital noise.
To begin, photograph a daylight scene. Mount your camera on the tripod and compose the shot normally–without the infrared filter over the lens–and make a normal, color picture. The color picture will be a “reference” picture. You might want to combine it with the infrared picture for creative effect later.
After the “reference” picture has been made, shoot a second picture in exactly the same way except go through the infrared filter. With the infrared filter on the lens, you’ll see the infrared effect on the camera’s LCD viewing screen. The image will appear dark and a monochromatic red-pink in color. This is normal for an infrared picture. After you shoot the picture, you should review the image on the camera’s LCD screen and check for proper exposure. If the image is dark, you might want to switch the camera to manual and increase the exposure. Fortunately, many cameras’ automatic exposure settings will provide an accurate infrared exposure without further compensation.
That’s all it takes to capture an infrared image digitally! It’s much easier than shooting infrared film. However, once you’ve captured the image, you still have work to do in Adobe Photoshop™.
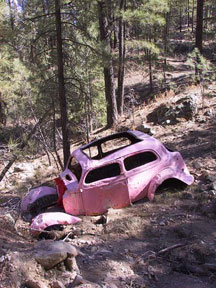
Unmanipulated color image of the Pink Car.
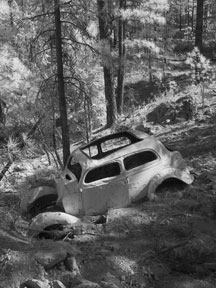
Desaturated infrared image of the Pink Car.

Combination of the first two images simulating a “hand-colored” effect.
Bottom layer:
infrared image
Top layer: color image with increase of +85 saturation & 24 pixel gaussian blur with 60% transparency. (See “Creative Effects” below)
Post-exposure Image Manipulation
Once you’ve captured your infrared images, you’ll want to do a little clean up in an image-processing program like Photoshop. When you open the infrared image file, you’ll probably see a monochromatic red-pink image that might be a little bit dark. First desaturate the image (Image > Adjust > Desaturate) to turn it black-and-white. Leave the file in RGB mode for best reproduction (with most photo-quality ink-jet printers). Next, you may want to adjust the curves or levels to brighten the image. Finally, you may want to adjust the contrast to your liking. That’s all there is to it! Now you have an image very similar to one shot on infrared film–but without the hassles.
Creative Effects
An infrared image can be a starting point for a variety of creative effects. Since most infrared films are grainy (especially the Kodak HIE film), you might want to add noise (Filter > Noise > Add Noise or Filter > Texture > Grain) to emulate the film look. Also, try the diffuse glow filter to simulate the glowing highlights commonly seen in infrared film images.
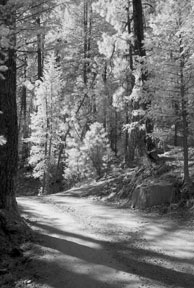
Desaturated infrared image.
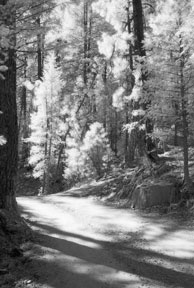
Same as image on the left but with the addition of noise. (Simulates the graininess of infrared film.) Filter > Noise > Add Noise, 3%, monochromatic noise.
One quick and easy way to create a “hand-colored” look is to use that color reference image you shot at the same time as the infrared image. If you didn’t move the camera or change the zoom lens setting, your color image will be exactly the same as your infrared image. Open both your infrared image and the color image in Photoshop, then make the color image into a layer, drag it on top of the infrared image, and move it into register with the infrared layer on the bottom. Now, with the color (top) image active, go to Image > Adjust > Hue/Saturation and slide the saturation slider to the right to super-saturate the color of the top layer. Finally, with the color (top) layer still active, apply a blur to it (Filter > Blur > Gaussian Blur). Try a blur radius between 24 and 48 pixels. The result will be a deeply saturated, blurred color image on top of the infrared layer. Finally, adjust the transparency of the color layer that’s on top of the black-and-white infrared layer until it emulates a “hand-colored” effect. (See above)
Conclusion
Photography by the “invisible” light of infrared can open a new world of artistic expression. Happily, it’s no longer the exclusive domain of the technically oriented darkroom-dwelling photographer.
by Dale O’Dell
All text and photos: © Dale O’Dell. All Rights Reserved.
Leave a Reply