
Most people think a flash is used only for photographing people when it’s dark outside, and that’s certainly one of its uses. However, the use of modern flash techniques in photography opens up a whole range of possibilities that will enhance your images tremendously.
The use of flash, particularly in travel photography, can produce images that literally present your subject in a whole new light. I’ve used flash in my travel photography for many years to make my viewers’ impressions of “where I’ve been” more exciting.
Welcome to the wonderful world of flash photography!
In this article, I’ll expose you to a number of exciting ways you can use your flash to make your photography more versatile and your photos more intriguing. For me to do this successfully, you’ll need a modern flash, one that allows full manual control of flash lighting but also provides all the wonderful automatic features that are available today (reading ISO from the camera, zooming the flash head automatically, allowing compensation of the flash output, and automatically balancing flash output with ambient lighting, to enable perfect fill flash lighting every time).
I’ll describe the techniques to be used and tell you how I do this with my flash, but it’s up to you to read your manual, find out how your flash allows the same technique, and then practice it.
THE RIGHT ATTITUDE FOR LEARNING
Flash units are complex boxes and will perform many feats for you, so you have to be careful not to rush off in fifteen directions to try to learn everything at once. Working slowly and easily up from the bottom of the learning curve will make you a “maven of flash” in due course. As you proceed, it’s important that you understand the basics of why you’re pressing a particular button and what it’s going to do. You don’t have to understand the technicalities of how the flash works, but you want to control the flash photographic process.
As you work your way through the various possibilities, maintain note-taking discipline. It’s the only way you can remember what you did and figure out why it did or didn’t work! With digital capture and its instant feedback, note-taking isn’t as important as it was when you were using film, but if you want your friends to help you use your flash, they’ll have to know what settings you were using.
So, for now, before you make a flash image, review ALL the flash settings and the camera settings that control the various flash modes (rear curtain sync, etc.) and note them before shooting. This activity will also help you establish a habit of reviewing your settings before you use your camera, so you don’t goof, using past settings that aren’t relevant for the current image.
One important piece of advice to keep in mind is before you press a button on the flash, you must have a good idea of why you’re doing so and what effect it’s going to have on your image. If you don’t have answers to these “why” questions, do some homework before you start working!
THE BASICS OF FLASH
A little theory goes a long way when you’re acquiring the ability to use your flash intelligently to enhance your images. To understand when to use flash, begin by considering the ambient light. You need a flash when ambient light is nonexistent, too minimal, or too contrasty for you to expose the subject properly. Low light can occur when you’re shooting in the shade or when the sun is very close to the horizon. Contrast seems to haunt your every exposure as you try to balance exposure between highlights and shadow.
To properly expose for ambient light, you have to balance shutter speeds and apertures. You must use the correct combination to properly expose your film for the existing light, based on the speed of the storage medium, while at the same time achieving the depth-of-field you desire or the proper effect on a moving subject. When you add a flash as a primary or secondary lighting source, your life becomes more complex.
CALCULATING THE PROPER FLASH EXPOSURE MANUALLY
The amount of light that will illuminate a subject depends on the strength of the flash (its “guide number” rating) and the distance between the flash unit and the subject (flash-to-subject distance). The correct exposure of that subject, given that you have illuminated it with your flash, depends on the speed of the medium (ISO) and the aperture setting of the lens. Many lenses will have a distance scale on them, which will tell you the distance after you’ve focused properly.
If not, you must use a high-tech device such as a tape measure. The relationship between guide number, aperture, and flash-to-subject distance is given by the formula: GN (guide number) = Aperture x flash-subject distance. The GN of your flash is a published figure. If you know the distance to your subject, you can calculate the aperture (use the nearest f-stop figure to your calculated result). If you know what aperture you wish to use (to achieve a certain depth-of-field), you can figure out how far from your flash you must place your subject. Don’t let simple math defeat you!
A few precautions:
1. The specified guide number of your flash, as found in your manual, is measured at a certain distance. Distance can be measured in either English or metric units, so check to find out which one you’re supposed to use!
2. The guide number of your flash will be specified in the manual at a certain ISO rating – usually 100. When doing your calculations, start with that ISO rating to determine what f-stop you require. If you wish to use a faster ISO, use a higher f-stop number for each “doubling” of ISO rating you use (200,400,800). If you need a slower ISO rating, open up your aperture by one f-stop for each decrease in ISO below that of 100 (50, 25).
3. When doing your experiments, ensure that your flash head zoom position doesn’t change, and don’t change your shutter speed, which should be set to the camera sync speed. Remember that, when using the “scientific method” of experimentation, the idea is to eliminate as many relevant variables as possible.
Michael Huber, in the “Magic Lantern Guide” to the Nikon SB-28 Flash, suggests that “when using just the guide number calculation, perfect flash exposures are almost always an exception.” This is because the effective guide number changes slightly as a function of several different variables. He suggests that using a small flash meter is a far better way of ensuring your manual flash exposures are correct.
When I was doing the flash section of my photography course with the New York Institute of Photography, the instructors had me doing “guide number” manual flash. I would follow instructions, measure my distances faithfully, shoot in black-and- white film, and wait for my processed results–which were always terrible. Eventually, I got smart, bought a small Shepherd flash meter, and produced perfect flash exposures with it–even on slide film–forever after… and, on occasion, still do.
When in doubt, I stand in front of my subject, fire the flash remotely at full output, and measure the aperture setting I need from the flash meter. I can check bounce flash from ceilings or umbrellas, set up portrait ratios, check light drop-off level to backgrounds, all accurately. (Depending on automatic circuits when I’m working on an article still makes me nervous.)
It’s quite possible, with modern flashes, to control the amount of light that strikes your subject. You can “tell the flash” to give you ½ (or some other ratio) of the maximum output, or you can instruct it to deliver “f-8 of light” (a better technique). Conversely, you can always demand full output from the flash and control the exposure with your aperture setting. Keep in mind that, for simple flash photography, the shutter speed is not a factor in the exposure (more on this later).
The best way to control flash exposure is to measure a test exposure with a flash meter, which–when set to the medium’s speed (ISO setting) – will tell you what aperture is correct for a given distance. An inexpensive flash meter takes all the worry and calculation away from manual flash exposure and frees you from depending on flash/camera auto settings. However, manual flash is slow to implement and impossible to do quickly if you’re trying to balance against ambient lighting (more on this, later, too!) that might be changing. The automatic features of the modern flash allow the kinds of exciting possibilities that were not easy to do in times past.
WHERE DID THE LIGHT GO?
It’s important to realize that, as you move the subject away from the flash, the light from the flash drops off drastically. Don’t expect the same flash illumination on a subject that’s ten feet away as that on a subject only two feet from the flash. Author John Shaw, in his book “John Shaw’s Close-ups in Nature”, suggests that it’s not necessary to perform “square law mathematics” to relate aperture settings to flash light to subject distance. Instead, he suggests that you’ll gain or lose one f-stop of flash light as your subject changes in f-stop distances. For example, if your subject is 8 feet away, and you want to increase the light on it by one f-stop, you must bring the subject closer to the flash, so that it’s now 5.6 feet away. If you have a subject that’s 4 feet from the flash, and it moves away to a distance of 11 feet, you must open your aperture by three f-stops (4 to 5.6 to 8 to 11 feet).
These guidelines are true for any lighting source, not just for flash. At this point, you digital shooters should take out your cameras and your tape measures to perform experiments to ensure that you understand the relationship. Take careful notes, and perhaps put small paper labels that specify distances and aperture settings in front of your subject for each different photo you take. This “scientific method” of experimentation is the only way you’ll learn to use the different flash techniques and how to correct the errors you might make along the way.
MANUALLY BALANCING FLASH WITH AMBIENT LIGHT
Let’s begin by examining, in more detail, all the situations in which you can use a flash to augment your images. (To keep the list manageable, I’ve tried to keep the choices as general as possible.)
Where do you use flash?
1. Use flash as the primary lighting source when you’re photographing in a dark environment (e.g. capturing friends on the street, outdoors at night). This is the most common use of flash for many photographers, who never explore all the other possibilities. (We’ve looked at techniques for making such photos manually. We’ll look at alternative methods of making these photos in the section on automatic techniques.)
2. Use flash as the primary lighting source, together with ambient light (photographing people on a dark day), where the flash lights up the people brightly, and the ambient light fills in the shadows and illuminates the background. These shots are more spectacular when the people are wearing brightly colored clothing. (The technique used here, which can be used in a zillion different situations, is very straightforward.)
a. The camera is set up to produce proper exposure for the ambient light. If the light is changing, aperture priority is used with auto exposure, so that the changing light will not affect the exposure.
b. The flash is adjusted, independent of the camera, to provide a little more light than the measured ambient level, depending on the needs of the image. If you think in terms of f-stops when discussing light, the flash will provide1-2 f-stops more light than the measured ambient level, keeping in mind the capabilities of the flash.
Copyright 2007 Mike Goldstein
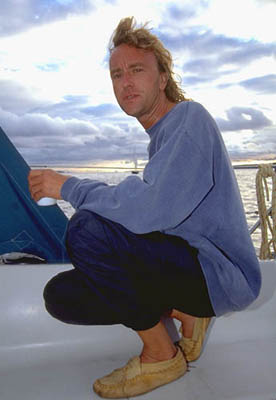
This shot was taken on a sailing course, early one morning, when the instructor had just come on deck with his coffee. It was still rather dark, the sky just beginning to lighten.
To make this shot using manual techniques, I measured the ambient light exposure with my camera meter (f2.8), then manually programmed my flash to deliver f4 of light, overpowering the ambient light by one f-stop.
I set auto-exposure on the camera, with aperture priority, so the camera would continue to give me properly exposed backgrounds as the ambient light level changed.
Because I was exposing for ambient light on a darkish morning, my shutter speed was most likely rather slow, perhaps 1/30 of a second. I needed that slow shutter speed to properly expose the background lighting, so I would have set the flash sync mode (on the flash, in this case) for “slow sync”. This prevents the flash from forcing the shutter speed to the much faster flash sync speed, which would have rendered my background black.
This technique is called “dragging the shutter”, and allows me to make flash-assisted time exposures with shutter speeds as slow as 30 seconds (on my venerable Canon A1 cameras).
I always claim that “if you can tell that flash was used, the image is a failure”. Mea culpa. If you look carefully at this image, you can see that the flash threw a shadow behind my subject, on to the deck of the boat!
3. Use flash as the primary lighting source at night or in low level situations, using time-exposure techniques to allow ambient light to fill in the background (i.e. friends sitting around a campfire, where the campfire is the only source of ambient light).
4. Use flash as a secondary lighting source, indoors or outdoors, to fill in dark shadows caused by the ambient lighting (i.e. people in bright sunlight, lit from the side or the back).
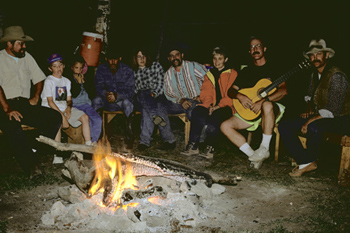
Copyright 2007 Mike Goldstein
This image was made with my Canon A1 and dedicated flash, during a wagon train ride over the plains of Wyoming, back in 1993.
This is one of those situations where the photographer has to visualize the image he wishes to make … you simply can’t see it through the viewfinder.
The basic exposure was set, as before, by measuring the ambient light of the campfire area, using auto exposure and aperture priority (e.g. aperture setting of f8).
The flash was adjusted for two f-stops less light than my measured aperture setting (f4). This would ensure the fire would be the brightest area in the image, and that the flash would not “burn out” the fire area of the film. Fearful of losing too much light over the distance between the campfire and the people, I “bracketed” my flash intensity by making another shot, with the flash delivering one f-stop less light than the campfire.
The flash was set to “slow sync”, as my camera (on a tripod, of course!) would use a shutter speed somewhere around ten seconds. The slow sync ensured the flash would not force the shutter speed to the camera flash sync speed, 1/60 seconds in this case.
I explained exactly what I was doing to my subjects, and cautioned them that the camera shutter would stay open for about ten seconds after the flash went off. They were to stay perfectly still after the flash went off, until I told them otherwise, to avoid blur in the ensuing time exposure.
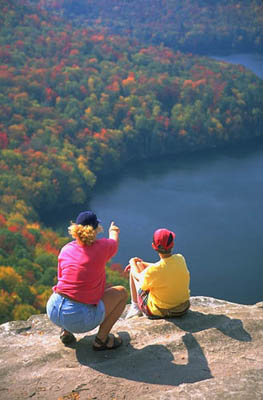
Copyright 2007 Mike Goldstein
This photo was made on top of Nickel Ledge near Cabot, Vermont. The gal in the yellow is my bride Allison, and the gal in the pink is Ruth, wife of Andre Jenne, well-known Vermont landscape photographer. We were being treated to a tour of Andre’s favorite shooting locations.
The flash was set for one f-stop less light than the measured ambient lighting, to fill in the dark shadows caused by front/side lighting on the two girls. The shutter was ‘dragged’, to avoid the flash sync speed on the camera.
The shadows look “real”, but have detail inside them.
Watch for Part 2 on Enhancing Your Photography with Flash Techniques, when Mike covers:
Automatically Balancing Ambient Light with Flash and
Special Effects Using Automatic Flash Capabilities
by Michael Goldstein
Leave a Reply