
I’ve been lucky enough to have snorkeled in the Gulf of Mexico, the Caribbean, the Atlantic Ocean, and the Mediterranean Sea. However, I took a camera with me into the water only once, and that was in the Bahamas. The water was so cold, I snapped just one photo – of someone’s legs – goose bumps and all! Of all the sea creatures I’ve seen, the dolphin are by far the most interesting and beautiful to me. However, to capture photos of them or other sea creatures is quite a challenge. Of course, the first step is to go where they are. Most of us don’t have an opportunity to join a mini-sub crew or to do extensive scuba diving. We need a less natural environment. Presently, those places are more widespread than they used to be. Most states have a large public aquarium of some type – perhaps a place where dolphin and Orcas are trained. Since I love to watch sea creatures perform, it was inevitable that they and my camera would eventually meet.
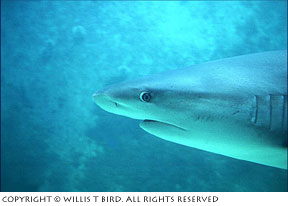
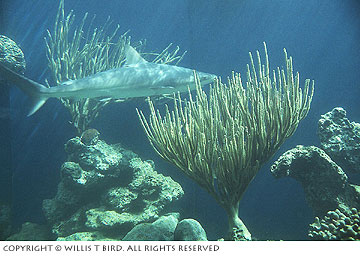
It took some trial and error before I began to get my marine photos right. At first, I caught many unnecessary reflections – especially when I used a flash. However, I soon learned that if I placed the lens barrel against the exhibition glass, I left little room for a reflection to enter the camera. But if you try my technique, be careful not to scratch your lens or the glass. Actually, the glass around an exhibit is usually pretty tough–unlike your lens. A lens shade – especially one of those rubber, collapsible ones – is a perfect cushion to place flat against the glass. A hard lens shade will also do. In a pinch, you can cup one of your hands around the barrel of the lens. Rest your fist against the glass, while triggering the shutter and holding the camera with your other hand.
I would recommend an ISO of about 200. You could use 400, but you may get some grain that you don’t want.
There’ll be some discoloration from a large aquarium-type tank because of light entering from above and the glass you’re shooting through. So, you’ll have some obstacles to overcome. I would discourage trying different filters at this point, because you’re already shooting through very thick glass that degrades the image considerably – as well as the water, which will not be crystal clear. To add more obstacles between the subject and the film can’t help. If you have photo management software such as Photoshop or some other product, you may be able to do some color corrections. However, most underwater shots I’ve seen that were taken with underwater cameras tend to have blue and blue-green casts. I think those colors are pretty much what anybody sees at depth, so the colors make a nice photograph.
Timing is another thing that should concern you. I suggest that you watch the dolphins and other creatures of the deep carefully for a while to get a feel as to how they navigate the tank before you begin shooting. In fact, try out a few experimental shots without actually pressing the shutter release to get your timing down. It’s good to keep one eye open outside the camera, so you can see a big fella coming and switch your eye to the camera just as the creature moves into range. (This takes some practice, too.)

If you have an understanding pet store manager in your city, you may ask him to allow you to practice on the fish in his tanks. That experience could be a hoot all in itself. It will help you get your timing down and give you practice. Small fish can move very quickly. Usually, there will be all sorts of lighting problems, as well, because of the artificial lights that are used with small aquariums. Who knows? You may come up with a very unusual image.
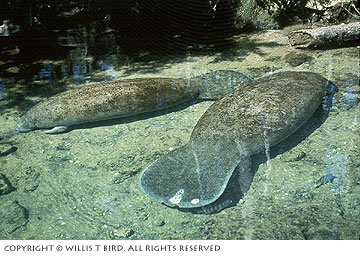
If you’re observant, you may catch shots looking down into the tank from above. My photos of the manatee, which were taken at Homosassa Springs, Florida, show what observation can do. The manatees were shot as I stood on an observation deck. A telephoto lens and a polarizing filter can help decrease reflections.
Obviously, you don’t have to have costly underwater gear to capture some really neat underwater photographs. Who is to know where you shot them, if you choose not to tell? Maybe you can even convince Mom and Pop to shell out big bucks for skin diving lessons and gear if your underwater images turn out well enough. After they agree, you can slip in the little fact that you’ll also need underwater cameras and waterproof housing! Wherever you shoot, have fun, be safe, and stay dry!
by Willis T. Bird
Leave a Reply