
Sometimes, when photographers are talking about their cameras and their work, they seem to be speaking another language.
The experience of listening to them using photographic terms can be as strange as listening to computer nerds discussing the inner workings of their latest super-mega-whiz-bang-giga-baby.
However, breaking photographers’ “code” is as simple as understanding a few basic terms.
The Aperture
One of the most basic terms is “APERTURE.“
Your camera is basically a box. The sensor is in the back of the box. You must expose the sensor to light to get a picture. The light must have a way of getting into the box and to the sensor. This is where the LENS and APERTURE come into play.
The lens is the piece of glass in the front of the camera. Inside the lens is a device called the aperture that can create a hole much like a kaleidoscope does–but without the colors. The aperture opens and closes as you make adjustments to allow more or less light into the camera to strike the sensor.
F-Stops
Now comes the tricky part. You may have heard of “f-stops.”
The “f” comes from the word “focal.” The f-stop is the ratio of the focal length of the lens to the diameter of the opening in the lens.
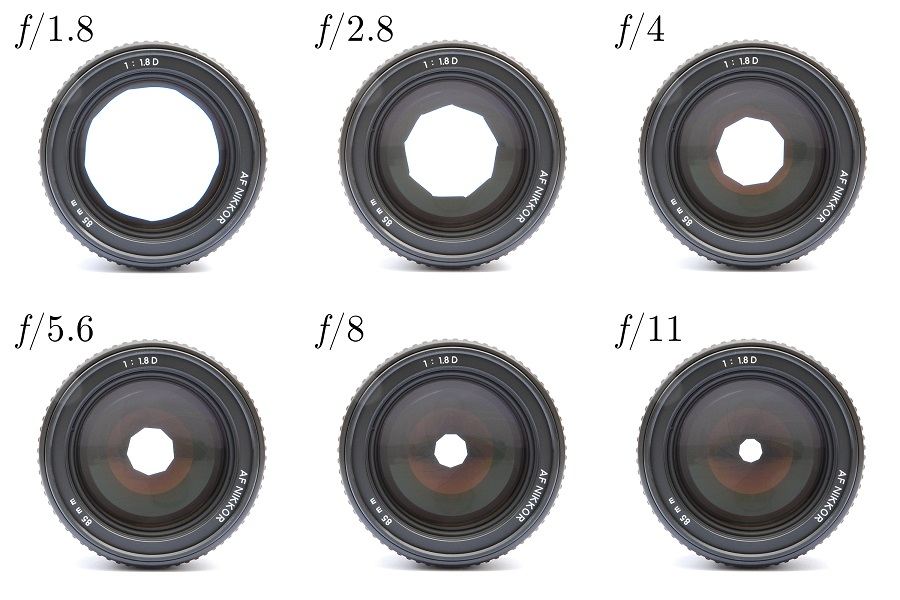
But understanding all that technical stuff isn’t important at this stage. The size of the hole that lets the light through to the sensor is called the f-stop. It may be f1.7, f2, f2.8–up to f32. The smaller numbers (f1.7, f2, etc.) are wider apertures that allow more light to pass through to the sensor.
The larger numbers (f16, f22, f32 etc.) allow less light to pass through to the sensor in the same length of time. Think of it this way: If you want to pour a certain amount of sand into a bottle and you have two funnels, one with a large hole and one with a smaller hole, it will take longer for you to pour the same amount of sand using the funnel with the smaller hole.
The same concept applies to getting light to the camera sensor. The smaller the opening, the longer the time you need to keep the hole open to get enough light inside.
In summary, the aperture is one of the devices that control the amount of light that strikes the sensor.Since photography is “painting with light,” this principle is very important. The aperture values are called f-stops, and the larger the number, the lower the amount of light you are allowing in.
Depth Of Field – Photographic Terms
“DEPTH OF FIELD”is another term you’ll need to know. It can make or break a photo.

The depth of field is that area of the photo that is in sharp focus. There’s usually a space in front of and behind your subject that’s in focus.
The aperture can control this. Wide apertures (f2, f2.8) let in a lot of light but have a narrow depth of field.
In other words, the area of sharpness is very narrow from front to back.
For instance, if you were taking a photo of posts, the front post may be sharp but the rear posts in the photo may be fuzzy.
The front of the long face of an animal might be in sharp focus, while the back part would be difficult to make out. Because you’re allowing plenty of light in through the wide opening, you can take the shot at fast speeds so you won’t create an overexposed image (more on this later).
In contrast, if you use a very small opening (aperture) such as f22, you’ll find that the area of depth of sharpness is much greater. You may be able to get an entire length of a bug in the photo and have it sharp from front to rear.

But in a case such as this, you’re allowing very little light to reach the sensor, so you must use a slower shutter speed to allow enough light for proper exposure.
Are you beginning to understand the relationship between the three concepts–depth of field, aperture, and shutter speed?
New, fully automatic cameras try to handle these relationships for you, but sometimes conditions are such that the camera can’t manage the job and you must switch to manual operation (if your camera permits) to get the photo you really want. Also, sometimes you want the background to be fuzzy, so it doesn’t compete with your subject.
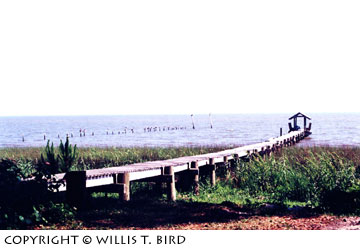
Now, take a look at the image above, which shows a long dock leading out into the water. Your eye naturally follows the dock out to the end. Therefore, you want the photo to be sharp from near the camera to the far point at the end of the dock. To take this photograph, you need a small aperture to have the greatest depth of field.
In this article, we’ve looked at aperture and depth of field and how they interact to produce the photo you want.
Next time, we’ll go over terms such as “lens focal length,” “ISO,” and “shutter speed.” In the meantime, experiment with your camera using what you’ve learned.
Remember to use a tripod when you’re shooting at very slow speeds and wide-open apertures, so your photo will be sharp.
Try finding subjects that allow you to use extremes in apertures so you can play with the differences in the depth of field. Write down the settings (i.e. f-stop and shutter speed) you used on each photo. Then you can compare your results when you look at your images.
Soon, selecting the settings you want will become second nature to you, and you won’t have to write yourself so many notes anymore. Until next time, good shooting!
Taking the Mystery Out of Photographic Terms (Part 2)
By Willis T Bird
Leave a Reply