
© Nancy Rotenberg. All rights reserved.
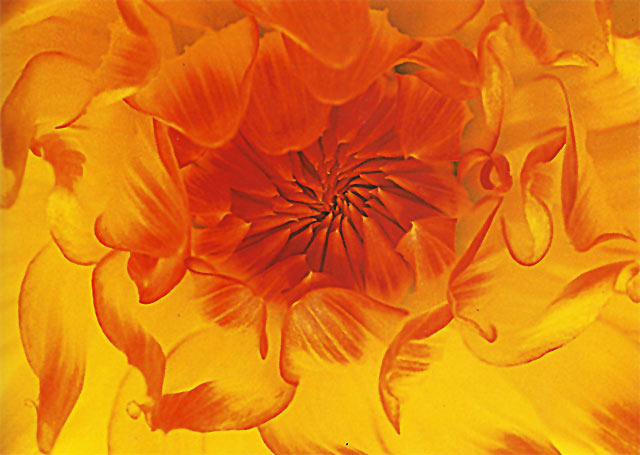
This Dahlia was backlit by a setting sun. In order to maintain detail in the shadows, I opened up 1 1/2 stops, and used fill-flash. I bracketed the exposure as the light was tricky. Had I not opened up, the flower would have been silhouetted.
EXPOSURE
Middle Tone
As long as the subjects being photographed have approximately 18 percent reflectance, the camera’s meter recommendations will yield the correct exposures.
But the world is not composed of ideally lit scenes. If you trust the meter’s judgement, images photographed in deep shade are often too light and those photographed in bright sunlight are often too dark. To have your images accurately reproduce the tonality of the original subject, you must replace the meter’s suggested settings with ones that will yield a more accurate or more pleasing rendition. To do so, you need to know what part of the scene your meter is measuring-the entire scene, a circle in the center of the viewfinder, or an area at the bottom of the viewing screen-and judge how much lighter or darker your subject is than middle tone.
Exposing For Highlights
Highlights are the parts of an image that contain the lightest tones in which you’d like to see detail. Identify them and, if possible, take your meter reading directly from this area. This is where a spot meter comes in handy.
Imagine that you are photographing bright yellow daisies. If you shoot at the meter’s recommended exposure, the bright yellow petals will translate into a dull, mustard yellow-brown. If you wish them to be more accurately rendered-lighter than middle-toned-you must increase your exposure accordingly. Take your meter reading from the petals and ask yourself how much lighter than middle tone the area is that the meter is reading. Suppose your meter reads 1/60 of a second at f/8 when you meter directly off the yellow petals. If you decide that the petals are one f-stop lighter than middle tone, you must open up one f-stop, exposing at 1/30 of a second at f/8 (a slower shutter speed) or 1/60 of a second at f/5.6 (a larger aperture). Both of these combinations will give you one f-stop more light than the meter’s recommendation and will produce a lighter and more accurate image of the daisies on film.
© Nancy Rotenberg. All rights reserved.
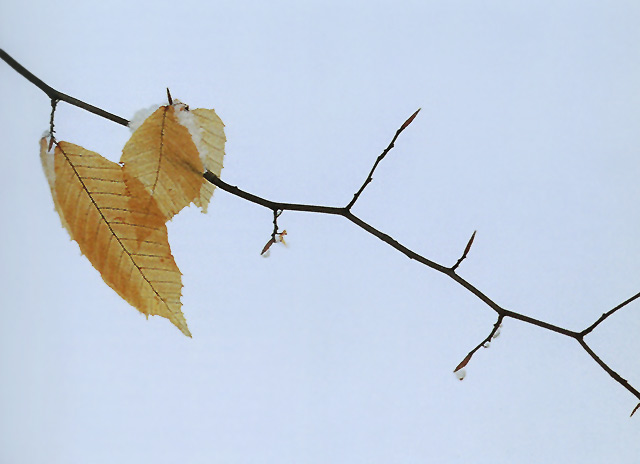
Leaves Against Snow: Minimalist in its simplicity of muted color and design, the interplay between the strong diagonal of the branch and the weaker diagonal intersection of the leaves contributes to a sense of balance in this image. Exposure was calculated by metering off the snow and opening up two and a half stops. Slight overexposure, sometimes referred to as “high key” exposure, adds to the overall feeling of delicacy.
Contrast Range
If an image contains a contrast range greater than five f/stops (the range of tonality between the lightest and the darkest tones in the subject), you may still wind up with burnt-out highlights even though your middle-toned exposure is accurate, because transparency film cannot record a contrast range of more than five f-stops. You have to choose which of the tonalities present is the most important to you and to the integrity of the image.
EQUIPMENT
When you purchase a camera, you are not just buying a piece of equipment: you are buying into an entire system. Do your homework and make sure that both the specific camera body and the system itself provide the features you may want as your interest and skills grow. Certain features will make your life simpler in the field.
Interchangeable Lenses: For close-up photography make sure that the system you purchase includes macro lenses.
Depth-of-Field Preview Control: A depth-of-field preview control, either electronic or manual, allows you to evaluate the depth of field through the lens before releasing the shutter. It really helps to eliminate those sighs at the light table of “Where did that stick come from?”
Other useful camera features include Interchangeable Focusing Screens, Through-the-Lens Metering, Remote Operation, and Self-Timers.
Some optical accessories could include Telextenders, Close-up Lenses, and Right-Angle Finders.
Next to your camera and lenses, your tripod in the most important piece of equipment. Its support allows for sharp images even in the dim lighting conditions you will often encounter in the field. For close-up work, the legs should move independently, and you should be able to collapse the entire mechanism to ground level. Avoid tripods with braces between the legs and a center column.
Photo Magnification Devices
© Nancy Rotenberg. All right reserved.
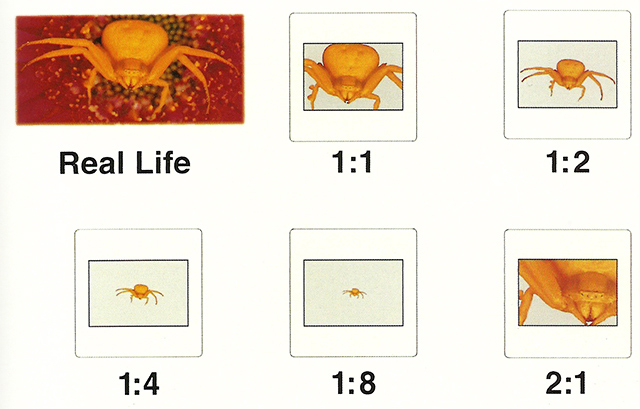
Magnification is simply a comparison of the size of the subject in real life to the size of its image on film, expressed as a ratio or fraction. A magnification ratio of 1:1, or life-size, means that a subject that is 1 inch long in real life will also measure 1 inch on film. A magnification ratio of 1:2, or one-half life-size, means that a subject that measures 1 inch in real life will measure 1/2 inch on film.
Extension Tubes and Bellows
You can increase photographic magnification by increasing the film-to-lens distance with extension tubes or bellows. Extension tubes are hollow metal tubes that attach between the camera and lens. The longer the tube or combination of tubes, the greater the degree of magnification. A bellows unit consists of front and rear standards, which couple to the lens and camera body joined by a flexible, accordion-like extension.
© Nancy Rotenberg. All right reserved.
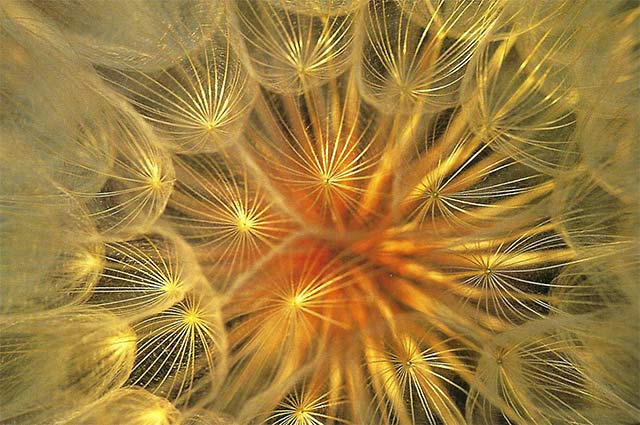
A 105mm macro lens with a short extension tube yielded a magnification of greater than 1:1. An 81A warming filter emphasized the golden color.
© Michael Lustbader. All right reserved.
A magnification of 1:2, with its more shallow depth of field, was chosen to exclude distracting elements. Fill flash at -2 was used to fill shadows.
Reversing Rings and Stacking Rings
Reversing the lens on the camera face plate, with the aid of a reversing ring, increases magnification and may actually improve image quality. A reversing ring is an adapter that mounts to the camera on one side and the front of the lens on the other. Automatic functions are lost when the lens is reversed, so the lens must be stopped down to the correct shooting aperture either manually or with a double cable release made specifically for that purpose.
OTHER DEVICES
If you wish to further explore the realm of higher-magnification close-up photography (3X to 10X), several camera manufacturers produce short focal-length lenses, from 20 to 45mm, specifically designed for this purpose. Some have focusing helices like normal lenses. Others do not and are intended for use on a bellows.
Photo Filters
Filters change the appearance of light by eliminating some colors and enhancing others, in varying degrees. Buy the best quality filters that you can afford and avoid the inexpensive ones sold in package deals by some camera retail stores.
Polarizing Filters
Polarizing filters are used to remove reflections from nonmetallic materials, such as water and glass, and to darken skies to accentuate clouds. In close-up photography, polarizing filters are used to increase the apparent saturation of colors and to decrease contrast by eliminating specular reflections and highlights (small reflections from shiny or irregular surfaces).
With a polarizing filter, there is a loss of light between one-half and two and a half stops, depending on the degree of polarization. This is compensated for by your camera’s meter.
The best polarizers have a thin profile and are made from anodized brass, which have less of a tendency to bind during operation. The thin profile helps to prevent vignetting-the darkening or cutting off of corners-especially if you are using two or more filters or a wide-angle lens.
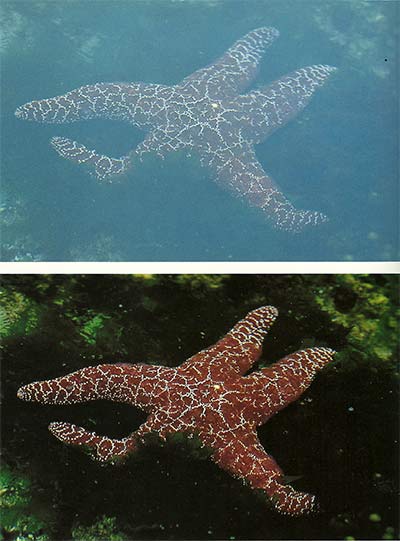
© Michael Lustbader. All right reserved.
Starfish in Tidepool
The left starfish was photographed without a polarizer. A circular polarizer set at full polarization was used in the right image.
Warming Filters
If you shoot in shade or in early morning, you may notice that the light tends to have a slightly cool, or bluish, cast. You can compensate for this color shift and restore a more natural-looking color balance by using filters to absorb blue light in various degrees. This effectively exaggerates the warmer tones: red, orange, yellow, and brown. In autumn, using warming filters will enhance the colors of foliage close-ups.
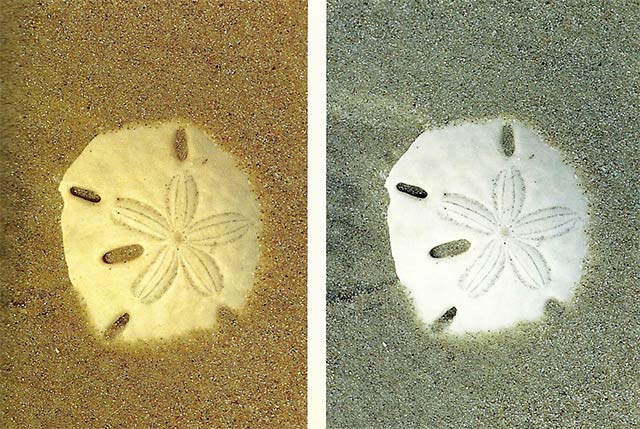
© Michael Lustbader. All right reserved.
The image on the right exhibits a fairly neutral palette. For the second image, an 81A warming filter was added. Which is “better” is a matter of personal taste.
Stacking Filters
On some occasions, a polarizer and a warming filter may be stacked together and used simultaneously. It is important that both filters be clean and of the highest optical quality. Use your depth-of-field preview button, and watch for vignetting or flare.
To strengthen inner vision, start by merely slowing down. Before you begin a walk in search of images, take a deep breath. Look around you and focus on the ground below you and the sky above you. Smell the air and think about the flowers and grasses that grow from the earth upon which you are walking. Think of everything that might have happened where you now stand. Then refocus on where you are and the gifts that the day is bringing you.
Part 2 will cover Natural Light, Flash and Adding Interest to your photos.
by Nancy Rotenberg & Michael Lustbader
Updated in honor of Nancy Rotenberg.
All tips are excerpted from the book “How to Photograph Close-ups in Nature”.
Article and photos: © Nancy Rotenberg & Michael Lustbader. All rights reserved.
Leave a Reply