
There is one feature of your camera that you may have just brushed over in the past or ignored altogether; that holds the key to improving your ‘in-focus’ hit rate enormously – the Back button focus. Because this one tiny button will change the way you shoot forever.
Traditionally, you hold down your shutter button half way to focus and set your exposure and then, when the moment is right, depress the shutter button the rest of the way to take your shot. But what if you want to focus, hold focus and re-compose, and then take the shot.
No problem. Just make sure you are on ‘One Shot’ or ‘Single Shot’ focus, hold the shutter half way to focus, re-compose whilst continuing to hold the shutter button half pressed and shoot.

Fine, except now the exposure is not right because the area that the camera metered from is different to where you originally focused (mainly a problem with spot metering for portraits or wildlife). So, you redo the shot and hold down the AE-L button on a Nikon or the * button on a Canon to lock the exposure or use exposure compensation….. hmm, it’s starting to get complicated.
Let’s simplify everything. How about one button to focus and another to lock exposure and activate the shutter.
Now you could press a button to focus and if you needed to recompose, by simply half depressing the shutter button, and then recomposing and shooting, your exposure would be correct based on the reading taken from your subject before you recomposed. Easy.
But it gets even better. How about never having to change your focus mode from One Shot or Single Shot to AI-Servo or Continuous A/F or whatever. Just use one setting that works for everything.
Using Just One Setting With The Back Button Focus
In your camera’s menu find the section where you can allocate different functions to different buttons.
Set your Back Focus Button to ‘enabled’ or ‘on’.
Set your shutter button to activate exposure lock. Make sure your shutter button does NOT activate focus. It would take another couple of pages to go through the menu settings for each camera so you’ll just have to work through it but it’s easy.
After you’ve changed the allocation of the buttons you should have a back button that activates focus and a shutter button that activates and locks metering at half press and takes the shot when fully pressed. Simple really (but it can take a bit of digging around in menus to get there.
Consult your manual if you run into trouble). Just a quick note here to advise that some of the entry level Canon cameras don’t have an AF button on the back. Everything is not lost as you allocate the * button to carry out this function.
On Sony cameras, you can map the AEL button to focus. Most modern cameras allow for Back Button Focus but there are some earlier models in some brands that don’t offer that ability.
Having set your buttons up change your focus mode to Continuous or AI-Servo and leave it there. Forever.
So here is what happens now.
The back button focuses when you are depressing it. If you take your thumb off, the back button focus stops. You have effectively locked focus on the last thing you focused on.
Shutter button activates metering and locks it when half depressed and then activates the shutter when fully depressed.
Stationary Subjects And Moving Subjects
Now let’s look at two common scenarios that will help explain why this new alternative focus method works so well. In one situation, we have a stationary subject and another situation we have a moving subject.
Let’s look at the moving subject first. As long as you hold your new focusing back button pressed your camera will continue to focus, changing constantly as the distance to your subject changes.
So, provided you have your focus point lined up on your moving subject, as you track along with your subject you will continually maintain correct and accurate focus. Remember your camera is now set to Continuous Focus or AI-Servo, exactly the same as you would have used in the past for a moving subject.
Now though, you don’t have to shoot off a heap of unwanted shots by keeping your shutter button depressed to maintain focus. Just keep your thumb pressed on your Back Button and fire off the shutter whenever you want. Perfect.
If you want quick burst, then fire of a quick burst. Want one shot, then simply press the shutter once. The focus remains independent and your subject will remain sharp and in focus if you keep your back button focus pressed.

So, for this shot of a lion bolting with its prey in the Serengeti, I just kept my thumb pressed on the back focus button, tracking along as the lion took off. I fired off a series off shots, all of which were in focus. Easy.
Okay, now let’s move on to a non-moving subject. Standard shot first, no recomposing necessary. Leave your camera on Continuous A/F or AI Servo. Line up your focus point, press your back focus button and, when you’re ready to take the shot, press the shutter button. Too easy.
Now, the recompose method. Again, leave your camera on Continuous A/F or AI Servo. Line up your focus point, press your back focus button and, when focus is achieved, take your thumb off the back focus button. Your focus now won’t change. Unless you press the back focus button again your focus is effectively locked.
Now, half press the shutter button and hold it half-depressed. Recompose and press the shutter button the rest of the way. The result is a correctly focused, correctly exposed shot.

For this shot of a tiny Uinta Chipmunk at Bryce Canyon in Utah, I focused on the chipmunk’s eye, released my thumb from the back focus button, half pressed the shutter to activate the metering (spot metering in this case), recomposed slightly (half holding down the shutter button) and took the shot. Focus remained correct as did the metering.
You can, of course, also move your focus points around to avoid recomposing but not all cameras link the spot metering to the focus point. Although your focus may be perfect, your exposure may not be.
Like anything, you will need to practice this technique but, once mastered, you will never go back.
I find that one of the most useful features of the system that I have just described is the ability to go from a still subject to a moving subject without changing anything except how you use your thumb. Here is one final example.

This Brahminy Kite on Fraser Island in Queensland was perched high in a tree scanning the water for prey. Using the same technique as for the Uinta Chipmunk I focused on the bird’s eye, half depressed the shutter to lock the exposure, released my thumb from the back focus button (effectively locking the focus), recomposed slightly to leave more space in the direction the bird was looking and took the shot.
Moments later the bird took off and did a big circle before coming back to almost the same spot. Instantly, I was ready without having to alter any settings. I just tracked the Kite keeping my thumb depressed on the back focus button and fired off a few shots as I wanted.
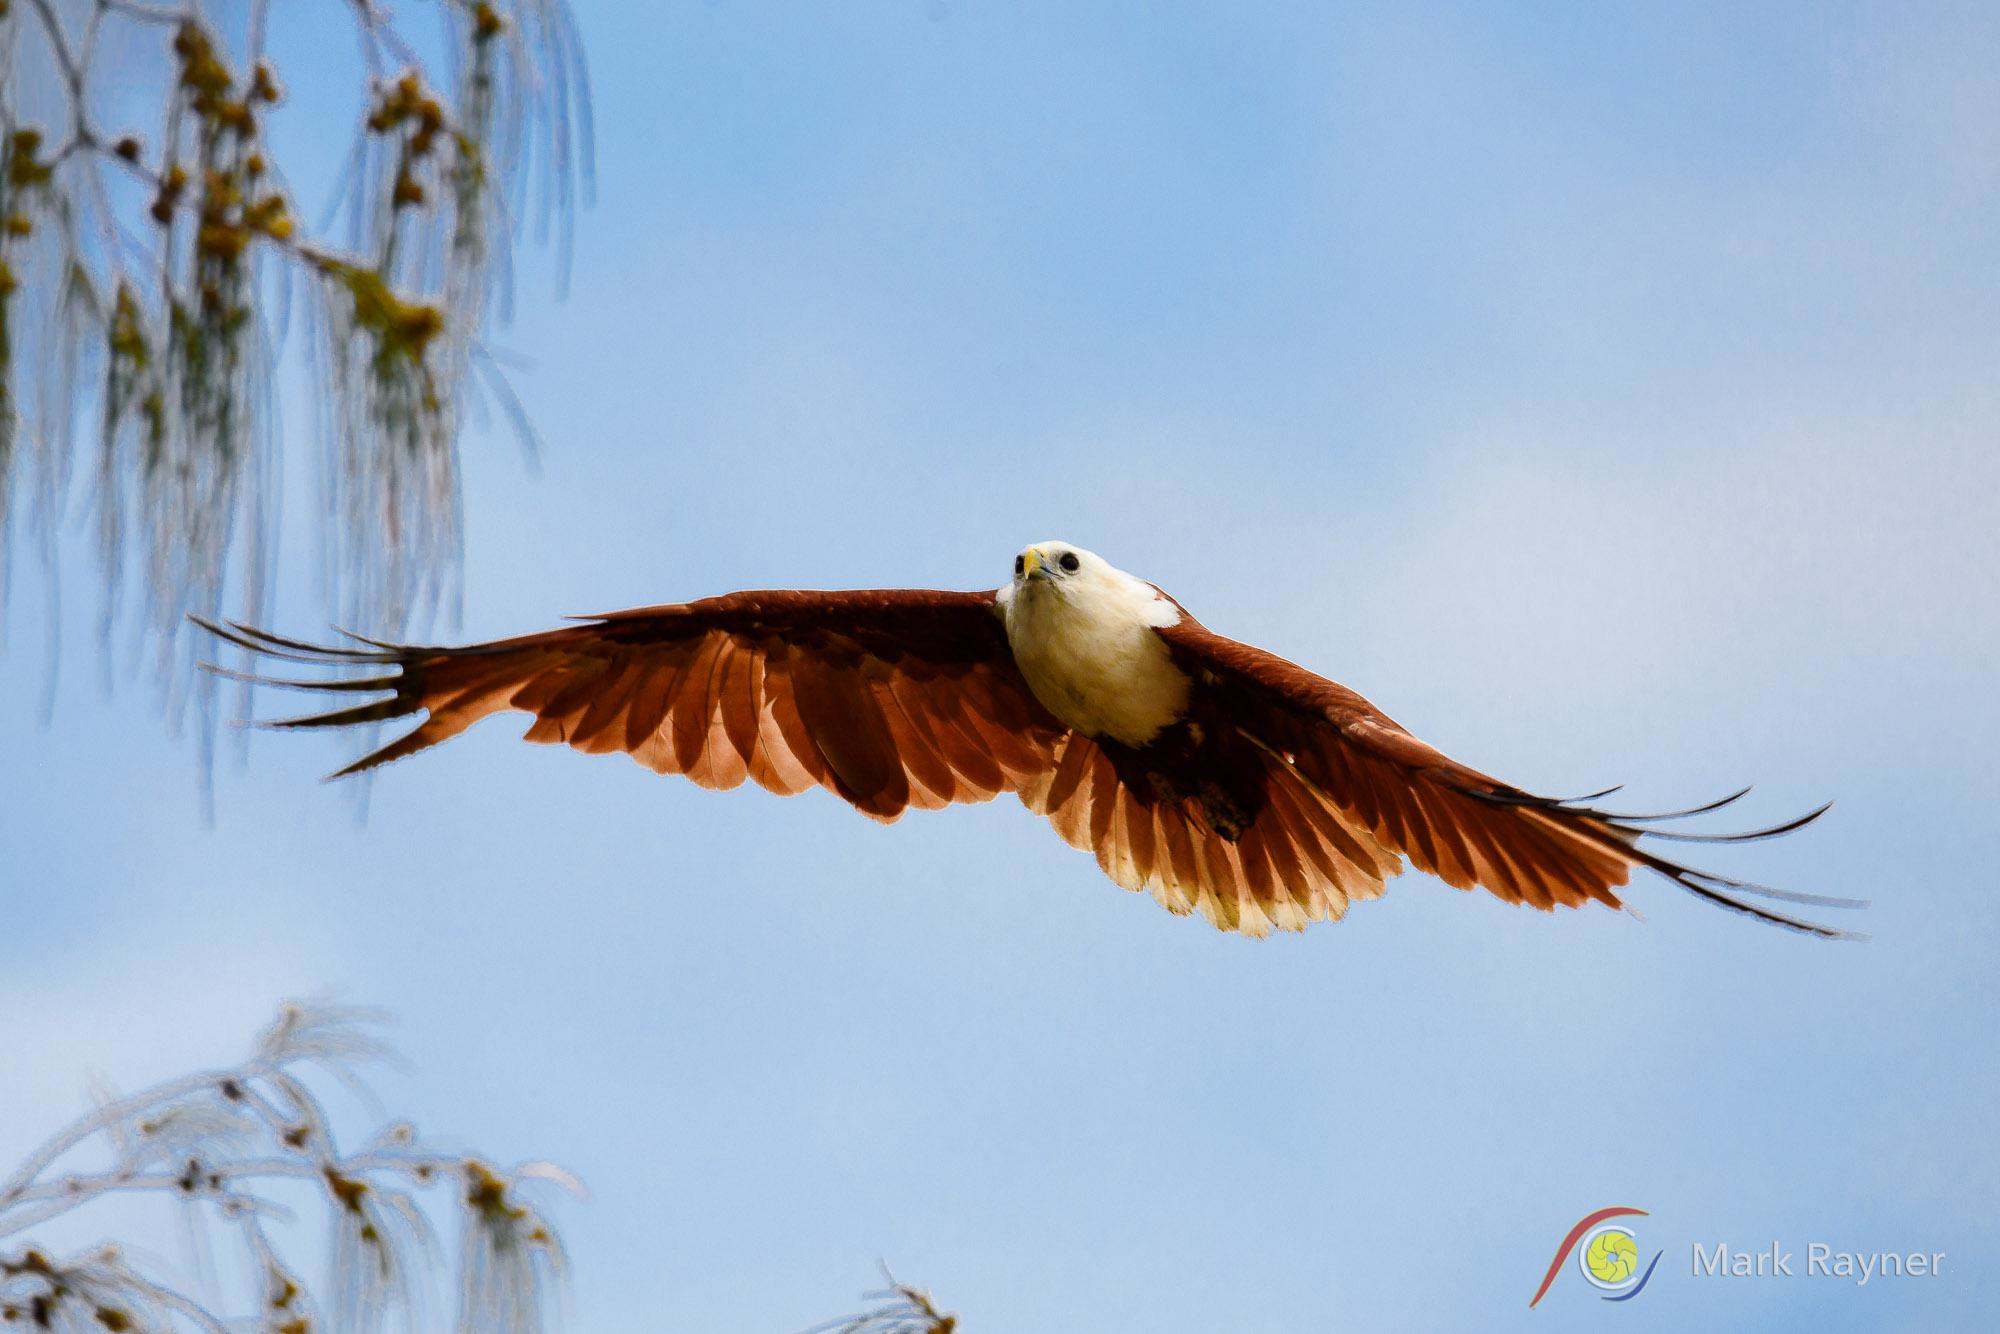
Had I been still using the older method of One Shot or Single Shot for the perched Brahminy Kite image I would have been in trouble. As the bird took off I would have had to quick switch from One Shot or Single Shot to AI-Servo or Continuous Auto Focus, find the bird again, re-focus and shoot. Time consuming and very likely a missed opportunity.
How does all this affect landscape photography? Well it doesn’t really. You can still leave the settings the same and focus / release using the back button and then squeeze off your shot.
If you are using a tripod and turn on Live View you will notice in most cases that you have automatically reverted to One Shot or Single Point. You simply press and hold (very important) the back focus button until the focus square changes to a solid green.
It will normally flash while the camera is focusing and then once focus is achieved it changes to solid green. If focus is not achieved it will change to solid red and you need to try again.
Enjoy your tack sharp photography with these back button focus tips.
Article from Mark Rayner of Trekaboutphotography
Leave a Reply