
These are images that are just pure fun.Find the article I wrote with Jalien Tulleyfor PhotoGraphic Magazine (April, 1989). Use a slow shutter speed or even put it on the “B” or bulb setting. Zoom, spin, dance, twirl, write your name or anything else you want to do while the shutter is open. It may take a little experimentation to “get it right” but loosen up and let go!
As we mentioned in the first article of this series, mastering the basics about cameras isn’t really as difficult as it seems–even for those of you who’re confronting the complexities of cameras for the first time. Now that you’ve conquered the information and exercises we used to begin, we’re ready to advance. With each article, we’ll expand your understanding of the basic controls on your camera by adding a few variations on what you already know and by suggesting some exercises for you to try. (If you haven’t read the firstand second articles and tried the exercises we detailed, please go back and begin at the beginning. Why? You’ll find that by going step by step, in order, you’ll learn more rapidly.)
In the first of our series, we discussed the four basic camera controls: film speed (ASA/ISO), shutter, aperture (f-stops), and focus control. We suggested exercises that were designed to help you become more familiar with the workings of your camera. In the second article, we explored the aperture control.In this third article, we’re going to go into the shutter speed as well as when and how to let your camera do the work for you.After all, if you’re using a modern camera, you paid quite a bit for all of those “bells and whistles.”If you’re using an older model, take heart, because while you’ll have to work a little harder, your knowledge will become your strength.
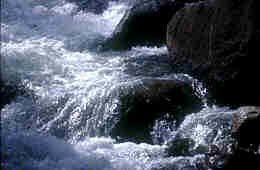
A fast shutter speed can freeze the motion.However, the variable is how fast the water is moving.Sometimes, even when you use a fast shutter speed, the water moves faster.
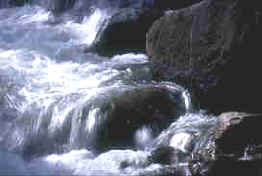
A slower shutter speed allows the camera to be photographing while the action of the water moves.This will cause the water to look blurred or “smoky”.It can create a lovely effect
Be sure to try the exercises at the end of the article.Some of them are easier or more fun than others.They’ve all been designed to teach you a skill or to help you understand a feature of your camera.Even the last exercise is specifically designed to loosen you up and to push the camera (and you) to the outer boundaries.Remember to take notes! They help when you get your film back.
To recap, exposure of film is made when a certain amount of light hits the film. To manage the amount of light entering the camera through the lens, there are two controls: the shutter and the aperture. The shutter control is fairly straightforward. The shutter controls the amount of light by regulating the amount of time the shutter stays open. The speed at which the shutter opens and closes determines whether you’ll freeze the action or allow the motion of the subject to show. The exercise we suggested was for you to set up your camera on a busy street where cars are speeding by. A fast shutter speed freezes the action; a slower shutter speed shows the cars blurring as they whiz by.
There are a number of reasons why shutter speed is important to the photographer.First, it’s the other part of the exposure equation.In order to make a proper exposure, you need to have light go through the aperture (“hole”) in the lens for a specific amount of time.The aperture controls the size of the “hole,” but the shutter controls how long that “hole” will remain open.Think of the shutter as being like the entry to a building.The building has a revolving door with a large opening.That’s great, but the opening is whizzing by so fast that even if you run, you have trouble jumping in.On the other hand, there’s another building across the street in which the revolving door has only a little tiny space for you to squeeze into, but the door moves so slowly that you have lots of time to enter.Can you understand the relationship between shutter and aperture more clearly now?The revolving door image works for me, and I hope it works for you.
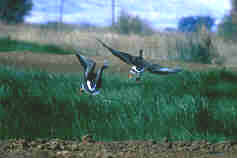
I was photographing birds early in the morning.Sometimes they spook easily.These took flight, and I shot them as they were moving rapidly away. You can tell that the shutter speed I was using was a fast one, because the birds’ wings and tails are sharp. The fast speed stopped the action.
Now we know how the shutter and aperture work together to make an exposure.Speed is also important because of camera shake.If you’re hand-holding your camera (not working on a tripod), you want to keep the shutter at a speed that will prevent any slight movement you make from affecting the outcome of the image.A common rule of thumb is to check the focal length of your lens.If you’re using a 50 mm lens, your shutter speed should be no less than 1/60th of a second.If you’re using a 300 mm lens, your shutter speed should be no less than 1/500th of a second.If you’re using a tripod, your camera should be steady enough to enable you to use any shutter speed.Always be sure to adjust the aperture to balance the exposure, however.
Let’s assume we have a camera with lots of “bells and whistles.”On one of the dials, or in the “mode” program of most new cameras, you’ll see something like “M”, “P”, “A” or “S.” (You might want to refer to the part of your camera manual that deals with these controls to see what you have to do to change from one to the other. )
“M“ is for manual control.This means that you control the exposure equation.You set both the aperture and the shutter speed.The camera’s light meter will help you, but the responsibility is all yours.
“P” is for full program.This means that you let the camera control the exposure equation.The camera picks both the aperture and the shutter speed for you.You have no say and no responsibility to do it correctly.
“A“ is for aperture priority.This means that you can select the aperture side of the exposure equation, and the camera selects the shutter speed that will work with the aperture you’ve chosen.
“S“ is for shutter priority.This means that you can select the shutter speed side of the exposure equation, and the camera picks the aperture size that will work with that shutter speed to properly expose the film.
When do you select one mode over the other and why? Here’s an easy guide:Pick “manual” when you know what you’re doing and/or when the situation demands you override every bell and whistle.Pick “full program” when you aren’t sure what you’re doing and/or can’t make a decision.Pick “aperture control” most of the time, because it’ll help you make artistic decisions (as we discussed in the depth-of-field section in part 2 of this series).Pick “shutter control” when you’re at sporting activities, shooting active wild animals, or whenever there’s movement you need to stop.Most of all, learn enough so you can trust yourself. If you don’t feel you can trust yourself,then trust that expensive, wonderful camera you purchased.If you know how to tell it what you want, it’ll make good decisions most of the time.
Now for some exercises on creatively using your shutter speed control.If you have a tripod, use it.If you don’t, set the camera on a table for stability.What you don’t want is for your movement to affect the photograph.

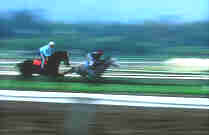
It’s early morning and still foggy at the Santa Anita Racetrack. By setting my camera on shutter priority, I selected a speed that would stop the action of the horse. Notice that I’m photographing the horse as it moves away from me rather than as it moves directly by. Choosing to shoot the horse moving away allowed me more latitude in the shutter speed
Exercise 1: Find a small river or set the garden hose in such a way that you have a stream of water.Put your camera on “Shutter Priority” (you select the shutter speed and the camera matches the aperture for you to create a proper exposure). Take a series of photographs using a variety of shutter speeds from 1/500th to 1/30th of a second.Try to keep something like a rock or the end of the hose in absolute sharp focus.What you want to see is what effect the shutter speed will have in stopping the action of the water.Although the stream will make a more interesting series of photographs, the hose does have one advantage: you can make the water run faster in one series and slower in another series.
Exercise 2: This time stabilize your camera near a city street.Photograph the cars whizzing by first, while you use a fast shutter speed and second, while you use a slow shutter speed. Take one series of the cars as you look directly across the street (stand at a 45° angle from the cars).Now, take another series of the cars as you point the camera down the street.(The cars will be coming toward you, rather than passing you).What’s the difference in the two series?What have you learned about photographing movement?
In this photograph, I’m panning with the horses. Again, it’s the movement of my body following the action of the horses that causes the background and foreground to blur. Because I’m moving with the horses, their action freezes.
Exercise 3: Try panning. Panning is where you put the camera on shutter control and set the shutter speed fast enough to stop the object you are photographing.Then, move your body as your eye follows the action.You should be making a clean, smooth move when you press the shutter control.The result will be that the object you’re photographing will be frozen, and the background will appear as soft blurry streaks.A great place to try this is at the races–horse or otherwise.Or you might focus on one bird as it begins to fly and follow its action.Another excellent place to find movement is at a fair or carnival. Check out the rides (but remember what you learned in Exercise 2).
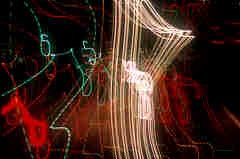
Creativity and having fun seem to go hand-in-hand.Here’s one way to have fun with your camera:Years ago, my photographic partner and I made monthly trips to the Eastern Sierras from the Los Angeles area.Mojave, a small desert community about an hour and a half from Los Angeles, is loaded with fast food stops and gas stations.We usually got there when it was dark.We knew we still had about five hours of driving, and we were looking for fun.While one of us was driving carefully, the other would set the camera on a really slow shutter speed or on the “B” (bulb setting: this setting keeps the shutter open from the time you push the button until you lift your finger off the button).While the shutter is open, you can jiggle and zoom and move the camera any which way.The lights “paint the film” with interesting designs.Break all the “rules” about keeping your camera still.It’s a great way to loosen up and have fun.
Exercise 4:Look up the article called “Funlights” that Jalien Tulley and Iwrote for Petersen’s PhotoGraphic (April, 1989).It should still be available in the archives at your library.Try one roll of film using some of the techniques in the article.Be creative. Try different things.You’ve been working hard at learning about your camera. Now take some time to relax and have fun!
by Noella Ballenger
Leave a Reply