
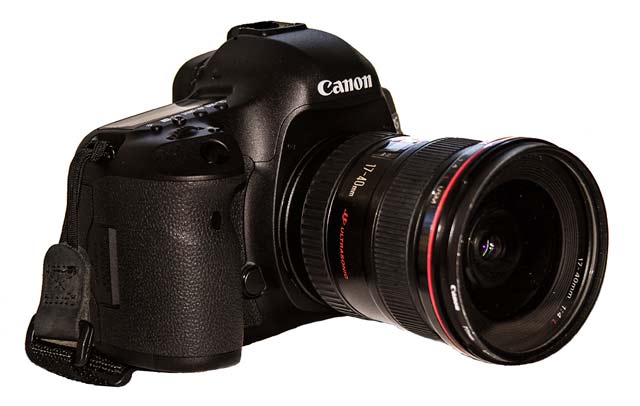
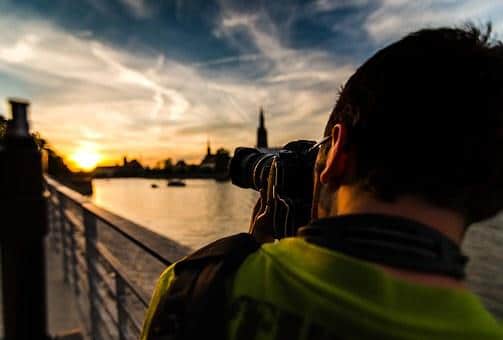
Congratulations! You have your first “real” digital camera, and you’re ready to get started as a photographer. A good place to begin is to learn all about your camera, so the two of you can work together and not against one another. So we’ll look at some dslr photography basics.
Mastering the basics isn’t really as difficult as it seems.
If you really want to learn quickly, take notes. I’m a professional photographer, however to be honest, I don’t like taking notes.
In this, the first in a series of articles meant to help you on your way, we’ll walk through the four basic controls.
Then, we’ll outline some simple exercises you can do to explore what you’ve learned.
We’re going to assume that you have a camera that allows you to set the controls both manually and in an automatic or semi-automatic mode. As our series progresses, we’ll expand on these controls and add a few more variations.
How Much Light?
Let’s start by looking at how your camera makes a photograph. There is a sensor within the camera that when exposed to just the right amount of light will make an image. There are three basic controls that involve what we refer to as exposure – sometimes referred to as the “exposure triangle”.
They are the ISO, the shutter speed and the aperture. Between the three of them, they control the camera to make a properly exposed photograph:
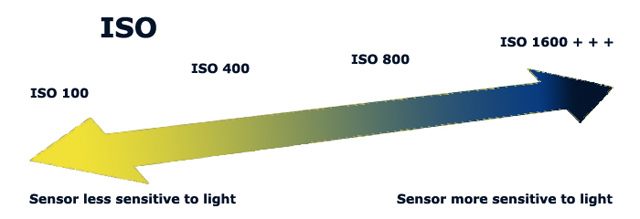
1. The ISO number determines how sensitive the camera’s image sensor is to the light entering the camera.
2. The shutter speed controls the amount of time light is allowed to enter the camera.
3. The aperture refers to the size of the opening in the lens. It is sometimes called the “f-stop” and this controls the amount of light entering the camera at that time.
(The fourth control on the camera, the ability to focus the lens, isn’t involved in the exposure, so we’ll cover that toward the end of this article.)
We’re going to explain what each of these controls is and what it does. Once you understand the basics, you’ll be able to move on to using the controls creatively to capture those wonderful photos that you’ve envisioned.
Understanding ISO
The ISO speed controls the sensitivity level of the camera’s sensor to light and that information helps the camera’s meter decide how much light will be needed for the exposure. If an eye doctor ever put drops in your eyes to dilate your pupils and then you went outside into the bright sun, you understand sensitivity to light.
The sunlight hits your face, and your eyes immediately squeezed shut in pain. Even people who have never visited an eye doctor know how it feels to stumble across an unlit room in the dark, their eyes open very wide as they tried to see.
In today’s digital world, you merely change the numerical reading on your camera’s ISO dial to change the ISO – a measure of the sensitivity. And when you do, the camera’s internal process will match each ISO speed set. (If you still happen to use a film camera, then you’ll need to purchase the various films to adjust the camera’s sensitivity to light.)
Your setting of the ISO can help you make images in normal sunny conditions (ISO of 100 or 200) or used to freeze action or for very dark conditions (ISO 800 and on up). Today’s cameras can set the sensitivity of the sensor to such a high number that they can almost photograph in the dark, but “noise”, the appearance of digital grain is going to occur.
Digital ISO covers an even wider range than film ever did, from ISO 100 – 200 for bright light conditions and ISO 800 and beyond for the darker to darkest conditions. Unlike film, the setting can be changed in an instant to fit the lighting needs for each photo frame.
Shutter Speed Control
The shutter speed controls the length of time that light is allowed to enter the lens of the camera. In other words, this control tells the shutter how long it can stay open.
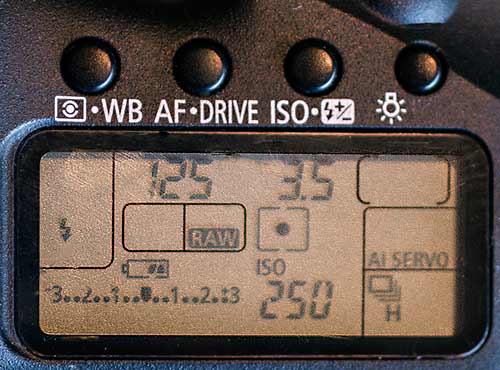
For example: The numbers you see on the LCD screen correspond to the numbers below. They are the shutter speed settings that you’ll find on many digital cameras and on a film camera if you happen to still be using one.
If you change them into a fraction, they become easier to understand as units of time. On other digital cameras, the manufacturers made it even easier by actually showing them full seconds or as fractions on the LCD screen.
© 2013 Noella Ballenger. All rights reserved.
2 = ½ second
4 = ¼ second
8 = 1/8 second
15 = 1/15 second
30 = 1/30 second
60 =1/60 second
125 = 1/125 second
500 = 1/500 second
1000 = 1/1000 second
You may also see a letter “B” on your camera’s dial – that stands for “bulb” (may be within the camera’s setup / information format instead of on the dial). You’ll use the bulb setting when you want the shutter to stay open. As long as you have the button depressed, the shutter will stay open. When you remove your finger from the button, the shutter closes.
Keep in mind, we’re talking about the length of time the shutter stays open to let light into the camera. An example of a “slow shutter speed” would be about 1/30 second or slower – 1, 2, 3 or more seconds. A fast shutter speed would be a 1/250 second or higher. These speeds “stop” or freeze most actions.
NOTE: With film cameras many people prefer to set their cameras at 1/125 or 1/250 second to counteract “photographer vibration” or the movement you make without meaning to when you’re not using a tripod to take a picture. But again, we’ve come a long way in the digital camera world. Built in shake reduction technology eliminates some of the concerns of “photographer vibration”.
At 1/500 sec. or higher you can take a picture of a horse running and freeze the action of the horse (see a full explanation of stop action photography).
However, if you want to show the motion of a horse running, you’ll use a slow shutter speed, such as 1/30 sec. As the shutter stays open, the horse will run through the image field. The image of the horse will look blurry, which is what you want if you’re taking a picture of motion and not just the horse.

You’ll find a semi-automatic function or selection called “Shutter Priority.” This means that you select the shutter speed, and the camera will automatically select the aperture to make the exposure.
The advantage of using this semi-automatic function is that you know you’ll probably get a photograph that’s exposed properly under normal conditions without your having to think about it. The time to use Shutter Priority would be at an activity such as a race or a basketball game.
You want to be sure to stop the action and you may not have time to think about what exposure you want while you’re trying to capture the moment.
Aperture Control or F-stop
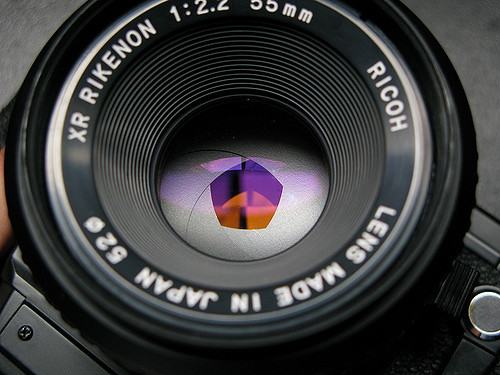
The aperture or f-stop refers to the adjustable hole or opening in the lens. This opening allows a certain amount of light to enter the camera. (Remember, the length of time and the amount of light that’s allowed to strike the sensor controls exposure.)
You’ll see some numbers –such as 4, 5.6, 8, 11, 16, and 22. To understand these numbers, turn them into fractions:
4 = ¼, 5.6 = 1/5.6, 8 = 1/8, 11 = 1/11, 16 = 1/16, 22 = 1/22, and so on.
Lots of people have difficulty figuring out how these numbers relate to the size of the opening in the lens. To make the problem easier, think of dividing a pie into sections. If you cut a pie into fourths and took one piece, you’d have a much bigger piece (1/4 of the pie!) than you would if you cut the pie into twenty-two pieces and only got 1/22 of the pie.
So, 1/4 is a much bigger opening than 1/22. In the same way, a lens set with the aperture or f-stop of 4 has a very large opening (allowing more light to come into the camera), while the one set at f/22 has a small opening (allowing much less light to come into the camera).
You’ll also find a semi-automatic setting called “Aperture Priority.” This means that you select the aperture or f-stop, and the camera will automatically set the shutter speed.
The aperture is a very special creative control, and many professional photographers will use the aperture priority setting much of the time–but they know (as you will learn) when to go out of this mode if special exposure situations arise.
Focus Control – DSLR Photography Basics
Now that we’ve gone through the basics about exposure, it’s time for us to move on to focus, as we promised. The last major camera control is located on the lens and is the focus control. Here you will probably have the choice of manual or auto-focus.
With the camera’s lens focus control in “M” (manual control), turn the barrel of the lens until the image you’re looking at becomes sharply focused. Switch to “A” (auto-focus), and the camera will mesh with the lens and focus for you when you depress the shutter release button half way down.
The focus control has nothing to do with exposure. You can have a properly exposed picture that is in or out-of-focus, or you can have a poorly exposed picture that is in or out-of-focus. There is no connection between focus and exposure. You’ll usually want to have your images come out sharp or in focus.
PRACTICE: You’ll learn your camera best if you practice with it frequently.
a.) Now that you understand the dslr photography basics. Go through your instruction book and learn where the controls are. You don’t have to master all of them at this time, but look for the ones we have discussed and begin there.
b.) Practice putting your lens on the camera and taking it off, change the ISO, change the shutter speed and aperture. Switch from Shutter Priority, to Aperture Priority to Manual (where you set both the shutter speed and aperture.)
Do these mechanical jobs over and over, until they’re easy for you. I suggest spending a few evenings in front of the television “playing” with your camera, so your fingers can learn where things are even when you’re not looking. Getting the feel of you camera makes learning photography easier.
Keep in mind that all of these exercises are your experiments. If the pictures you make turn out to be nice shots, terrific! If they aren’t so good, that is perfectly fine as long as you learned something from making them.
If you keep trying, you’ll succeed at a faster pace.
However, I take them whenever I’m trying something new or different. Carry come 3×5 cards with you and photograph your note after you make the picture.
In this way the photograph you are working on and the photograph of the note are together. Study them and see if you succeeded in doing what you set out to do.
Here is what you need to record:
a.) What were you trying to do?
b.) What camera settings did you use and why? (Just writing down the settings without noting what you were trying to do isn’t helpful. Light changes all the time, so even if you write down a setting of f/8 at 1/125, it means nothing. A more helpful note is: “Metered off side of barn, wanted to show lots of detail, meter read f/8 at 1/60. I used f/8 at 1/60 and at 1/125.”
Or, “Wanted to show horse motion of horse, set slow shutter speed of 1/30 at f/11.”
NOTE: Now I’m sure you’re asking why I would write down the camera settings when it’s all in the metadata of the photo. It merely saves you from having to flip back and forth between the two images – the photo and the “notes” photo.
Everything is recorded in one place on the “notes” photo. Also by deliberately forcing yourself to write notes, one tends to remember what was done and why.
Finally, after you have a chance to review them, decide if you were successful in actually doing what you were trying to do. If you weren’t successful or if you really didn’t understand why you got the results you did, then go back and try doing the lesson again.
Keeping a scrapbook in which you write your lessons beside a print of the image and your notes can be very helpful.
EXERCISES FOR DIGITAL CAMERAS:
ISO Exercises:
Exercise 1: Run through the ISO settings. Get familiar with the dial and think about the kinds of images that you want to make. Do you need to stop the action or slow it down?
Exercise 2: Set your camera on either Shutter Priority (just start with 1/125 sec.) or Aperture Priority (just start with f/8).
Experiment with different ISO settings by making some photos early in the day when the light is bright and then, late when it’s almost dark. What differences do you see in your results?
Shutter Speed Exercises:
Exercise 1: Locate the shutter speed on your camera. Practice changing the settings. Make a list of subjects that would require a faster or slower shutter speed. Try photographing some of those subjects.
Exercise 2: Take your camera to a busy street and set the camera on Shutter Priority and select a slow shutter (1/30th second or slower) speed. See what happens when something moves rapidly through the camera range.
Make images of some cars that are going slower and some that are going faster. Change your shutter speed to faster (1/250, 1/500, 1/1000) settings and try to freeze the action. (If you’re trying manual settings, always remembering to change the aperture to get a proper exposure.)
Aperture Exercises:
Exercise 1: Set the camera on Aperture Priority and locate the dial that changes the aperture settings. Take a series of photographs using each aperture setting. (Again, if you’re trying manual settings, remember to change your shutter speed accordingly) to get a proper exposure.
I suggest using a fence (or something similar or setting objects in a row) as your subject. Stand at about a 45-degree angle from the fence, and photograph it so that you’re looking at a row of markers. Focus on the same post for each photograph.
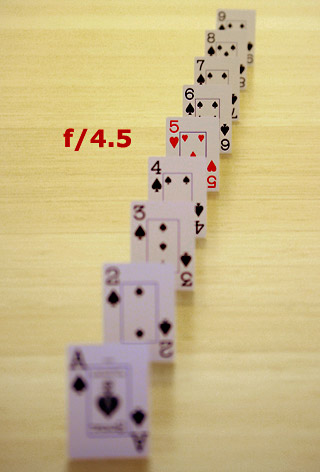
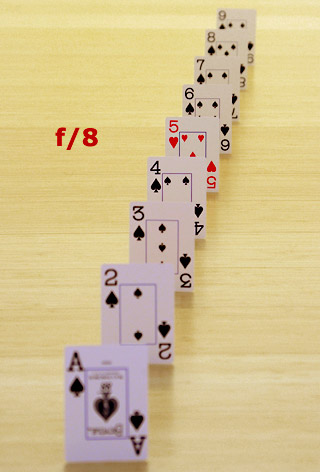
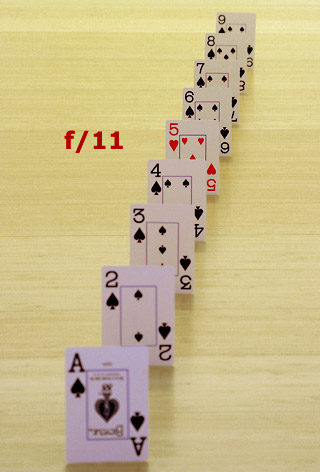
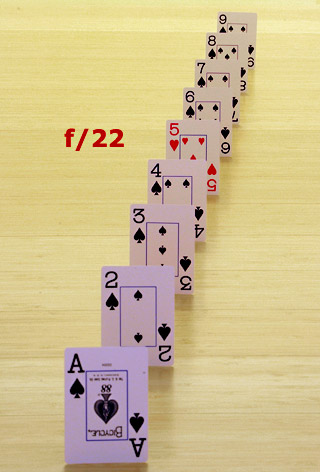
Above 4 images: © 2013 Marla Meier. All rights reserved.
As you decrease the aperture (f/4.5 to f/22) the depth of field (how much is in focus) increases. Notice how more cards are in focus at f/22, even though the “5 of hearts” is the center of focus for all the photos. (For your exercise make sure to focus on the same point for each exposure.)
(We’ll be going into the creative use of this control in an upcoming article. This exercise will prepare you.)
Focus Control Exercises
Exercise 1: Out-of-focus photographs usually aren’t pleasing. Go to the library to find some magazines or photography books that show really good photography. Visit a museum or art gallery that exhibits photography and really look at what sharp focus is.
(When your eye and mind know what really sharp focus is, you won’t be satisfied with less.)
Exercise 2: Tape a newspaper (classified ads work well) to a wall and photograph the paper from various distances. Make a couple of images that are out-of-focus and then practice making your pictures really sharp. (Note: photographing newspaper is also a good way to judge just what your camera lens is seeing.)
by Noella Ballenger
© 2013 Noella Ballenger. All rights reserved.
Leave a Reply