
Clipping, Banding, and Combing: What does that mean?
“Don’t worry about it. You can fix it in Photoshop.” While that admonition may be true for some things, exposure is not one of them. Even more than film, when shooting digital it is essential to get proper exposures if you want quality images. Let’s examine the reasons.
First, what must be clearly understood about using a photo editor such as Photoshop is that every time you make an adjustment using levels and curves you lose data. Each time you make additional changes this loss is compounded. You probably won’t see this on your monitor, but when you either print the image on your own printer or have it printed by someone else, it will most likely be very obvious. It will show itself as banding in the critical areas of gentle transitions in tonal values such as those of skin or in the sky. This banding will be an irregular hard line that marks the transition from one tone to the next. It’s as if the tonal values jump from one value to the next.
In fact, that is exactly what has happened. In order to have a gradual gradient of values, the image must possess all of the tonal values needed to create the transition. If some of those values are missing, then you will get this skipping from one tonal value to the next, and this is what we call “banding.”
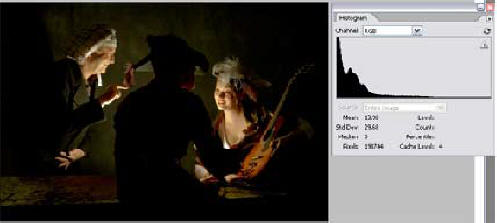
Below you have an image that was taken in a recent lighting class of mine. The object was to recreate a work of art from the Dutch Golden Era. If we examine the histogram, we can see that we have clipped blacks, although our highlights are about where we want them. You can see the highlights as the thin black line that extends to the right of the histogram along the floor of the graph. This was not far from being a good match for the painting, although it was lacking details in the blacks and was overall a little too dark.
For illustration purposes I have tried to adjust the image using levels to raise the overall brightness of the image. Here is what I get.
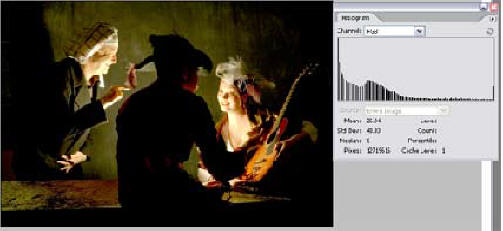
Now take a look at the histogram. We have stretched the darker tones and in doing so created the condition known as “combing.” It gets its name from the resemblance to the teeth of a comb. This represents a substantially damaged photo now. It is a little closer to the painting, but will not reproduce well when I try to print it. Let’s zoom in to see some details.
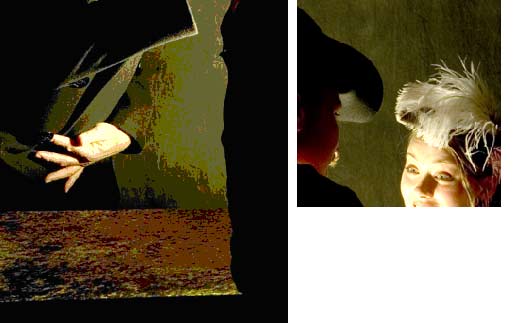
The skin areas of both examples show a lot of noise and there is posterization, which is also a result of the combing. The monitor does a lot of smoothing, so it actually looks better on the screen than it will when it prints. Look at the image on the right and examine the skin tones on both faces. Toward the lower part of the man’s face as it approaches his collar, we see a gradient that is the result of the light coming from the “candle.” We would want this to reproduce as a nice gradient reflecting the quality of the candlelight. However, what we will get, as a result of the combing, will be irregular banding as the tonal values move from dark to light. The woman’s face has the same problem. The highlights of her face will be made up of concentric circles of irregular bands.
How can we avoid this? First, we must assure that our exposure is better. In this case, simply adding a little fill light would have raised the values of the darker areas and we might not have had to use level adjustments at all.
Although this example was an exceptional case, the concept is the same when ever you are shooting. If your camera is able to show histograms of the images you are shooting, turn that feature on, so that you can see the histogram of each image you are shooting. NEVER trust the image you see on the LCD screen. Except in unusual circumstances, you want to make sure your histogram is centered with no clipping on either side. If the scene exceeds the dynamic range of your chip, and you have clipping on both ends, adjust your exposure so that the highlights do not get clipped. The viewer is much more forgiving of blocked shadows than of blown-out highlights. The eye always goes right to the areas of blown out highlights because they are the brightest areas of your photo.
Shooting in RAW
I have a trick question on one of my exposure quizzes. “What should you do if you keep getting histograms that are clipped on both ends when shooting a particular scene?” The best answer of the four multiple choices is “Go Home.” Go home and come back when the lighting is better. You will like your resulting images much better, because they will be higher in quality.
Another technique is to shoot in the RAW mode. This is a file format that more and more cameras are able use to save the data of an image. To understand why this could be better, you have to understand how your camera works. Normally, when you shoot a photo the sensor sends the data to your camera’s computer where it processes the data according to the parameters you set in the menu of your camera. It sets the sharpness you selected, the contrast, saturation and color. It tries to adjust the exposure to fit into the dynamic range of a JPEG file, the default file format. And then it throws everything else away.
What does it throw away? Well, quite a lot actually. The sensor of your camera is actually capable of capturing a higher dynamic range than can be represented in a JPEG file. So it throws away the values that don’t fit. And there is a lot of other information that is available if it could be used.
What the RAW file format does is save the data BEFORE it gets to your camera’s computer. This allows you, the real brains of the operation, to decide what to do with the data. You will do this in the RAW converter that came with your camera or in many of the image editors you might be using.
The result is that you may be able to tweak a slightly under- or overexposed image to create a perfectly exposed image. You can also adjust the contrast, saturation and color balance of your image. So when you open that resultant image in your image editor, you probably won’t have to do any adjustments. If you don’t do any adjustments, your image does not lose any data and combing is never a problem.
Additional Solutions
If your camera does not have RAW capabilities or you would rather not shoot in RAW because the files are much larger, there is another tactic that will help avoid combing. As soon as you open your image in the image editor, change the mode to 16-bit. You camera saves the file as an 8-bit file, but you can change it to a 16-bit file. This increases the colors and tonal values exponentially. Now when you need to make adjustment you have trillions of different colors and values to “stretch”. With more information, when you stretch the values in your histogram to make corrections, they are less likely to “break” and create combing. This is very effective and is common practice among many professionals. Just remember you have to change the mode back to 8-bit in order to print. You may see some combing in your 16-bit image, but this will disappear when you change it back to 8-bit.
Lastly, if you are not doing it now, you should make the following a routine part of your adjustment workflow. NEVER use Brightness/Contrast to adjust your image. This is a sure recipe for destroying your image. Also DO NOT simply go to Image>Adjust>Levels or Curves. Instead take advantage of “Adjustment Layers”. Adjustment layers allow you to make your changes without actually applying the changes until you flatten or print the image, allowing you to go back and adjust your changes. Remember when I said that each time you make additional changes to levels or curves you compound the loss of data. Adjustment layers let you add, delete or alter your adjustments and your final decision isn’t applied until you flatten the image. So in effect you have only made one adjustment that is applied to the final image.
I hope this article has helped explain some of the causes of combing and how you can avoid this problem. But most of all remember the old phrase: “Garbage in Garbage Out.” Make the best image you can from the start and you will have the best image when you finish.
by Michael Fulks
All text, graphics and photos: © Michael Fulks. All Rights Reserved.
Leave a Reply