
Nature is a wonderland of design. To appreciate its subtleties, one can learn a lot by consciously diagramming landscapes and natural subjects, thereby breaking them down into their elemental parts. Manipulating design elements in a studio setting is relatively easy, but moving a mountain or tree in the field is, well, difficult, to say the least. Aware photographers, therefore, let nature be their guide. They control their compositions by isolating, emphasizing, and eliminating unwanted elements in the “studio” of their minds.
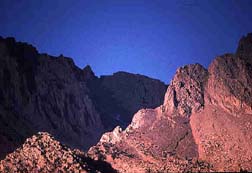
Sierra Nevada Mts,
Lone Pine, California.
Strong diagonals, contrasts
in light and subtle colors
carry the eye along the r
idges of these mountains.
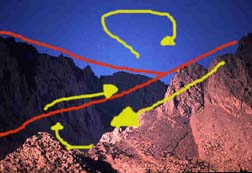 This composition has a basic design and space division of three triangles.The eye follows the light ridge downward until the small mound acts as an arrow preventing the eye from sliding out of the photograph. The eye then rests and follows the dark triangle of mountain up into the sky where it circles to slide down the light ridge. Allowing your eye the opportunity to move around your compositon is what will hold the interest of the viewer.
UNDERSTANDING SPACE
Lines direct, connect, and divide space. This division determines the balance, pulse, and rhythm of a photograph. Looking at space more closely, we discover it has volume and weight. If a line divides a space into equal parts, is the weight equally distributed? Not necessarily. For example, when space is divided by a diagonal line, our perception tends to dictate that the bottom is heavier. If a space is evenly divided into vertical or horizontal areas, a sense of equality will probably prevail.
Consequently, it is apparent that the simple act of dividing space has many variables with a multitude of consequences.
Other elements of design, such as light and color, accentuate the basic sense of space division. They may cause areas to retreat, or come forward and be emphasized. They are not to be dismissed lightly, as they are major elements in a final image. However, when analyzing an image for design detail, it’s usually more important to look at line and space first, then at light and color. Early on, however, it is very easy to ignore the basics and be carried away by the magic of light and color.
 Mono Lake, California
Circles in part or in whole
capture the eye. Here at
Mono Lake we follow the
shoreline into the photograph.
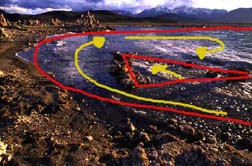
This composition is based on
a circle. Although only a part
of the circle is in the image,
your mind will complete it and
return to the starting point.
Note the strong but subtle
triangular shape of the small
tufa mounds that act as a
pointer.
Imagine, in the “studio” of your mind, a beautiful scenic of trees, a lake, and mountains. What do you see? Trees, lake, mountains? Before the eye becomes photographically trained, we see just as we have been taught. A tree is a tree, and we look no further. But a tree is more. It has volume, shape, line, pattern, rhythm, and weight. Light and color emphasize these elements. You’ll see them only if you look for them, however. You’ll also see lines-the basic division of the space and the weight of the various elements, as well as their rhythm. Lastly, you,11 see blocks of color, ribbons of light, and how effectively they highlight the overall design.
TRAINING TECHNIQUES
TRACE IT: A good way to judge a photograph, and hence your ability to see, is to project a slide onto a piece of paper tacked to the wall. (An alternate is to make a print, protect your print with a piece of glass and use a sheet of tracing paper.) With a felt-tip marker, trace over the basic lines of your photograph, using the fewest lines possible to express the design and space division. Turn off the projector and study your drawing. You should now be able to see how the space is divided. Have you created any shapes? Are they regular or irregular? Does one area “weigh” more than another? What is the center of interest, its placement, and weight?
Remove the paper and project your slide again. Has your perception changed? Is the image as pleasing to you as before, or could it be improved? The basic design should stand out in a different way. Practice this exercise, with 10 to 20 of your favorite shots, and then with 10 to 20 of your most disappointing shots.
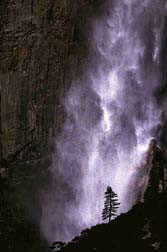
Yosemite Falls,
Yosemite National Park
The small tree is the focal point within the triangle of the waterfall, while the lines of falling water bring the eye back to the tree.
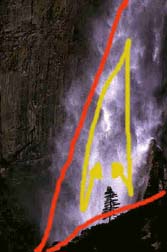
The red lines show the basic composition…a large triangle. The yellow arrows how that the eye uses the focal point ( the tree) as well as the falling water to move about and be caught within the triangle.
Frequently, the strength or weakness of an image depends on the route the eye takes as it meanders through the photograph. The eye path helps determine the intensity of communication in an image. To prove this, again project onto your original drawing. Taking a different-colored felt-tip pen, trace the path you are asking the viewer’s eye to follow. The eye should move fluidly throughout, and not be bounced out of the photo, nor stopped and held prisoner. It should spend some time at the center of interest, then be led to and fro by lines, light, color, and pattern.
Again, using the imaginary scenic, follow the eye path. Can you go up the tree, across the cloud shape in the sky to the mountain peak? From there, do you glide down the side of the snow pack, getting caught in the waterfall that drops into the quiet lake? Then, do you travel back to the tree? Or, do you have to fight to get through the thicket before making the leap to the mountain top where you ungracefully manage to drop off the side of the photo? The eye path will make a difference.
Notice that there are some general conclusions that you may draw when you begin to study the eye path. First, the eye tends to follow space divisions. Then the eye is drawn to highlight areas, which attract more readily than dark areas. The center of interest in a photograph is a “homing” place. The eye will go on excursions from this place, but eventually slides back to home base. Study this more and see what else you can discover about the eye path in your images.
REST IT: Have you included some visual resting areas in the image? These important areas of subtle shading and/ or shadows are a place for your eye to wander and relax before continuing its journey. These are the pathways holding the image together. To see this concept in action, either at the projector or in the camera, get everything set and then throw the image out of focus. Concentrate on the blocks of color, as well as the balance and the relationship of dark areas to light. If the composition “works” when it is out of focus, it will work when it is in focus. (Similarly, if a composition “works” upside down, it will work right side up.)
STRETCH IT: Now to the outdoor studio. Put on your jacket and gather up your gear for some observation and visualization. We are now going to take some of our best images using the very finest equipment ever made-our eyes and mind. Using an empty slide mount helps focus your attention. It also relieves the “itchy trigger-finger syndrome” (the need when holding a camera to take a picture). Hold a slide mount close to your eye until it becomes a wide-angle “lens.” When held at arm’s length, it becomes a telephoto lens. Depth of field can be controlled by squinting.
Look for designs in nature as you look through your wide-angle/telephoto slide mount. What do you see in terms of line, pattern, shape, etc.? Is the composition balanced? To make this exercise more meaningful, use your sketchbook and draw what you see in minimal terms. Remember to make notes. After spending time analyzing and sketching, use your camera and take that shot. A time-consuming and tough exercise, yes, but don’t quit now! Vary your basic theme and take the shot three or four more times. Each time, change one variable, such as position, angle, or lens. Perhaps one shot will put the center of interest to the right-or maybe to the left. Another might be placed within a vertical format. If this exercise becomes too exhausting, you should stretch out comfortably on the ground and then shoot the photograph.
Be aware that training your eye and learning to rely on your instincts is a long and slow process. These exercises are meant to be done for a short time only and after that, only as a sporadic review and revitalization technique. You need to be able to depend on your “sixth” sense. The feeling you get when you pick up your camera should be an intuitive one. Your instincts should be able to tell the difference between a shot that is working and one that just misses.
Your mental camera is always with you. Use it to “take” a photograph when rushing to your job or waiting in line. This is heavy-duty training in learning to see. Soon, the intuitive part of the brain will take over the process, and analysis will become subconscious.
DUMP IT: “Optical noise” is an expression used to describe the distractions that interfere with a good photograph. Compare it to a busy office with phones ringing, people talking, computers clicking, and music playing. Your mind can automatically block out all of these sounds or selectively tune into the sound of your phone ringing, a favorite song, or a bit of gossip at the next desk. Your eye also has the capability of blocking, either totally or selectively, what the mind does not want to see. That does not mean that it is not there. Quite the contrary. It just means that you can no longer see it if you are only looking casually.
Before you take a photograph, stop and look! Train your mind to recognize “optical noise” and eliminate it. Direct your eye to give a last minute sweep around the edges of the viewfinder. That is where most of us leave optical debris.
FIX IT: At last, we see the distractions, and know what and where they are. The big question then becomes how to eliminate them. Since it is impractical, and usually against environmental regulations, to move the mountain, why not move yourself? Sometimes this simple act is all that is needed. Change camera height and angle. Switch to a different lens. At first it is helpful to take the original shot-with the distractions. Then work on eliminating the extraneous, and photo-document your progress toward attaining the perfect image.
by Noella Ballenger & Jalien Tulley
*This article was originally published by Petersen’s Photographic, February 1991.
Leave a Reply