
When I took my first Fine Art Photography course many years ago, I learned how a subtle edge burn could improve a photograph. By encouraging a viewer’s eye to move into the photograph, a well-executed edge burn could make a good photo into an even better one. For those of you with no darkroom experience, an edge burn is a subtle darkening of the edges around the images, gradually darkening from center to outside edge. By well-executed, I mean one that has no visible edges and may not even be noticeable except when the print is compared to the original.
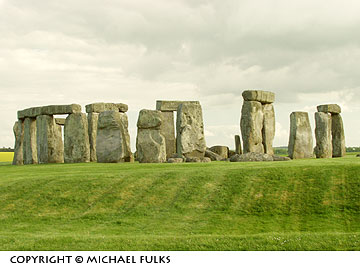
Before without edge-burns
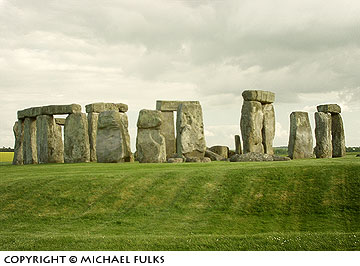
After with edge burns
From that point on, almost all of my prints received the edge-burns as described by Ansel Adams in his book, The Print. When I began to do portraits, of course, I expected to have those prints edge-burned as well. I was disheartened to find that for most labs this puts the print into the custom category and costs at least 100% more and sometimes more.
To get around this extra charge for what I thought should be SOP (Standard Operating Procedure), I purchased from Lindahl Specialties, a lens bellows with a piece of glass inserted that is designed to produce the edge burn in camera. It is the answer to having your edge burn and your standard print too.
Recently, I began teaching a digital darkroom class at the local college. In going over many of the students’ images, I noticed that edge burns would also improve their digital photos. The way to do this in Photoshop is simple and can be done quickly.
First, open your image and do whatever adjustments you need to make. Do your tonal adjustment, spotting, burning and dodging, and sharpening until you have the image as good as can make it. Now you can do the edge burn.
Flatten your image. Make a duplicate of it before you flatten it if you have trouble with commitment and feel you may want to change something in the image later. In the layers palette, drag the background layer (the only layer you should have now) onto the Make New Layer icon at the bottom of the palette. The default name of this new layer is “Background Copy”.
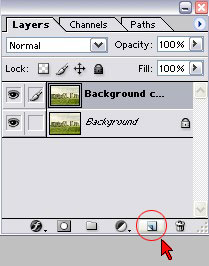
Highlight this new layer and click on the Add Vector Mask icon at the bottom of the palette. This will add a mask the “Background Copy”
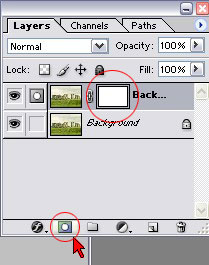
Now choose the gradient tool, and select the radial gradient. On the options, choose black to white.

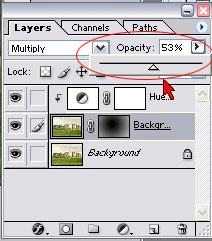
Position your brush in the center of the image and pull outward towards the edges. Your palette and mask should look like this.
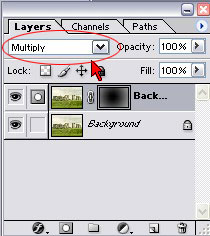
Now, change the blending mode to multiply (see above), and you will see the effect of your gradient. You should see a noticeable darkening if the edges. You can continue playing with this by simply drawing the gradient over and over until you like what you see. There is no need to hit “undo” or to go back in the history palette.
It is sometimes necessary to pull the gradient out past the edge of the image. To do this, zoom out so that the image is surrounded by the gray canvas. Now you can pull further and create a more subtle change.
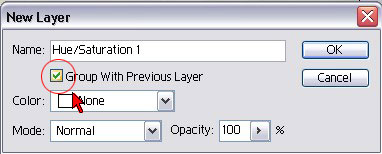
I have noticed that on color images this has a tendency to increase saturation of the edges, as well as darken them. To get around this, change the new layer (“Background Copy”) to a gray scale image. That will darken the corners without affecting the colors. (This step can be done at any time in the process, as long as you do it before you flatten the image the final time.)
To do this, chose the Layers>New Adjustment Layer>Hue and Saturation. When the dialogue window comes up, click on “Group with Previous Layer.” This will group the new adjustment layer with “Background Copy” and it will not affect the whole layer stack.
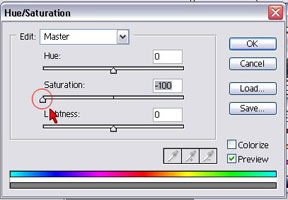
Move the Saturation slider completely to the left and the result will be to change that layer into a B/W image. The advantage of using this adjustment layer is that you will be able to control the level of saturation and its effects on the edges to fine-tune the edge burn color.
The edge burn should be very subtle. You should not be able to see the edges of your gradient. You can now fine-tune the edge burn even further by adjusting the opacity of that layer.
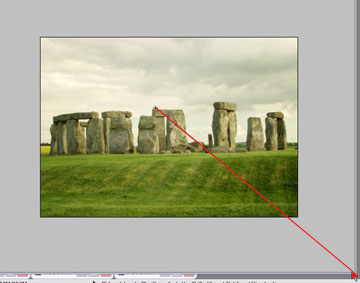
Let’s compare our final results with the original.
Before
After
by Michael Fulks

Leave a Reply