

Observe your subject with wide angle, normal, telephoto and panoramic eyes.
For many of us, amateurs and professionals alike, producing creative photographs is a challenging objective. Snapshots just don’t satisfy. We want to produce images that are more expressive, imaginative, and original. But can our photographic creativity be developed—and expanded—and, if so, how?
I have closely observed many people taking pictures—my father William “Bill” Gottlieb (renowned photographer of jazz musicians), various colleagues, and many students. From my observations, which include observing myself, I’ve concluded that virtually anyone can learn to be creative… or I should say be more creative, since no one who has made it through childhood starts from ground zero. Creative ability, I strongly believe, is far less an inherent talent than an affirmative choice.
To choose to be creative means dedicating yourself, working with great intensity, and continually pushing yourself to improve. It means being open to new ways of seeing, and it helps if you master the tools of the trade, which runs counter to the way in which most people make pictures. Most find a subject that interests them, decide quickly how to approach it in terms of camera position, lens choice, etc., raise their camera, and–using auto-focus and program exposure mode–click the shutter. Then, they move on in search of their next photographic quarry. Their energy is spent primarily on finding many subjects rather than exploring subjects carefully and with a fresh eye. Mind you, I’ve logged my share of miles searching for intriguing subjects, but that’s no substitute for applying thought, imagination, and effort to the subjects you find. Even top pros will fall into a rut unless they stay mentally sharp and demand the best of themselves.
My favorite method for sharpening creative vision is photographing the same theme or subject in many different ways. Variations on a theme forces you to see beyond your initial, and generally conventional, instincts. You must take more time, look more carefully, and think more about the range of visual possibilities.
As an example, I chose the Jefferson Memorial in Washington D.C. I offer my pictures and tips as food for thought, but remember that being creative is not about seeing as someone else does; it’s about seeing your own way and pleasing yourself. So pick a subject that interests you—some person, object, or place—and start photographing.
Let’s get started…
Lens Choice
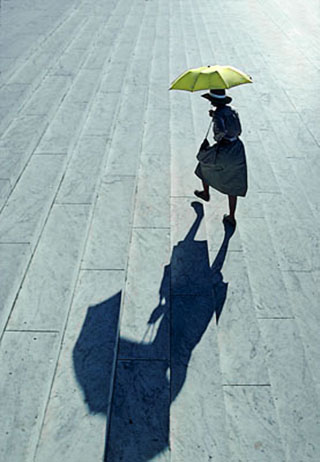
Observe your subject with wide angle, normal, telephoto and panoramic eyes (example – lead photo ).
How will different focal lengths change the relative sizes of elements in the picture?
How will changing lenses affect the amount of foreground/background that’s visible?
How will it change depth of field?
TIP: Learn what each lens is capable of doing and then work with them – practice. Over time, you’ll be able to choose which lens is best in order to achieve your creative vision.
Note: I used a pan camera for the lead photo, but alternatively, you can make multiple images and digitally stitch them together.

With popular subjects, like the Jefferson Memorial and cherry blossoms, avoiding clichés poses a special challenge.
Composition
Is the center of interest in the center? Should it be?
Is every element in the frame needed?
Is there an interesting relationship among the various objects in your photo?
Is there a balance of picture elements?
Don’t forget to think vertically as well as horizontally.
TIP: Study design elements, the Rule of Thirds
and the Golden Ratio for well-balanced images. When the rules are known, then by all means, get creative and break those rules if it produces an image that is pleasing to the eye.
Get Low – Get High – Try All the Angles
Ask all the, “What if I tried…” questions?
Most pictures are made from five to six feet high – the height of most people’s eyes. You get a predictable look and often one that doesn’t put the emphasis where you want it.
Looking straight ahead is normal, which often results in an expectable visual feel, so be sure to look up, down and sideways.
TIP: Before you leave the scene, evaluate all the various ways to make the image. Move around, look at it and photograph from many different perspectives. Be sure you have answered the what if I tried question by trying to get higher, lower or photographing from various sides of the subject.
Climbing onto a balustrade gave me the desired perspective.
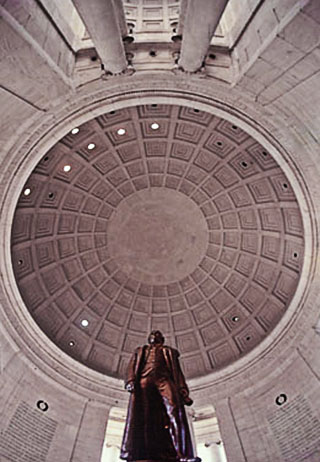
Here, I’m looking almost straight up using a fisheye lens.
F-stop & Focal Point
Depending upon the f-stop, focal point, and lens you choose, you have tremendous control over what’s in focus.
TIP: Before you walk away, try a variety of f-stops and focal points and then review the images. Which one provides you with the best overall look to the scene? Keep at it until you get the, “Awe, that’s it”, image!
Foreground/Background
Do foreground and/or background elements effectively “vibrate” with the main subject in terms of color, shape, contrast, texture, and content?
TIP: Be sure to check the edges of the image frame for any distracting elements that don’t resonate with the overall scene.

With a telephoto lens and aperture of f/22, focus was on the tulips. The Jefferson Memorial in the far background still remains recognizable.

Look for interesting juxtapositions, such as where the bend of a branch mimics the curve of the dome. A silhouette aids in the dramatic effect.
Patience
Patience often pays big rewards, whether it’s waiting for just the right light, for the action to start, or for a clear view.
TIP: Slow down and take the time needed to make your image sing.

From scouting, I knew a great image could be made if I could get up high on a ladder in the middle of a busy road that winds around the memorial. I waited for a rare moment when the roads were almost vacant. On my ladder, I waited half an hour for something to happen. A tourist came by and and not only became the picture’s focal point, but he added a sense of scale.

The warm like brings out all of the graphic details.

Sunlight creates warm tones to the pillars, while the steps in the shade have cool tones.
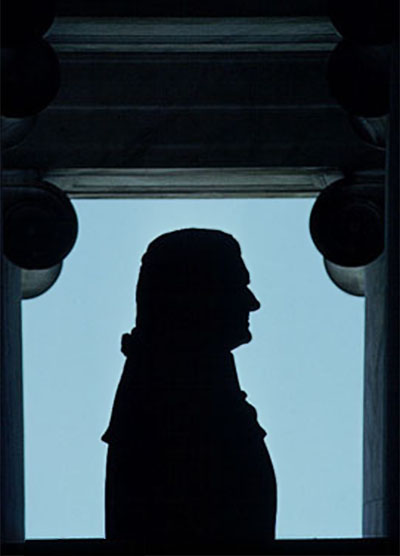
By taking a manual exposure reading of the sky, what’s in the shade goes dark.
By Steve Gottlieb
Article and photos: © 2015 Steve Gottlieb. All rights reserved.
Leave a Reply