
Copyright © Ron Veto 2010 All rights reserved.
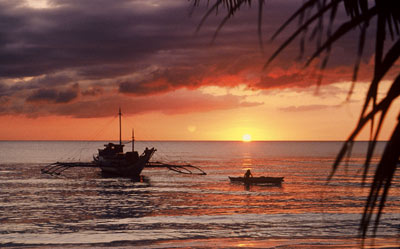
I’ll never forget the stunning Sunset’s on Boracay Beach, Southern Philippine Islands.
“Twenty years from now you will be more disappointed by the things you didn’t do than by the ones you did do. So throw off the bowlines, sail away from the safe harbor. Catch the trade winds in your sails. Explore. Dream. Discover.” – Mark Twain
The photo trip has been planned and now it’s time to make those decisions on what to pack, so I’ll present my travel packing strategy and help you tackle issues before they could become potential problems on your trip.
Through the years on the road I’ve learned I needed to sacrifice my comfort level a bit to make room for my camera gear. I love my photography, so don’t make me choose between my 20mm and my tooth brush. I find I always have a much better trip if I under pack and leave room for a few small souvenirs. It may be too sparse and it maybe even too much for some, but I feel it is a good place to start.
Learn to streamline your gear to custom fit your traveling style—every traveler has his/her own comfort level while traveling. Mine is geared towards month long photography trips while hopping from country to country.
First of all, I dump the suitcases.If I can’t run to catch that train or power that pack up stairs, it’s time to scale down the load. Have an idea of what you can comfortably carry—for me it’s around 100 pounds—not for the “faint of heart”! Included in that is camera gear that weighs nearly 40 pounds.
The second key to easy travel is clever packing. The secret is to have many organized compartments. Just like organizing the desktop of your computer, you need to structure it so your brain naturally knows what goes where. No one can organize your files or pack your bags like you can. But there are certain logical tips which hopefully will make life easier.
MY PACKING SYSTEM:
Copyright © Ron Veto 2010 All rights reserved.
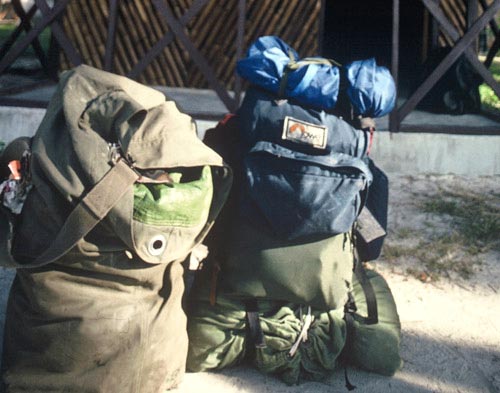
EXTERIOR BAGS for on the road (from country to country & hotel to hotel):
1. Main soft structured back pack
2. Customized military duffle bag (they are cheap, strong, practical and have interesting designs
and ideas)
3. Black airline carry-on pack with a day pack packed inside
4. Camera bag
These packs are your best friends and a link to home. Each bag has it’s own lock and security cable. Also attached to the cable are a few small loud bells which can alert you if anyone is tampering with your bags or are attempting to move them.
Inside of my main customized military duffle bag I also add a empty spill over military duffle bag as part of my kit–lock and security cable included. This second utility duffle bag will be used for storage while on the road or as a container to ship items or larger souvenirs back home.
Note:I may carry two duffle bags eventually, so if that happens, I divide them evenly in weight. I will start with one main pack and as the trip unfolds I may unpack the second duffle bag if needed. Being over weight is like the “tail wagging the dog”! No one in their right mind wants to physically carry around too much weight, so be cautious in making that decision. It seriously adds stress to the daily logistics of travel. It slows you down, not to mention wear and tear on the body–on the bus, off the bus, on the boat, to the train and up the stairs to your room. Over and over—Ouch!
And, if your luggage is not prepped you’ll find you have to plan your travels from place to place based on the constraints of your weight. Having to pay expensive over weight airport fines gets serious (50 pounds allowed). It limits your options and forces you to digest a new travel plan. It may force you to take buses or trains, when flying would be more efficient.
“He who would travel happily must travel light.” -St.Exuperymar
Within the External Packs are My Internal Bags or Sacks.
Copyright © Ron Veto 2010 All rights reserved.
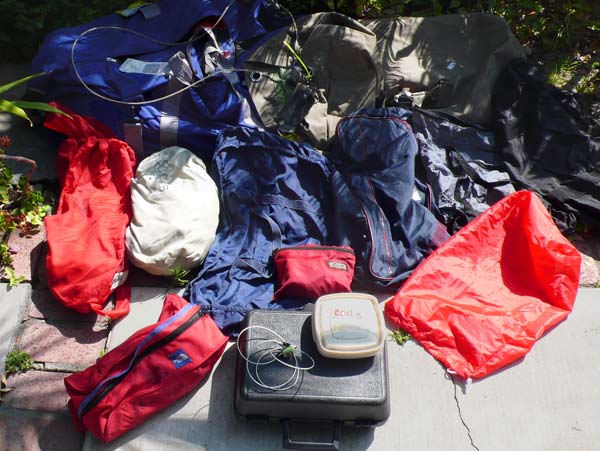
INTERNAL BAGS OR SACKS—Color coded to keep things organized and easy to find:
Red Sack: under garments
White Sack: socks and other soft items like sarong and a extra towel
Gray Sack: tee shirts and tank tops.
Two Blue Sacks: long pants, belts, short pants
Black Sack: sandals and tennis walking shoes, windbreaker, 2-plastic bags and any small trinkets or souvenirs. I happen to collect small elephants.
Black Hard Plastic Case: breakable items
And 3 Small Additional Red Containers—
First Removed on Arrival & Last to Repack on Departure. Having essential items in a bright red color helps in the frenetic early morning packing process when last second items can be forgotten. You won’t miss seeing them.
Copyright © Ron Veto 2010 All rights reserved.
Tip: When designing your main pack, try to incorporate side compartments for your “3 Red Containers”, making them easily accessible.
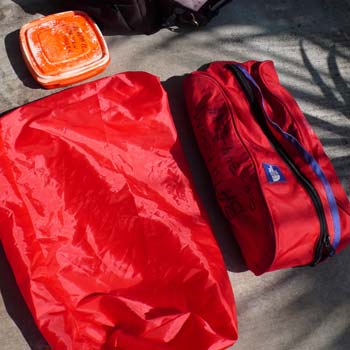
1. Red plastic, 6”x 6” water proof container (paint it red if need be) for items such as: reading glasses, two small electric alarm clocks and a very small travel flash light. Mosquito coils, since they are fragile, should also be protected by a hard case.
Note: When lit, the smoke from mosquito coils deter insects and the serious diseases they may harbor, such as, dengue fever and malaria.
2. Red pillow case: use inverted (keeps sleeping side clean) to store a small single bed sheet (insurance for those chilly nights with over active hotel air conditioners or for chilly bus travel). Some hotel pillows are hard and/or very thick which negatively affects your sleep. Turn your pillow case right-side out and stuff it with your sheet, clothes or towels to control your pillow height.
3. Red Sack holding: shaving gear, toiletries and/or cosmetics.
Tips:
1. On arrival to your room, place your varied colored sacks out in a line along a wall out of the way of house keeper traffic. You can then easily and quickly organize and keep track of your items.
2. Try to pack your clothes the night before travel to your next destination.
3. If possible take the time to relax, review your guide book and collect your thoughts for the next day’s journey.
4. Always carefully scan the room before checking out & pack those last “3 Red Containers”.
Copyright © Ron Veto 2010 All rights reserved.
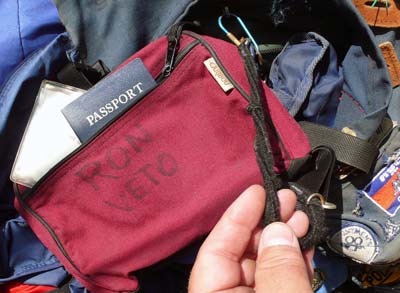
Passports, big money, and important documents all live in this red pouch. I tether the red bag to my main day pack. In crowded and frenetic airports and hotel check-in counters it helps keep everything together and in control. The color red helps visibility.
IMPORTANT PAPERS
I keep my day pack inside the larger black carry on while traveling from place to place. It’s been customized through the years to become a great pack and tethered by an 18″ leader inside the day pack is a small red pouch. This red pouch is my “travel brain”–my money, tickets and most valued documents. Once at a location, I can unpack my day pack from my black carry on and go on my way, knowing all is secure.
Note: I use dog collar leashes which have clips on both ends to attach my pack and pouch together. When you find yourself presenting documents, tickets or changing money you can never misplace and lose your pouch–it’s tied to the pack. During these times we’re easily distracted and most vulnerable to mistakes or pick pockets. Stand your ground and protect your day pack, while always having a smile on your face. In Asia that goes a long way for stress free travel, but don’t be too shy. You need to be somewhat aggressive in a polite way to get anything accomplished.
ADDITIONS TO THE MAIN PACK
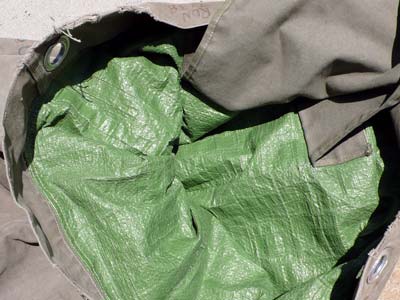
Rivet a second waterproof bag to your main pack for wet/sandy shoes or clothes–no need to soil your clean clothes inside the pack. This liner also adds that rain protection to your gear, especially during Indian bus trips where your bags are stored on top of the bus.
Copyright © Ron Veto 2010 All rights reserved.
Sew waterproof rip stop plastic to the inside of the military duffle bag. It provides protection from weather and the rip stop creates a double layer, making it a good theft deterrent against knifes and razors. It’s low key and doesn’t attract attention.
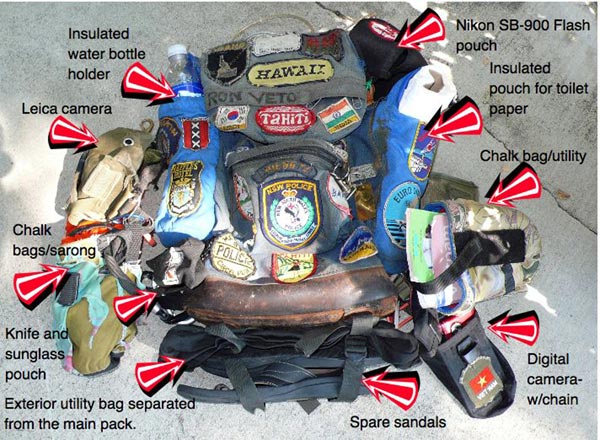
THE CAMERA BAG, THE DAY PACK & CHOCK BAGS
My black camera bag is the one which I carry most of my gear when in transit and it has a tendency to become heavy. It needs to become part of me, so to keep the straps and bag from falling off my shoulders I custom made a strap system.

Copyright © Ron Veto 2010 All rights reserved.
First I added a rubber friction piece of rubber to help it adhere to my shoulder. I did this by sewing it to the main strap. I made this main strap extra wide, adding more surface area on my shoulder—prevents it from sliding.
Then I added a second strap which goes around my neck. The combination of these two additions makes it possible to run and even to bend over without worrying about losing my precious camera bag. I have a quick release snap which makes it easy to get in and out. This system works great.
I added custom rain covers and organizational accessory compartments on my day pack. Traveling with cameras and many lenses requires preparation. Making quick lens changes in the middle of Bangkok traffic requires concentration and a sense of awareness to everything flying around you. Anything you can do for yourself to create an organized system makes lens changes less stressful and gives you more time to shoot, resulting in more “keeper photos”.
Copyright © Ron Veto 2010 All rights reserved.
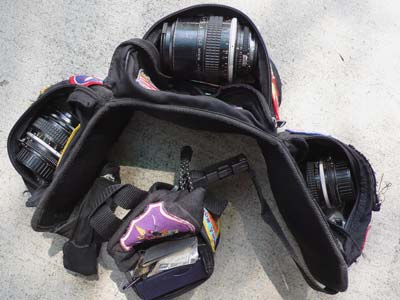
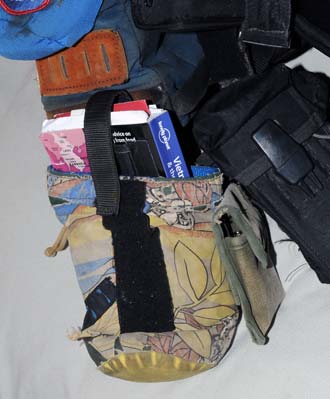
I always carry three prime lenses, so I have my packs altered to fit my style. I use this waist pack to offer quick access to my glass. I lace the chock bags thru my straps to keep them at a nice working position. You will notice I added a male/female Velcro strap to keep everything in place.
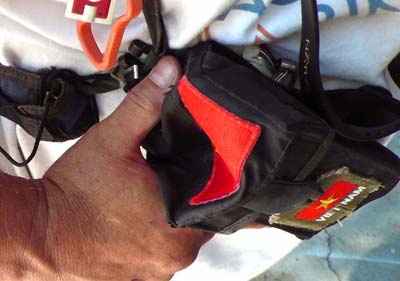
I carry two common mountain climber’s chock bags attached to my day pack: one as a quick lens changing pouch and the other for my Sarong (great for lying on the beach, gear protection, picnics or…….). They have a large opening with a pull tie, a soft interior, and they offer quick access. I usually have one bag on either shoulder strap at chest level. Military ammo pouches also work well as some have secure buckles to keep it closed.
Copyright © Ron Veto 2010 All rights reserved.
Chock bags work well for holding a water bottle, travel books or lenses. They attach easily to your day pack to help keep gear organized and ready for action.
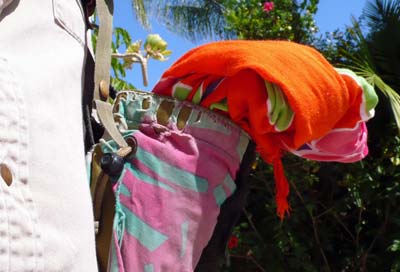
Having instant access to a sarong is a good idea.
It has helped save my trip and saved me from injury. A simple sarong can do that?
Yes it can, and did.
My Tale of Woe: Beware of Dogs in Asia

Copyright © Ron Veto 2010 All rights reserved.
Life is tough for this mangy old Thai street dog. These wild dogs can end your trip. Check out his loss of hair & the hole in his testicles. Ouch! No doubt he’s working on his fleas in this shot.
The choice: Should I walk around this large Bangkok block or confront a pack of unpredictable wild street dogs just yards from my hotel? The single male stray looking and scrounging for trash is dangerous in itself. But the mentality of a pack is very different. They see you as a prize to be kept. They will actually fight among themselves tearing your body apart trying to get possession of their new toy, which is you. I was almost that victim—obviously I made a poor choice!
I was confronted years ago by this group of 7 wild Bangkok street dogs. By the time I re-evaluated my position it was too late. A confrontation was happening. The Alpha male kept coming up to smell me–taking small snaps at my legs. I kept my hands up in the air but low enough to protect my torso area. There are a couple things which are 90% effective in discouraging a attack. If you feel a attack is going to happen, yell loudly “NO” while backing up slowly–don’t run, don’t stop, always making eye contact. Trying not to show fear is hard if not impossible. I was scared! My hairs on the back of my neck were on end. Then throw a object away from you as far as you can–a purse, umbrella or anything which will distract their attention and give them something for which to fight. I used that trusty sarong. It’s a competition between males for possession. You want to separate yourself from the new object. Continue walking away, never turning your back until the danger is over. They tore that sarong into pieces as I was making my escape, never running, never stopping. You have to use the mindset of these wild dogs to make a escape for yourself. Getting bit by a wild dog, rat or even a monkey can spell disaster for your trip. Be safe and avoid when ever possible.
“On a long journey even a straw weighs heavy.” – Spanish proverb
CUSTOM BUILD YOUR PACK
Take the time to custom build a pack that will meet your needs
and it will make a big difference in the total success of your photo safari.
All above photo: Copyright © Ron Veto 2010 All rights reserved.
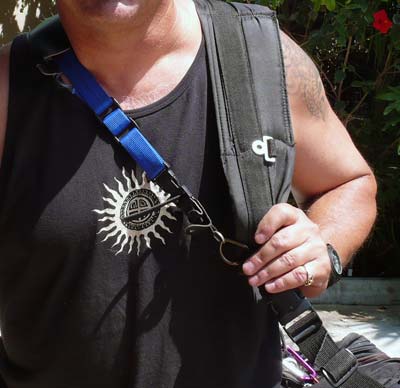
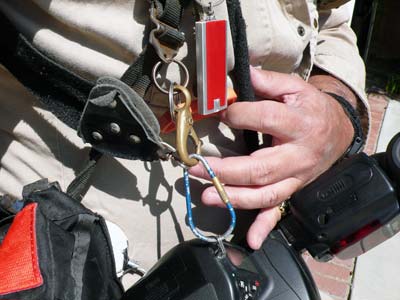
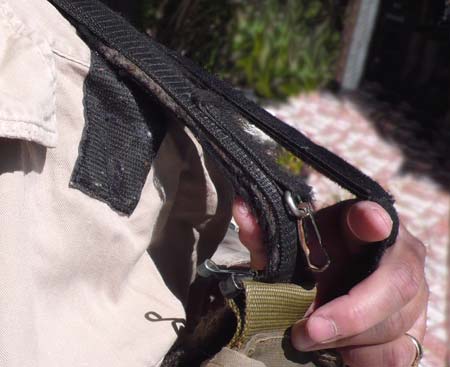
Adding harness hooks and swivel snaps at chest height on the shoulder straps of your day pack lets you hang and secure your camera to your body while in transit—vehicle to vehicle or boat to boat. It also takes some of the camera weight off the shoulders. Using the hooks keeps the camera tight against the body when you’re not shooting, yet makes it quickly accessible for a last second shot–they all seem to be last second shots when you’re in an action packed area. It also adds a bit of security from a camera snatcher. You will also notice I added a small red flash light which comes in handy for low light camera adjustments and general utility.
Flashlights: The importance of a flashlight is usually over looked until that special moment you really need some light. Not having a light puts you at risk–I always carry two:
1. A small LED flashlight attached to my pack strap—a bend of the arm and it’s there. In other words I don’t need a flashlight to find my flashlight.
2. A Maglite on a holder on my pack. It has many uses–hang it from a string from your room or hut or set it upright and use as a candle on the table.
~~~~~
Friend’s Tale of Woe
One night my friend and I were on this small island in Indonesia. We decided to go for a walk to have dinner, followed by a few drinks. I came back to my hut early, but my buddy stayed into the night. By midnight or so my friend decided to return to his hut. He started to walk back when the lights suddenly went out. When you’re in the jungle setting it gets really black out there. If it happens to be a moonless night the footpath becomes invisible and useless. The next day I went to his hut to see if he wanted to eat breakfast. He wasn’t there and hadn’t been all night. I started to go to breakfast when out of the blue this activity came from the bushes–he had wondered thru the night trying to find his way back to our bungalow. Realizing it was impossible, he settled down and slept under a Coco palm tree. Not the most comfortable night for him. After that night he always kept his flash lights handy.
~~~~~
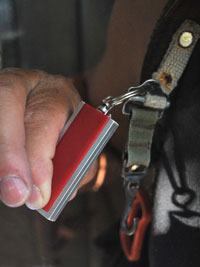
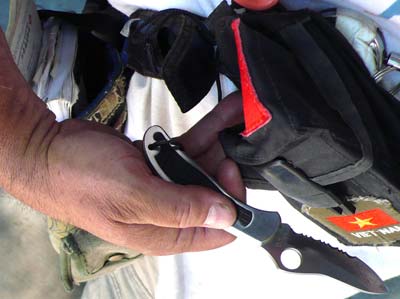
Pocket knife—always a handy tool: Using a sunglasses strap to prevent loss, I attach one end to the knife and the other end to my pack–invisible but very quick to find. If I need it in an emergency I can quickly pull it and it becomes loose.
Tip: Always remember to pack a knife in your main pack when boarding a airplane or it will be confiscated.
NEED TO MAKE ALTERATIONS?
Many alterations can be done cheaply in country and on the fly. Access to mountain gear and hardware is readily available and are fun accessories. Military surplus stores are always cheap and interesting, having lots of gear which can be used for travel.
For alteration or repair I stay away from outdoor shops or pack repair services unless parts are an issue, which is rare. I take my gear to my neighborhood shoe repair. I mark and/or glue or pin the object where I want, and let him go at it. The shoe repair has the much needed horsepower to sew or rivet thru the thickest leather pack straps. You need to be hands on and provide exact direction. Usually it’s a real bargain and the repairman likes getting a break from his normal routine.
Tip: When walking around with my camera I would get annoyed by the camera straps always slipping down my arm. This layer on top of layer of Velcro keeps everything tied together on my shoulder, allows me to be more active, and it works great.
Copyright © Ron Veto 2010 All rights reserved.
I rig all the straps for my pack & camera to stay on my shoulder.
1. Sew the looped side of Velcro to the shoulders of your traveling/shooting shirts.
2. Sew the soft side to the underside of your pack straps, while sewing the looped side to the top of the pack straps.
3. Sew the soft side to the underside of the camera straps.
Having the key, proper essentials will make or break a dream vacation.
Clever packing will make for a more enjoyable, efficient and user friendly trip, so take the time to plan what you absolutely want to carry, organize it, customize it and personalize it for yourself.
Copyright © Ron Veto 2010 All rights reserved.
Tip: Do a practice run at home before you travel–know that you
can carry the weight and know where you can find things quickly.
“I travel light; as light, that is, as a man can travel who will still carry his body
around because of its sentimental value.” – Christopher Fry (b.1970) British playwright
Happy Travels
Photo Wanderlust – Part II: Preparing for a “Country Hopping” Photo Adventure
Photo Wanderlust – Part III: Security for a “Country Hopping” Photo Adventure
Photo Wanderlust – Part IV: Bus Travel for a “Country Hopping” Photo Adventure
Photo Wanderlust – Part V: “Hunting People” with My Camera
by Ron Veto
Leave a Reply