
Copyright © John Watts
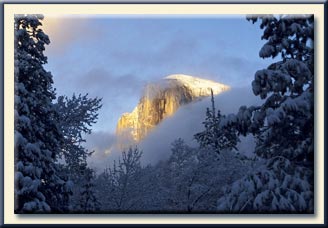
Half Dome at Yosemite National Park, California
There are links to updated articles below for everyone using CS6/CC.
I want to share the effects of the digital realm on photofinishing from the
perspective of 25 years of experience as a custom photofinisher. I define
photofinishing as the art and science of making photographic prints.
In this column, I will be concentrating on Saturation, Sharpness, Cropping and Straightening the Horizon as few of the basic elements of a good color print using Photoshop as my “darkroom enlarger”.
In my opinion, too much emphasis in the digital realm is placed on the “widgets & gadgets” available and not enough on what makes a good print.
The process always starts with a well-exposed and composed image. Remember, GIGO—garbage in, garbage out. Learn how to properly use your camera. While Photoshop is a great tool for enhancement, it is not a “miracle program” for correcting poor photography.
So what makes a good color print and how do we use the basics of
Photoshop to achieve it?
Get up-to-date information on CS6/CC here.
There are 8 basic elements.
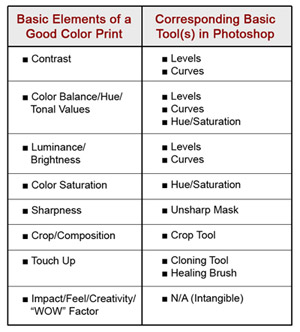
To make good prints, you only need to use about 10 -15% of Photoshop’s functionality, so don’t let it overwhelm you.
K.I.S.S. – Keep it super simple.
The tools listed are the simplest and most effective ways for photofinishing. If one tool is not getting you the desired result, try another one or try a combination from the list.
As an aside, I find the generic tools such as the “Brightness /Contrast” controls are too global or destructive to the image to be of any major use.
Saturation & Sharpness
As my wife and I go to various art shows, galleries, contests and photo club
exhibits, we notice two common Photoshop errors repeatedly. If someone looks
at your print and says, “Oh, that’s digital!”, it is usually not a compliment. It
usually denotes manipulation and phoniness. There is probably nothing wrong
with the original image. More than likely it is just over-saturated and over-sharpened in Photoshop. My thoughts on this – these are the two most abused functions in digital printing. What does this mean? It means that the colors are unrealistic and unnatural to the point of creating posterization and pixelization and that lines and objects are so sharp that you are getting a slight “halo” effect.
So, as you are working with your digital image in Photoshop, what do you do to
avoid this?
Let’s start with Saturation – defined as the intensity or purity of a color. The trick is to keep your colors looking natural and not too intense. Trying to increase the amount of a color that is just not there will create a sense of phoniness. Use a Hue/Saturation adjustment layer to make your corrections. (This will be covered in more depth in next month’s article.)
Now let’s talk about Sharpness. Again, the trick is to keep things looking natural and not too intense.
In Photoshop, open “Unsharp Mask’ and try starting with Amount: 75, Radius: 1.0 and Threshold: 2. Increase the “Amount” slider slightly until you start to see sharp edges, then back off a bit.
By the way, if yourimage is not fairly sharp to begin with, you cannot use the sharpening features in Photoshop to sharpen it.
Cropping
Get up-to-date on cropping with CS6/CC here.
So you’ve been out taking pictures and you’ve captured the killer image: your exposure is “spot-on”, your lighting is right, but it’s missing something. Is there a hot spot in your image that needs to be eliminated? Is your main subject matter lost in the clutter of your image? If your image is a panoramic, is there too much sky or foreground? How can you easily focus more on the main subject of your shot and eliminate unwanted objects and distractions? The answer is to experiment with cropping.
In Photoshop, this is accomplished with the Crop Tool. You can find it in the Toolbox. In the Options Bar, you can select your desired width, height, and DPI, so let’s look at the options.
1. To start, put your mouse cursor in the upper left portion of your image, hold down the left mouse button, and drag down to the bottom right area of your image. This creates a Crop Marquee. Don’t worry about being too precise. You can fine-tune your crop by:
2. Resizing – put your cursor on one of the boxes in the corners and change the size of the crop marquee.
3. Moving – put your cursor inside the crop marquee, hold down the left mouse button, and drag the crop area.
4. Moving minutely – by using your arrow keys.
5. Rotating – put the cursor near one of the boxes in the corner until a curved arrow shows up, hold down the left mouse button, and move clockwise or counterclockwise as desired.
6. You can visually double-check your crop by putting a “Shield” around the area to be cropped out. Just check the “Shield” box in the Options Bar. You can also change the color and opacity of your shield.
7. Once you’ve got your desired crop, click on the “” button in the Options Bar.
Now you can experiment with the “rule of thirds”, horizontal vs. vertical cropping, and multiple crops from the same image – the possibilities are endless.
Straighten the Horizon
Get up-to-date information here.
Maybe the horizon in the photo is not quite straight. If not, it can be very distracting. Here’s an easy way to straighten it.
1. Choose the “Measure Tool” (click the “Hidden Tool Triangle” in your Toolbox under the “Eyedropper Tool”)
2. Draw a line along your horizon.
3. Go to the “Image” menu, choose “Rotate Canvas”, choose arbitrary, leave the number alone, and click “OK”.
Voila! Your horizon is now straight! By the way, this technique works equally well if you need to straighten vertically.
Take some time to play around with these various tools and have fun.
If you keep these few points in mind as you are printing, you will find that a good image becomes a very good image!
Next month I will cover Color and Contrast – see you then.
by John Watts
Leave a Reply