
Australia is an amazing country and continent. It has some of the most diverse and spectacular scenery in the world with the desolate outback, iconic red deserts, deep canyons, rugged coastlines and the Great Barrier Reef. A Great Ocean Road Photography Trip is an amazing experience, and highly recommended

Part of this astounding scenery includes the sea cliffs along the “The Great Ocean Road” located just south of Melbourne where the Southern Ocean, the most ferocious body of water in the world, crashes furiously against the shore, constantly reshaping the landscape. The Southern Ocean separates Australia from Antarctica, and has carved some of the most bizarre and beautiful formations in the world.
Planning For Great Ocean Road Photography Trip
The Great Ocean Road can be driven in one day, but you really need to give it at least two, and preferably three days, to fully explore and appreciate the territory. The two lane highway hugs the coast for the entire length of the road, 150 miles, between the towns of Torquay on the east and Warrnambool to the west.
I’ve visited the area twice and on each occasion spent three days photographing the area, which is barely enough time explore the highlights.
On our most recent visit I carried my Nikon D300 and three Nikon zoom lenses: 12-24mm, 18-200mm and 80-400mm. Doris used her Canon D50 and three lenses: Sigma 12-24mm, Canon 18-200mm and Canon 100-400mm.
We both brought our Gitzo 1155T travel tripods. Since the digital bodies have 1.5x crop factors, our lenses covered the 35mm equivalent of 18-600mm which was quite sufficient. You’ll use all the lenses you’ve got on the variety of subjects from wide landscapes to macros, flowers, birds and wildlife.
If you’re familiar with HDR or have panoramic software you can have a field day along the Great Ocean Road utilizing these tools.
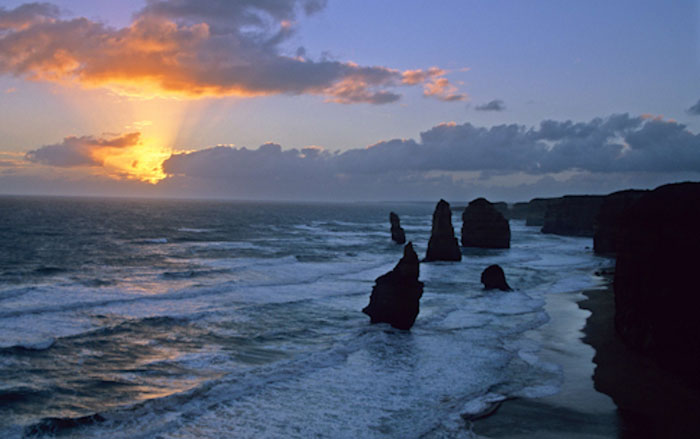
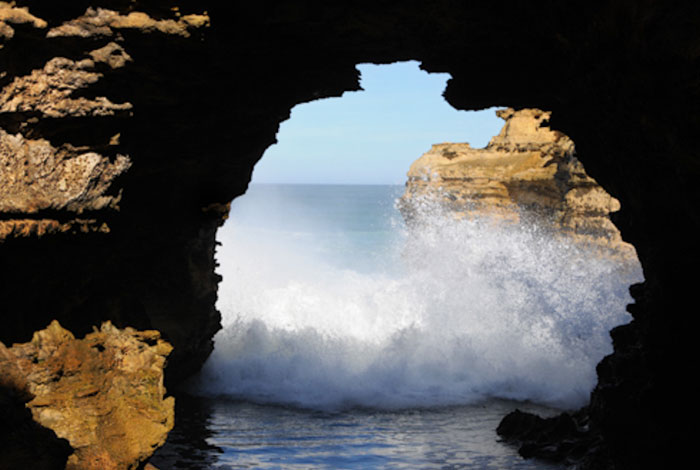
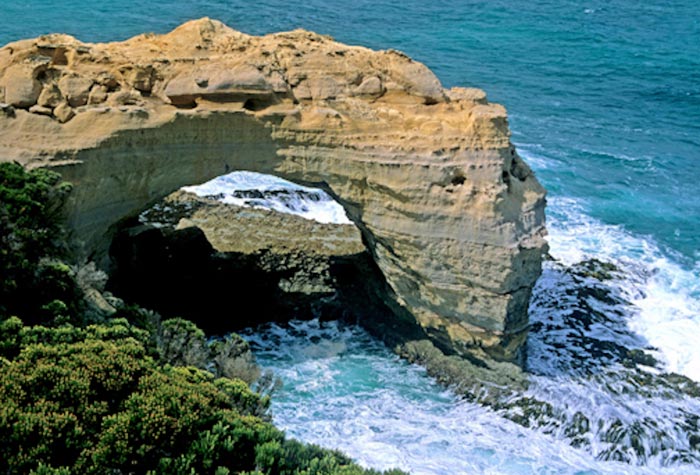
The most famous cliffs and formations along the Great Ocean Road are located in Port Campbell National Park and include the Twelve Apostles, Loch Ard Gorge, London Bridge, the Arch and the Grotto.
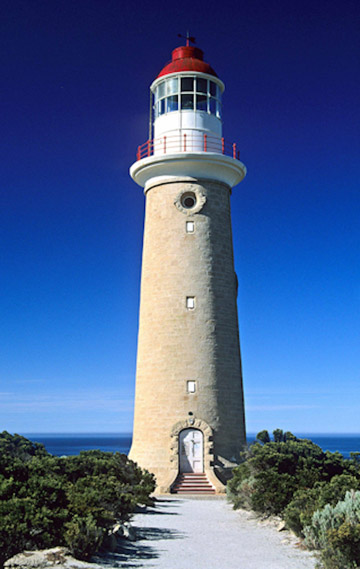
Two gorgeous lighthouses, Split Rock and Cape Otway, were built along the coast to protect ships from those great formations. Although early morning and late afternoon produce the best light for photography, mid-day at some of these locations allows for less shadows interfering in the shots of the formations.
Loch Ard Gorge is a prime example where mid-day shooting is suggested since the golden hours create distracting shadows. On the other hand some of the most famous and iconic photographs in Australia are images of the Twelve Apostles in late afternoon around sunset.
As with all outdoor and nature photography, the background is a critical part of the image. The cliché of “what is excluded from an image is just as important as what is included” applies along a Great Ocean Road photography trip. Your main subject relies on everything else around it to create the beauty and the grace of the total image.
With incredible seaside cliffs and formations along the Australian coast, you need to stay observant of what’s happening in the background; in this case the sky, sun, clouds, waves and surf. Depending on the time of day and weather conditions each one of these will either be interesting, boring, bright or distracting.
Only one of these (“interesting”) will improve an image.
If the sky is clear, hot or washed out, you’ll want to include as little as possible in your image. Try to include just a sliver, if any at all, at the top of your image. On the other hand if there are picturesque clouds in the sky, include them.
But be aware of the dynamic range of light between the sky and your subject. If the sky and clouds are much brighter than the subject you could end up with washed-out clouds in your image. You can compensate by using a split neutral density filter or by using HDR (Photomatix is a great software tool for processing HDR images).
Another alternative is to adjust the tonality in Photoshop. The risk with this is that the clouds might still be washed out if enough detail was not captured in the image.
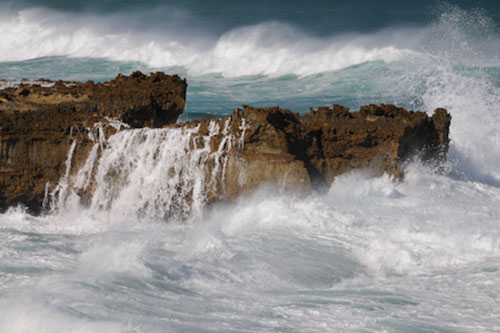
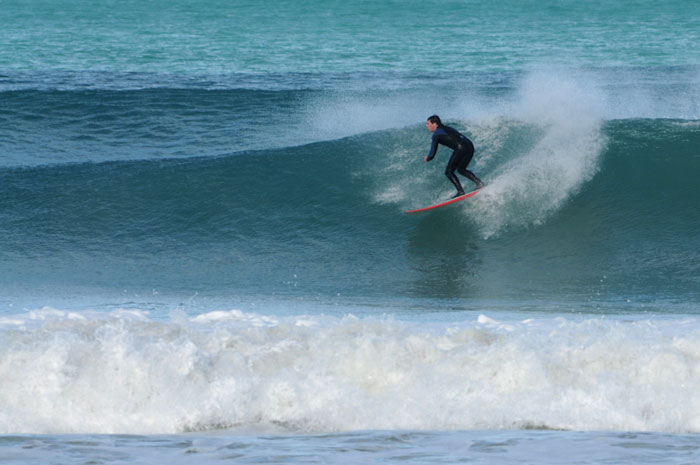
When you want to include surf or sea waves in your image, observe the ocean for a while before shooting. In the accompanying images that include waves or surf I watched the rhythm of the ocean for a while and then shot when I knew they would be crashing.
Decide if you want a pastoral image with quiet waters or an exciting image with active waves and surf. Choose your moment carefully and shoot in burst mode while the waves or surf crash on the rocks or shore. Most SLR’s will shoot bursts of at least 4 frames per second.
You can use a lot of memory with action shots so be sure you have plenty of room on your card. To totally freeze the waves shoot at shutter speeds of 1/400 sec. or higher and to capture a classically blurred effect (i.e. cotton candy) shoot at 1/8 sec. At the slower speed you’ll most likely need a tripod and/or much higher ISO setting in order to avoid image blur. Experiment and be sure to also shoot somewhere in between for a “blurry frozen” effect.
It is important to bring a tripod when embarking the Great Ocean Road photography trip. There are sturdy, compact tripods that are perfect for travel. Gitzo makes some that weigh less than three pounds and fold to 20”. By adding a quality lightweight ballhead you can have a setup that will keep your equipment solid in the constant breezes and will travel with you easily.
I carry a Gitzo 1155T tripod (2 lbs) topped off with a Really Right Stuff BH-40 ballhead (1 lb). This is solid enough for zoom lenses up to 400mm f/5.6. The tripod supports over ten pounds of gear securely, fits into my carry-on luggage and passes through TSA security with no problem.
With good tripod techniques you don’t need to lose any images to blur. The main issue is price – these tripods and ballheads are not cheap, but well worth the investment.
With strong winds along the Great Ocean Road you’ll be glad you brought a tripod. A sudden gust will send your unattended equipment to the ground in a flash.
Unfortunately I know from personal experience. On my first visit I had set up my tripod on a cliff along the coast and then turned around to get something out of my photo bag. A gust swooped in and blew the tripod over before I could reach around to grab it. I could only watch in horror as my tripod and camera, seemingly in slow-motion, headed for the ground.
I grabbed the tripod as the camera hit the ground but it was too late. The lens hit first and cracked, but luckily the camera body was not damaged. It was not a good feeling. Fortunately I had two more lenses but it was a hard lesson — and a good reminder to never leave a tripod unattended, especially in a breeze.
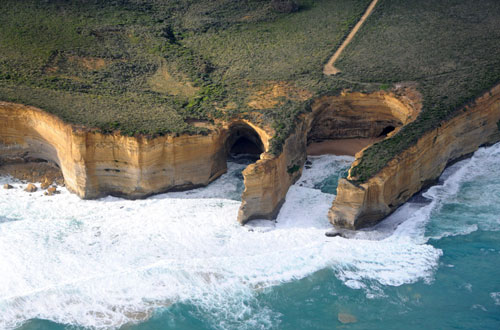
Make time for a helicopter ride over the Shipwreck Coast. It is an incredible and amazing way to see the landmarks and rugged shore from a bird’s eye view. The vast ferocity of the sea becomes more apparent from the air.
The heliport is next to the Twelve Apostles visitor center and advance reservations are highly recommended since there are so many groups passing through. Photography from a helicopter adds a dimension to your portfolio that is not appreciated until you do it.
The view along the Great Ocean Road is jaw-dropping with miles of rocky, rugged shoreline, cliffs and ferocious seas stretching out in front of you.
When shooting from a helicopter, stay relaxed, breathe easy, remain aware of your metering and settings and most importantly, keep shooting. It is easy to become excited about the view and forget camera basics. Don’t let that happen.
Choose your lens before boarding and use just that one. Bring just your camera and one lens and leave the bag and other gear in the car. You don’t want to waste time changing lenses, because the landscape moves quickly and you won’t get a second chance for a shot. I generally use the 18-200mm zoom lens in helicopters because of its wide range of focal lengths.
If the helicopter window is closed hold the camera against the pane and use your hand to minimize vibrations. Remember to cradle the camera securely in your hands for extra stability. Whether you meter in manual or Aperture Priority mode try to choose your settings and metering ahead of time.
You want to spend minimal time fidgeting with settings and metering. You’ll want to have your flight time filled with easy breathing, clean composition and smart shooting.
The Great Ocean Road is an incredible experience. If you get the opportunity to visit I am sure you will not only have an amazing adventure but come home with some exceptional images.
And while you’re in Australia, you won’t want to miss out on all your opportunities.
Take some time to visit other fabulous locations and capture those memories with your camera.
© 2011 Doris Kolber. All rights reserved.
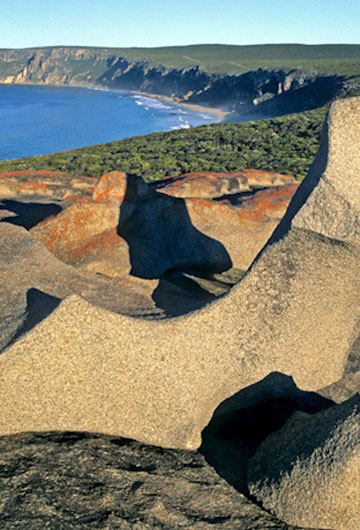
Granite sculptures at Remarkable Rocks are clusters of huge boulders chiseled by the forces of nature for almost 200 million years. Located in Flinders Chase National Park, Kangaroo Island, South Australia. The shadows point the way…
Canon EOS 7e; 28-135mm lens at 100mm;
f/16; speed unrecorded; Fuji Velvia 50 film;
Gitzo 1325 tripod; Bogen ballhead
by Cliff Kolber
Leave a Reply