
Why photograph people?
Human subjects offer an unending variety of expressions, moods, poses and of course facial and body shapes. They are both challenging and satisfying in a way no landscape or architectural subject can be.A vast number of the greatest photos of all time are of people – no wonder really, as we spend our lives surrounded by them.
People are also one of the most avoided photographic subjects for beginners – they don’t sit still and often don’t want to be photographed in the first place. And even if you get around to photographing your partner or best friend, chances are they’ll take one look at the print and say something like “oh, I don’t look that ugly – do I?”. Don’t worry – that’s their problem…
Start with a person
Any type of person will do – young, old, male, female. Set aside some time to take your photographs and explain to your subject that what you’re planning is ‘art’ and is neither snapshots nor for any other purpose than an artistic exercise (some people wonder why you’d want to photograph them and where they’ll end up). Do some preplanning – think about location, background, time of day or artificial lighting, clothes you want them to wear (or not) and of course film and equipment considerations.
When you’re starting out, pre-planning is essential. Deciding these issues when you’re with your subject can be frustrating and waste a lot of time. Be on time to the shoot. Spend some time talking to your sitter and relaxing them a little.
Talk about photography they like and bring examples of work you like if it helps describe your ideas. Don’t make a performance of the shoot – leave that to the seasoned fashion photographers. Just take it slowly, talking to your subject – observing the light on their face, how different expressions make wrinkles appear and disappear, how the shadows move as they turn their head.
Look into their eyes and make sure they’re in focus in the camera – these are the most important part of the face and they’re generally where the viewer of the image will first look. If your sitter is really nervous, try asking them to close their eyes and when you’re ready, ask him/her to open them and for a moment, chances are they’ll look relaxed, even unaware. Great portraits are created, rarely snapped.
Rules, rules rules
Read any book on photography and there’ll be a chapter on portraiture and a number of rules you ‘must’ follow. Ignore them! The only rule I’d suggest is to focus accurately on your subject’s eyes – always. If they’re at an angle to the camera, focus on the eye closer to the camera.
The only exception to this rule is when you’re using differential focus and have for example, the hands in focus, out from the body. In situations like this, just make sure the face is completely out of focus, or it’ll look like you’ve made a mistake.
Another common rule ‘to follow’ (if you must) is to use a lens longer than a standard focal length to minimize perspective distortion of the face. While it probably isn’t a good idea to take a full-frame closeup of someone’s face on a 20mm lens, telephoto lenses can sometimes make for a boring image – excluding additional subject from the background and completely flattening perspective.
Experiment – wide angle lenses are great for environmental portraiture as you can lead into your subject and then carry on to the background in a way no telephoto lens can. On the other hand, long lenses (such as a 200 or 300mm) can produce a background, so out of focus it becomes a ‘canvas’ and your subject could just as well be in the studio.
For ‘traditional’ portraiture, I find an 85 or 105mm lens ideal. The working distance between the photographer and subject is short enough to allow conversation, while still providing enough flattening of perspective to be flattering.
Until now, I’ve been referring to the 35mm format for simplicity, but of course there are many other camera and film formats you can use when photographing people. Medium format (120 film) in square (6x6cm) or rectangular format (6x7cm or 6×4.5cm) is a popular choice of many photographers (including myself) as it encourages a sense of space around the subject and offers a broad scope for composition. Due to its larger format size, it also permits greater cropping and/or enlargement of the image.
Another aspect common to medium format cameras is their waist level finder into which you view the image laterally reversed. This may sound confusing, but the very fact that you’re looking at the entire image rather than scanning it with your eyeball through a prism, tends to make for more considered compositions than with 35mm.
It also allows greater eye contact with your sitter as you have only to look up from the viewfinder rather than move your entire head around the camera to be seen. Older twin-lens cameras such as the Rolleiflex or Mamiyaflex are particularly nice to photograph people as the lack of a reflex-mirror makes the camera quiet and discreet to use. The second viewing lens can also be good to intrigue sitters, though make sure they are looking into the lower lens for direct eye contact.
Large format view cameras can produce some beautifully tonal portraits (for some good examples see the work of Richard Avedon), but it’s not something I’d recommend for beginners. I personally tried 8×10 portraiture in my final year at university and found the lack of immediate compositional/focus feedback and the long exposure times very challenging! Just be aware that with large format portraiture, some things are possible, though candid child portraits will drive you mad!
Color vs Black and White?
The big question – not the “answer to life, the universe and everything” – but what type of film is better for portraiture: color or B&W? This is as much about personal taste as anything, though I’m a great fan of B&W portraiture and I’m not ashamed to state it! Commercially, all of my editorial portraits are shot on color transparency film – a harsh medium, rarely flattering and bombarded by saturated colors.
Color negative film on the other hand is much softer and more tonal, as well has having greater exposure latitude than transparencies.
But when I look through my past 15 years of photographic portraits, 95% of my favorite images are shot on B&W film. It has a quality of simplification, excluding the distraction of color, instead concentrating on tone and form. Lighting is easier and less dependent on color temperature and contrast, and the final result of a B&W print just can’t be beat! Photographers such as Annie Liebowitz take amazing color portraits, but put incredible effort and expense into their lighting and makeup. Ultimately, the choice is up to you!
Film recommendations
Transparency – Stick to low contrast, medium speed emulsions such as Fujichrome Astia 100 or Kodak EPP 100. High saturation films such as Fuji Velvia have the tendency to render skin tones very warm, sometimes practically sunburnt! High-speed transparency films are rarely pleasing in terms of tone or color and tend to have a narrow exposure latitude which makes shooting more difficult for the beginner.
Color Negative – There are a number of color negative films out there specifically oriented toward the portrait and/or wedding photography market. They are low contrast emulsions which print neutral, pleasing skin tones. Fuji has NPS 160, Kodak – Portra 160 NC (neutral color) and Agfa has named their film imaginatively – Portrait 160.I’d suggest rating any of the above films at 100 ISO and you’ll find that not only can the film take the slight overexposure in its stride, the increase in density on the negative should give you a greater tonal range and more pleasing skin-tones.
Black and White – My advice here is to stick to conventional films. What? I hear you ask… Well, there are so-called T-Grain emulsions and there are conventional emulsions. From my experience and that of my friends and colleagues, T-Grain films such as TMax are less than ideal for portraiture. Try them out by all means, but do a comparison with a good, old fashioned film such as Kodak Tri-X or Ilford HP5 Plus and you’ll see what I’m talking about. As with color negative films, a little overexposure doesn’t hurt one bit and contrary to what I said about color transparency emulsions, I’d suggest using a 400 ISO film as it’ll have a greater tonal range and more exposure latitude than 100.
As a final note on B&W film – if you’re processing it yourself, avoid using liquid developers as they’re generally of the high acutance (sharpness) variety, which isn’t necessarily what you want with portraiture. I’d suggest using a ‘normal’ (eg. Kodak D76 or Ilford ID11) or‘fine grain’ developer (Kodak Microdol-X or Ilford Perceptol) as the results will be more tonal and therefore easier to print.
On with the show!
Now you know what film and camera to use, you might think you’re nearly there – but you’re not (sorry to disappoint). Lighting is one aspect of portrait photography that can make or destroy an image. There are dozens of books written specifically on lighting – what follows is a brief, practical introduction for those with a short attention span…
Studio Portrait Lighting – traditionally falls into three categories
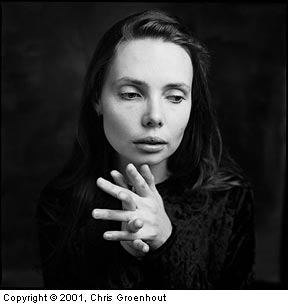
Midtone Lighting Technique – This probably encompasses 90% of both male and female portraits. The fundamental idea is to recreate window lighting – diffused, directional lighting from one side of the face. This can be achieved with either flash or continuous tungsten light, bounced off a reflective surface such as a wall, umbrella or reflector panel into the subject. To minimize contrast on the opposite side of the face, a reflector or additional light (at lower power) can be used. The ratio between the two lights determines how dramatic the effect is and how much contrast the film has to cope with. When shooting with transparency film, try to keep this contrast to a minimum (maybe 1 or 2 stops difference). On the other hand, using negative film (either B&W or color) gives you a much greater exposure latitude (maybe up to 4 stops?).
In all controlled lighting situations, the general rule for portraiture is to use a light source as large as possible in relation to the subject. This aids in the wrap-around nature of the light and minimizes any chance of unsightly shadows. Professional studios use ‘softboxes’ which fit over the front of flash heads and diffuse the light through multiple layers of fabric before it reaches the subject. The advantage of the softbox is the ability to accurately position it without any chance of light spilling onto the background or anywhere else you might not want it to go. On a negative note, they tend to be expensive and bulky.
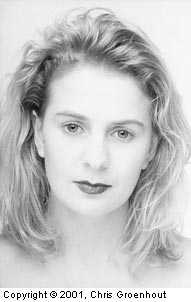
1/125th second at f11 (2×500 w/s flash heads with softboxes and red filter) Nikkor 85mm lens on Nikon FE2 35mm camera Ilford HP5 Plus processed in ID11 stock solution for 10 minutes at 20 C High key portrait example
High Key Lighting Technique – Often favored when photographing women, the idea of this lighting technique is to completely minimize shadows and texture with the use of soft lighting and filters. Firstly start with two diffuse light sources of identical intensity. Place them at either side of the face with a small gap for the camera’s lens in the middle. To reduce shadows under the chin, ask the model to hold a reflector. One or two lights more will be needed to light the white background as well. All lights should be of equal output or the background will either flare (from being too bright) or be reproduced gray.
As a final measure to ensure smooth, flattering, unblemished features, try a red filter over the lens, which should cancel out any redness in the skin – but only with B&W film! You’ll need to increase exposure 2-3 stops to compensate for the filter. Also ask your model to wear dark lipstick in any color but red, as the lips will disappear otherwise due to the filter. Finally, to ensure a really high-key look to the shot, over develop your film 10-20% so as to increase the skin tone density on the negative. The increase in grain from over-development will further soften any remaining detail in the skin.
Getting this technique right isn’t easy and takes some practice but the results are well worth it and can be quite appealing. Note: This technique only works with Caucasian skin.
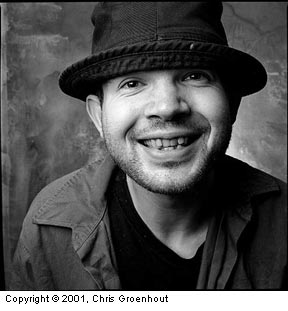
Low Key Lighting Technique – Here’s one for the guys that’s pretty much opposite to the one above. The idea here is to emphasize the texture in the skin whether it be wrinkles or a five-o’clock shadow or a face weathered by years on a fishing boat. Start with a black or darkly textured background with little or no light on it. Add a light (which can be direct or diffuse) from the side of the face skating across the skin toward the camera (but not directly into the lens). An additional light or reflector can be used to ‘fill’ the front of the face and minimize contrast. This technique is more often than not achieved with a tungsten spotlight and a large reflector next to the camera’s lens. It works extremely well to glamorize masculine men – women don’t seem to like this technique as much!
Available Lighting (or working with what you’ve got)
10 sec @ f45 360mm Sironar-N on 8×10 format. Ilford HP5 Plus film processed in HC110 1:9 dilution for 7 minutes at 20 C. An example of environmental view camera portraiture using available light.
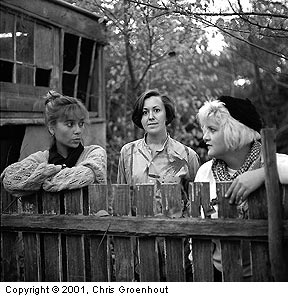
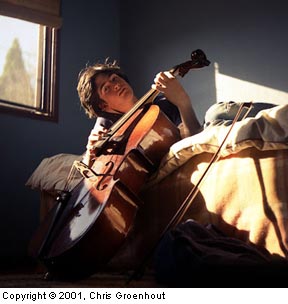
As a general rule, the safest lighting in which to shoot outside portraits is when it’s overcast – the cloudier the better! Shooting in direct sunlight is possible, but some care should be taken to minimize harsh shadows with the use of a reflector or fill-flash. Shooting in the shade of a building or tree is fine on B&W but can produce quite blue results on color film (warming filters are available to correct this). Just after dusk is one of the nicest times to shoot when the light comes seemingly from everywhere but your ‘window’ of opportunity is often only a few minutes before there’s no light left.
As in the studio situation, regardless of whether it’s cloudy or sunny, ask your subject to turn 360 degrees slowly and observe where the shadows fall and how much contrast there is between each side of the face and how much they squint. This understanding of available light can’t really be taught, it has to be learnt by experience in the field, and after a while, you’ll discover what works well for you and the mood you’re trying to achieve.
Exposure
Portraits are actually one of the easiest subjects to expose for, so long as you can previsualize your final result. As I’ve mentioned in my previous article on exposure, transparency film is exposed quite differently to negative, so we’ll take this one step at a time…
Trannie – best to use incident light readings (done using an ‘invercone’ over the sensor of your hand-held light meter). Hold the meter at the face of the subject, parallel to the camera and aiming back toward the lens. I find that a half stop of overexposure from this point works well to ‘clean up’ the skin tone (using Fujichrome films) – maybe initially do some tests with your lens/meter/film combination to see what works for you. Another option it to shoot what the meter tells you and ‘clip test’ the roll (where a small portion of film is processed to determine if the film needs to be push or pull processed). This technique only works if the entire roll is exposed using the same technique/reading.
Color Neg – though not as critical as transparency exposure, an incident meter is quite useful to determine a base exposure to work with. If it isn’t available, try metering off the skin tone with your camera’s in-built meter and overexpose a stop from that reading. Some photographers either meter off their hand or a graycard, either way, you’re trying to get an average reading that’s not too far off 18% gray. Personally, I’d always err on the side of slight overexposure either at the metering stage or by ‘downrating’ the film (as mentioned before – rating 160 film as 100 to increase density in the skin tone).
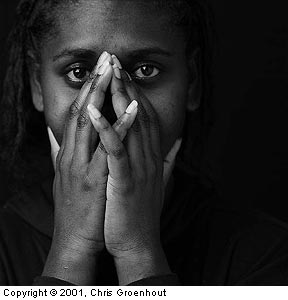
1/15th second at f11 (lit by one 500w/s flash unit in a softbox) 75mm lens on Bronica S2A 6x6cm SLR camera Kodak Tri X film processed in ID11 1:1 dilution for 10 minutes at 20 C Example of photographing black skin and maintaining detail by overexposure.
B&W Neg – is exposed essentially the same way as color with some consideration to the film being used. If for some reason you choose to use Kodak TMax emulsions, be careful not to overexpose the skin tone too much as highlights tend to ‘block up’ and can become unprintable. Conventional films such as Kodak Tri-X and Ilford HP5 Plus are quite partial to overexposure, and for that reason, many photographers rate both films at 200 ISO when shooting portraits. There is nothing worse than a lifeless gray skin tone, so this degree of overexposure minimizes the chances of this.
When shooting black skin on transparency or negative film, you will need to overexpose to some degree to get detail in the skin. Some years back I photographed Lillian, a young woman from Bougainville who was as black as night. I took a reflected reading directly off her face and shot with that exposure, effectively rendering her skin tone as mid-gray on the film. Later I printed the image ‘down’ to the correct density. The result was far richer than if I’d used the ‘correct’ exposure.
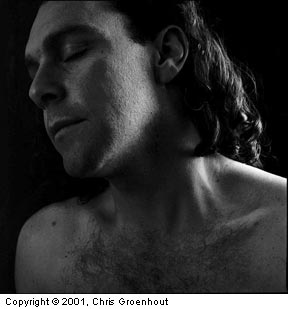
1/4th second at f8 (lit by one 500W spotlight and reflector) 75mm lens on Bronica S2A 6x6cm SLR camera. Kodak Tri X Plus film processed in ID11 1:1 dilution for 10 minutes at 20 C. Example of low-key portrait using a spotlight to accentuate skin texture.
1/4th second at f11 65mm lens on Mamiya C330f 6x6cm twin lens camera. Kodak Tri X film processed in ID11 1:1 dilution for 10 minutes at 20 C. Another example of shooting after dusk using twilight.

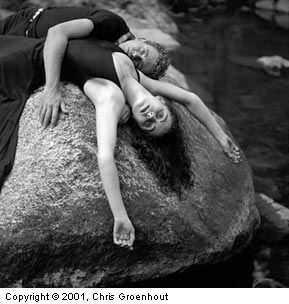
1/8th second at f2.8 Nikkor 24mm f2 lens on a Nikon FE2 35mm camera. Agfapan 400 processed in Rodinol. Good example of experimenting with viewpoint and low available light.

1/15th second at f4 Nikkor 24mm f2 lens on a Nikon FE2 35mm camera. Ilford HP5 Plus film processed in ID11 1:1 dilution for 12 minutes at 20 C. Example of experimenting with viewpoint and low available light and wide angle lens.
Summary
Portrait photography is as personal and individual as the people you’ll photograph. By all means read up on the subject – learn about the rule of thirds, the ideal focal length lens and how best to sit your subject – and then forget it all! As a society were are perpetually bombarded by boring images and only occasionally, someone shakes us up with something really different and we take notice. Experiment, experiment, experiment – that’s the best advice I can give.
by Chris Groenhout
Leave a Reply