
So, you’ve used previous versions of Photoshop, and now you’ve got CS6. You’re ready to crop your image and… Whaaa?! #%& Egads! This new Crop Tool is really different!Yes, it is, but once you know how it works and get used to it, you’ll never want to go back.
Purpose:
The Crop Tool allows you to crop to a portion of an image to enhance the subject matter, remove an unwanted object, or improve your composition.
Where to Find:
You can find the Crop Tool in the Tools Panel, or by pressing its Speed Key, which is “C”.
Crop Handles / Crop Box / Aspect Ratio:
1.) When you first activate the Crop Tool, you’ll notice the Crop Handles at the four corners of your image, as well as one on each side, creating a Crop Box (the area to be cropped). By default, the Aspect Ratio (discussed shortly) is Unconstrained (not a defined crop size), which is why the Crop box starts on the outside edge of your image.
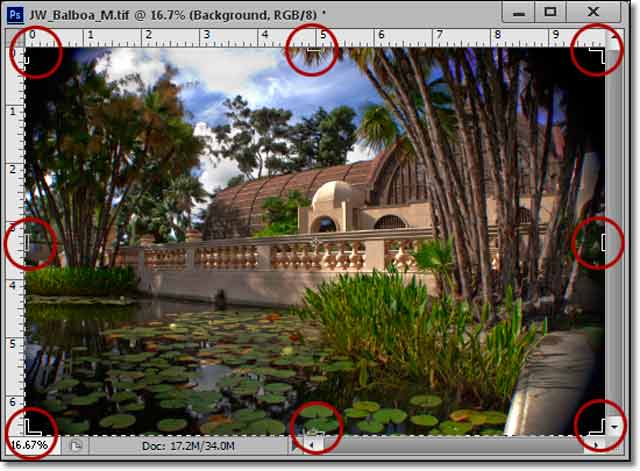
2.) Click on a handle, hold the left mouse button down and drag the handles to the desired shape. When a constrained crop size is chosen, such as an 8×10, your Aspect Ratio remains the same, no matter which handle you drag and move.
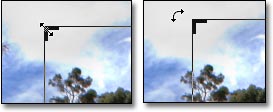
3.) You’ll notice that your mouse cursor changes to a double-headed arrow when you hover over any handle – you’re now ready to click, hold and drag to create your Crop Box
4.) In addition, hovering slightly outside the Crop Box at any handle will change the cursor to a 90-degree double-sided arrow – now you can easily rotate your image inside the Crop Box by clicking and dragging.
5.) It’s also possible to “free from” your crop, like in previous versions of Photoshop. Put your mouse cursor anywhere in your image, hold down the left mouse button, and drag up or down to a diagonal opposite from where you started, such as Top Left to Bottom Right, and so on. Let off of your mouse button. This creates the Crop Box.
Moving Your Image in the Crop Box:
** Unlike previous versions of Photoshop, the Crop Box remains stationary, and your image moves inside the defined Crop Box, NOT the other way around.
** Simply click and drag anywhere inside the Crop Box to reposition your image. You can also use the Arrow Keys on your keyboard for minute adjustments.
** It’s also possible to move your image outside of the Crop Box, such as the black area to the top and left of the sample image to the right.
What’s in the Options Bar?

** Presets: When you click on the Crop Presets drop-down menu triangle, a series of preset crop sizes will show up. Choose one if you desire, or fill in your desired width, height, and resolution in the “Size and Resolution“ dialog box and create your own (discussed shortly).
** Aspect Ratio: Unlike previous versions of Photoshop, filling in the values in the boxes to the right of this drop-down menu does NOT necessarily set your actual crop size and resolution – only the aspect ratio. I rarely use this, preferring to use the Size and Resolution option instead (discussed next).
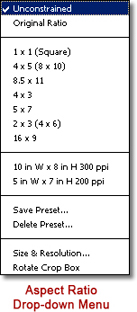
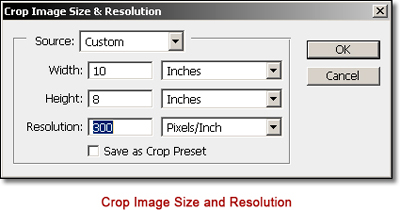
** Size and Resolution: If you’ve got a particular width, height, and resolution in mind, you’ll get more accurate results using this. It’s found under the “Aspect Ratio” drop-down menu. You also have the option of saving this as a preset by checking the appropriate box.
** Orientation: You can switch the width and height values by clicking here.
** Straighten: Here’s where you can straighten your horizon (or a vertical) easily.
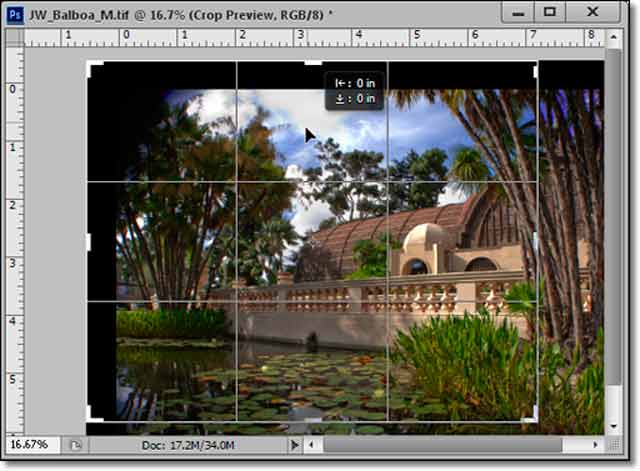
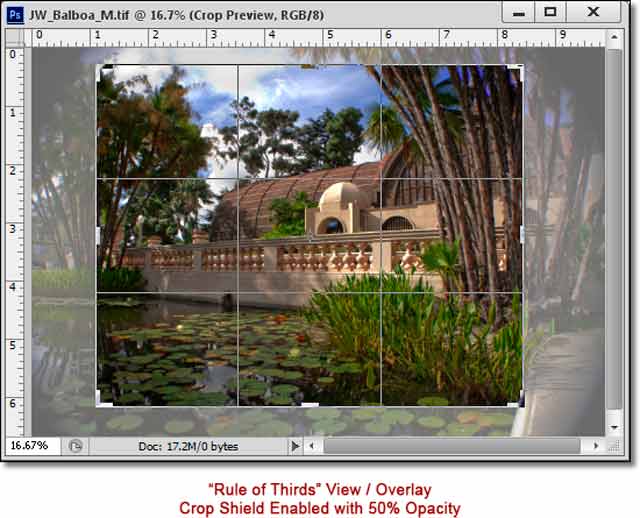
** View / Overlay: Here’s an easy way to judge your crop properly with an overlay. By default, the overlay is the “Rule of Thirds” (see sample image below) – check out the other views. If you need to remove the overlay, just click on “Never Show Overlay”.
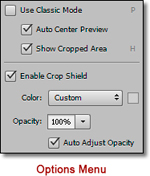
** Options / Crop Shield: The Crop Shield helps you visualize what your final crop will look like before committing to it. See the image sample below for an example of the Crop Shield enabled with a 50% Opacity.

** Reset: Pressing this resets the Crop Box, Aspect Ratio, Width, Height and Resolution settings, bringing your Crop Box back to “Unconstrained”.
** Cancel: This completely cancels the current crop operation, and you will lose all settings.
** Commit: Once you have everything set the way you want it, pressing the “check” symbol commits to the current crop operation.
** “Classic Mode”: If you don’t like the new Crop Tool, simply check “Use Classic Mode” from the Options drop-down menu. You’ll then be able to adjust the Crop Box without the image moving underneath.
by John Watts, Watts Digital Imaging
Click here to visit Watts Digital Imaging website.
All text & photos / screen shots: © 2013 John Watts, Watts Digital Imaging. All rights reserved.


Leave a Reply