
Taken at the Alligator Center in Saint Augustine, FL, the before and after photo below shows results you’ll get from this master Photoshop class
(Steps A through G, 15 minutes).
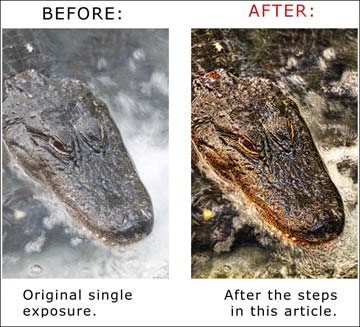
Copyright © James Austin
Overview
With your HDR photograph on a background layer, add a second layer to correct overall contrast, a third layer for local contrast, then add a fourth layer to super sharpen the highlights.
Introduction:
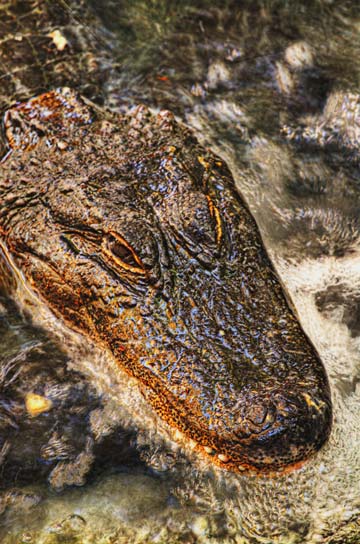
Click, click, click. The sound of a shutter clicking 3 times broke the morning quiet. Just seven feet away from my lens, an alligator was breathing as water rushed past it jaws.
To craft a dynamic portrait of this pinnacle predator hovering as water swirled past its jaws, I shot a high dynamic range seres of 3 exposures. While HDR images are usually of rock-steady subjects, I wanted instead to use a new process. I combined three images into one in Photomatix. At times, this may lead to less than sharp images, so I solve this problem by super sharpening the highlights. This preserves the sense of flowing water, and, as you’ll see, uses layers to control the contrast. There is an order to the steps in this master class.
Here are the steps to success:
First, control the overall contrast.
Second, adjust the local tones.
Third, use Unsharp Mask to super-sharpen the highlight details that tend to get blurred in long exposure HDR.
The bottom line for nature lovers: you’ll capture the power of an entirely new and magical range of light in your work.
STEP A: Bracket a series in Camera to process in Photomatix Pro
First, I bracketed a series of shots, shown below. Then, in the computer, I put the 3 shot series together in Photomatix Pro.
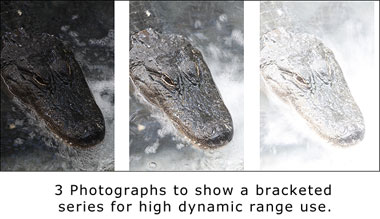
Copyright © James Austin
This is not a Photomatix tutorial, so if you are seeing the concept of Tone Mapping for the first time, you may want to see my Apogee article on HDR here. Photomatix is well-known to many photographers, and it has already has many tutorials. Of course, you can use Photoshop CS4, CS3 and CS2 for tone mapping your HDR photographs.
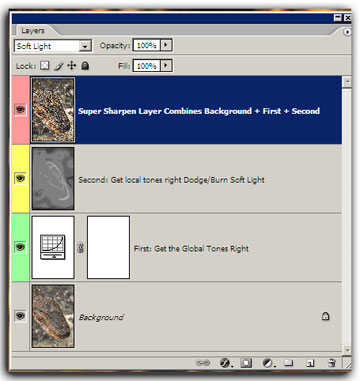
STEP B: Put Your (Alligator) Photograph on Background Layer
After tone mapping the alligator portrait in Photomatix, I opened it in Photoshop, as the background layer. Ok, so it’s clear: the bottom layer is called the background layer. All non-destructive adjustments are made on layers above it in Photoshop’s
Layers palette.
STEP C: Control the Global Tones on Layer 2 with Curves Adjustment
Right away, create Layer 1, a Curves Adjustment Layer. Its purpose is to control the global tones in your image. Just click (Layer > New Adjustment Layer >Curves). Make your changes in Curves to adjust the blacks, greys, and whites (Click OK) and a Curves adjustment layer appears in your layers palette just above the Background layer.
I tend not to use Photoshop Levels, as Curves is a superior software tool, but you may use Levels if you prefer.
STEP D: Control the Local Tones by Painting with a Paintbrush on Layer 3.
OK, here is a tricky part. In the Photoshop of the past, dodging and burning were confusing terms and the tool itself did not work too well. Today, a pro secret for lightening small areas of your print is to paint on the layer with a brush.
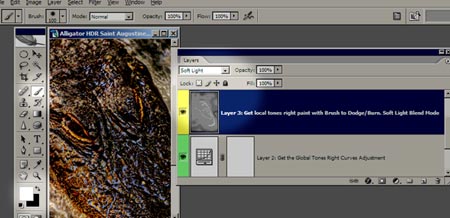
Copyright © James Austin
To do this, make Layer 3 (Layer > New Layer) , set it to soft light blending mode, and fill it with 50% grey. Above, I’ve set foreground color to White, clicked on the brush in the tools palette, and am ready to paint white on Layer 3 with a soft brush. Above, you can see Layer 3, with its blending mode set to Soft Light, in its position right above Layer 2 with the Curves Adjustment .
Remember, Soft Light blending mode, soft-edged brush.
Type B to select a Photoshop Brush. But before you paint, set the toolbox foreground color to White. Type the letter D on the keyboard, then type the letter X to toggle the white to foreground. Paint with white to LIGHTEN. Paint with Black to darken ( Type X ) . Now, with a circular motion, paint areas of your print to make them lighter. I used a brush size of 100 pixels, but you can use what works for your photograph’s size. I used a setting of 20% hardness in the brushes menu. Experiment and play with these settings for your work.
If nothing is happening at all, just make sure, in your Layers palette, that you have Layer 3 selected and highlighted in blue by clicking on it. Sounds basic, but I forget that one too.
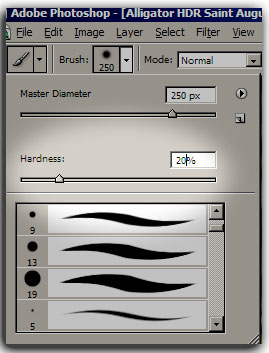
As you paint the Layer 3 mask, make the brush larger with the right bracket key on the keyboard and smaller with the left bracket key ( [ and ] ). On the left you can see the brush diameter and hardness settings, and you can pick what works for you. This is how I controlled small areas of my alligator predator portrait, painting down highlights at the edges and lightening shadows in the alligators skin to bring out subtle details.
STEP E: Save Your Changes.
File > Save.
Here are Photoshop Brushes palette settings I used. By the way, the Caps Lock key toggles the brush standard cursor to the crosshair curson. Save your changes.
STEP F: Make a Copy Merge Layer
Next, make Layer 4, a copy merge layer. This layer does not change any of the 3 layers below it, but combines them to preserve all changes you’ve already made to Layers 1-3. Use a 4 key command to make your Copy merge Layer.
The command is:
Control + Shift + Alt + E (PC), or Command + Shift + Opt + E (Mac)
Why? We want to make a new layer so we can super sharpen the details that are often less than sharp with multiple exposure high dynamic range series. Do not flatten. Layer 4 uses the power of Photoshop to create a Merge layer, above all the other layers. After you create the layer, set its blending mode to Soft Light.
Copyright © James Austin
STEP G: FINISH with a Super Sharpen USM.
USM stands for Unsharp Mask. Click Filter > Sharpen > Unsharp Mask and Apply Unsharp Mask at settings of Amount = 20, Radius = 50, Threshold = 0 . That’s right, 20-50-0. As an Adobe Certified Expert, I know these USM settings are out of the box, but they work well, in this example, to sharpen the highlights for HDR images. If you want, take my settings as a starting point and try your own Unsharp Mask settings depending on the pixel dimensions you have in your photograph.
Here is the final portrait, sharp enough to see all the teeth. Try this process and you’ll be amazed at how clear and colorful your natural images become when you combine high dynamic range with layers mastery!
by Jim Austin, M.A., A.C.E.
Leave a Reply