
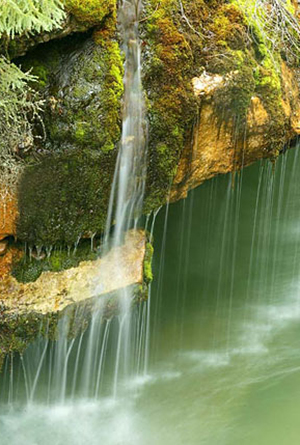
I selected a vertical format for the image on the left, because that format draws more attention to the dripping water in the scene. A horizontal format would have reduced the distance the dripping water flows and increased the amount of river water visible. A horizontal format would result in more emphasis on the river.
As soon as a photographers arrive on location, many jump out of their car, set up the tripod, and start photographing. They probably has a preconceived idea of what to photograph in an area based on previously seen images, whether on the internet or in guidebooks.
Ask yourself three simple questions before you start making photos: Do you know what you’re trying to communicate? Do you know how to meter the scene? Which camera controls are you going to use to interpret the scene?
These questions make each photographer stop to think about what’s in front of him rather than wildly taking photos that he might throw away later. There are several aspects of a scene to consider before you place your eye at the viewfinder. Here is a list of starting points that may serve advanced photographers who have been frustrated with their results as well as beginners:
1. Do you know the theme, main subject, and compositional elements of the photo?
The theme of the photo is what you want to communicate to the viewer. One consideration is whether you’re using a portrait or landscape orientation for your photo. Since each orientation emphasizes a different view of the subject (for example, a portrait orientation emphasizes the vertical nature of the scene), this should be one of your first decisions.
I often recommend that you carry an old empty slide frame in the field. It weighs next to nothing and can easily be stored in you pocket or bag. You can hold the frame in either a vertical or a horizontal position to see the difference between them. After a while, you’ll train your eye to see in both formats, and you won’t need the slide frame any longer. However, a slide frame can help you with your lens selection as well as with your format. If you hold the slide frame an inch from your eye, you’ll see the scene as you would if you used a 25mm lens. Four inches from your eye is the equivalent of a 100mm lens.
Another consideration is whether you’ll show your subject in its environment with a wide-angle view, isolate the subject from its environment, or select a position somewhere in-between. Showing the subject in its environment could mean placing an elk in a meadow or a person at their work desk. But you have to be careful with wide-angle lenses. They can reveal so much of the environment that the main subject becomes too small to be significant in the scene. It’s difficult to communicate how wonderful seeing an elk in a meadow can be when the elk takes up only one percent of the scene.
Every photo has a main subject. The subject can be one element of the scene, or it can be a relationship between various elements of the scene. Whatever scene you select, the main subject must be clearly differentiated from the secondary elements. If the viewer can’t recognize the main subject immediately, he/she will become bored and want to move on to another photo. You must, in your own mind, be able to articulate what the important components of the scene are. Everything else in the scene needs to be eliminated or de-emphasized as much as possible. If you find there are more than three dominant elements of the scene that are important to your photo, then you should make more than one photo of that scene. If you emphasize more than three dominant elements in a scene, the viewer is likely to become confused as to what’s important.
Compositional considerations include such things as perspective (depth-of-field), placement of the subject (practice breaking the Rule of Thirds when appropriate so your photos will become predictable), use of frames, a scale indicator, shape/form, lines, value, color management, lens selection, and/or texture.
If you don’t know the theme, main subject, or compositional elements you will use, don’t take the picture.
If you don’t know what you’re photographing, how can your viewer appreciate your results? When you can identify those components, move on to the next step.
2. Is the quality and direction of light acceptable?
Front lighting produces a fairly flat light. Side lighting helps imply three dimensions and brings out the texture of the subject. Back lighting can be dramatic. Do you need to change your position to take advantage of a specific type of lighting? When photographing a flower, for example, moving from one side of the flower to another can have a dramatic effect on the lighting.
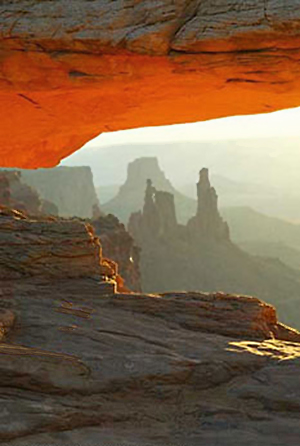
Careful metering was required to expose this image–Mesa Arch at sunrise. There is rock in both sun and shade and a bright sky just below the arch. From experience, I knew my spot meter was my best metering system for this situation.
The quality of light can create mood in your scene. Try to avoid the harsh light of mid-day. If you’re forced to create images under those conditions, try moving to shade, if possible, or use a polarizing filter to remove the glare. The golden hours of early morning and late afternoon provide excellent light for photography. Photographing in the light that occurs after a heavy rainstorm is one of my favorite pastimes. Overcast skies can produce flat light, but it can be corrected with directional lighting from your flash.
If the quality or direction of the light is not acceptable, don’t take the picture. You can do such things as change your position, use a flash or reflector to modify the light, use filters, and add or take away exposure to create a mood.
If the lighting is acceptable, move on to the next step.
3. Do you know what you’re metering?
Your camera’s exposure system has different ways of seeing the scene. Many cameras possess several methods of evaluating exposure. A multi-segmented system (Matrix, Evaluative, Honeycomb, etc.) divides the viewfinder into segments and analyzes the lighting pattern in the whole viewfinder. A spot or partial metering system considers only a portion of the viewfinder and ignores everything else. A center-weighted system places most of its emphasis (usually between 65-75%, depending upon the camera model) on the center of the viewfinder and feathers out the remaining emphasis toward the edges of the viewfinder.
About 80% of the time, amateur photographers will obtain good results with any of their exposure meter systems, because that percentage of time they’re metering medium-tone scenes or scenes that average out to medium-tone. The other 20% of the time, there’s too much contrast in the scene to use the default multi-segmented metering system. For these situations, you need to know three things: the metering system your camera is using, the tonality of the subject you’re metering, and what tonality you want in the subject in the final image. On these occasions, using spot or partial metering may require you to do some exposure compensation. You need to recognize high contrast situations and how your various metering system will react.
On many cameras, the point-of-focus is also the point of emphasis for the metering system. If you’re metering a medium-tone, your metering systems will perform at their best. Non-medium tones can cause problems with the metering systems. As a general rule, try to look in the scene for medium-tones to meter, even it they aren’t on your subject. For auto focus cameras not metering on the subject, you should first establish focus on the subject. Turn your lens switch to manual, meter the medium-tone subject, re-compose the scene, and take the shot.
If you don’t know what to meter or which metering system to use, don’t take the picture. Look for medium tones to use, decide if any exposure compensation is necessary, and make sure you know what metering system is active on your camera.
If you can do that, move on to the next step.
4. Is shutter speed important?
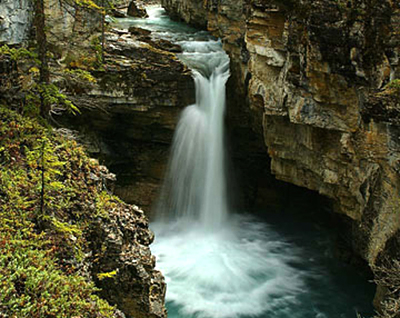
Shutter speed is important when there’s movement in the scene you’re photographing. If you want to interpret action/movement in the scene, then set your camera to shutter priority mode. There are times when you want to have a slow shutter speed to blur the movement. Most often this occurs when you’re photographing moving water (as in the picture on the left). To get a blur effect on the water, a shutter speed of 1 second to 1/15th of a second is required. A slower shutter speed will create a more pronounced effect. A blur of a baseball bat can imply movement. Don’t feel that you always have to freeze the action.
There are times, however, when you want to freeze action. The shutter speed required to do that depends on a variety of factors. The speed of the subject is obviously very important. The camera-subject distance is also important. A faster shutter speed is required when the subject is closer to the camera. The direction of movement is the final factor. If something is moving directly toward or away from the camera, a slower shutter speed can be used. However, diagonal or perpendicular movement in relation to the camera requires faster shutter speeds.
If the shutter speed is important, determine the appropriate shutter speed and make the photo. If you’re not confident you selected the correct shutter speed, shoot several shots at different shutter speeds that are at least two stops apart.
If shutter speed is not important, move on to the next step.
5. Is depth-of-field important?
Depth-of-field is important in the scene when there are two or more elements that you want in focus that lie at different distances from your camera. Some images need to have everything in sharp focus; other images require that you use selective focus to place emphasis on certain elements of the scene. The depth-of-field you use in the scene determines how much will be in focus. If depth-of-field is important to the photo, set your camera to aperture priority mode.
Shallow depth-of-field is generally used to blur the background to emphasize the subject. This is very common in portrait, close-up, flower, and sports photography. A small f-stop number is used to achieve a shallow depth-of-field. As a general rule, the three smallest f-stop numbers on your lens will provide very limited depth-of-field.
There are three controls you have over the amount of depth-of-field. The first control is the f-stop. A small f-stop number results in less depth-of-field in the image. Another control is the focal length of the lens. A longer focal length provides less depth-of-field at any f-stop than a short focal length. The final control is camera-subject distance. You will have less depth-of-field when the subject is closer to the camera.
A classic landscape photo has extensive depth-of-field. It contains a sharp foreground, middle-ground, and background. Part of your job as a photographer is to determine the amount of depth-of-field that is required in the scene to translate your vision onto film.
If depth-of-field is important, determine the appropriate amount and make the image.
If you’re not confident that you selected the correct f-stop, shoot several shots at different f-stops at least two f-stops apart.
If depth-of-field is not important, move on to the next step.

6. Is the entire scene at the same plane of focus?
If neither shutter speed nor depth-of-field is important, then everything in the scene is probably at the same plane of focus. For example, if you’re photographing a mural on the side of a building, there’s really no depth-of-field in the scene. The wall isn’t moving, so shutter speed isn’t important, either. The image on the left is a portion of a mural on a building in Chemanius, British Columbia. I cropped this dramatic portion of the mural. Although I used f8 to make the photo (see left), I could’ve used any of my available f-stops.
Another example of photographing everything at the same plane of focus is photographing star trails. They’re all at the infinity focus plane. Infinity plus ten feet is still infinity. If you focus on an object far from where you’re standing, check the distance scale on your lens, and you’ll probably be focusing at infinity. If you’re not concerned about foreground elements, then everything of importance will work at infinity focus.
If everything is in the same plane of focus, you can use any f-stop to achieve sharp focus. However, all f-stops are not created equal. You’ll obtain optimal results from your lens by using one of its quality f-stops. The quality f-stops for most lenses are two or three f-stops smaller than the maximum f-stop on the lens. For example, the quality f-stops for a lens with a maximum f-stop of f2.8 are f5.6 and f8. The quality f-stops for a lens with a maximum f-stop of f4 are f8 and f11. (Do you notice that f8 appears quite often when discussing quality f-stops? What’s the secret of photography? It’s “f8 [choose a quality f-stop] and be there”.)
If the entire scene is in the same plane of focus, use aperture priority mode, select a quality f-stop and make the photo.
Answering the preceding six questions will help you determine when you’re ready to raise the camera to your eye and create the image. The process should result in more “keepers,” because you’re making decisions about important factors in the photographic process.
TIP: type the six steps on a 3×5 card, laminate the card, and put it in their camera bags. The card provides an easy reference when you’re in the field.
by Jim Altengarten, exposure 36
All text & photos: © Jim Altengarten. All rights reserved.
Leave a Reply