
Ever wonder why that sunset image you made is flat, lifeless, and “looks digital” because of artifacts? Why is it that you can’t get detail in the highlights of that waterfall? Did you make a “boo-boo”, and over-expose that image of your Mother-in-law (uh-oh)?
You should be shooting in Camera RAW for your important work. The results are worth it!
The more digital information you’re able to capture in the field, the more information you have to effectively create your image.
We’ll discuss this critical subject in two articles – look for Part 2 next month!
What is RAW and why do I need it?
~ A Camera RAW file contains unprocessed, uncompressed data from your digital camera. It’s just information, but lots of it. It isn’t really a file “format”, like JPG or TIFF.
~ You can’t open a RAW file directly in Photoshop: You must first work with it in The Adobe Camera RAW Plug-in (ACR) before “sending” it to Photoshop. By the way, ACR is a separate program, but included with (and “linked to”) Photoshop.
~ If your Camera has the option of shooting “RAW” + JPG”, then you should do so. It takes up little in memory, and gives you a quick “look-see” image that’s been “processed” for contrast, color, etc (albeit by a computer chip!). Oh, and I frequently hear folks say “My JPG looks better!” Read on, and you’ll never believe that again!
~ Tonal Compression: This is the inevitable reduction /degradation of the original scene from your eyes to the print. It’s pure physics. The range of colors reproduced shrinks throughout the process. Let’s say, for example, that our eyes see 100 shades of red. The camera, shot in RAW, may see 70 shades. Then Photoshop may see 50 shades of red, and the printer may only print 30 shades of the original 100 shades available.
So, how can you minimize some of the effects of tonal compression? Three things:
1.) Shoot in RAW (or scan in 16 bit)
2.) Use a proper Color Working Space in Photoshop (discussed in chapter 4 of the book).
3.) Have your Color Management “house” in order (discussed in the “Color Management” section of the book).
~ A RAW file is different from a JPEG in 2 major respects:
There’s much more information in RAW (16 bit vs. JPG’s 8 bit).
There’s automatic “file compression & processing” built into the creation of a JPG, whether you want it or not.
~ 16 bit vs. 8 bit:
The more information there is in a photographic capture, the better.
(JPG) 8 Bit: 255 values of each color x 3 (RGB) = 17.7 Million combinations
(RAW) 16 Bit: 65,000+ values of each color x 3 (RGB) = 281 Trillion combinations.
~ What is an .xmp file?
It’s a separate (“sidecar”), tiny, glorified “text” file that contains “metadata”. You never need to directly open it. Think of it as the “instructions” for all of that RAW information (which is never directly “changed”). It’s generated as soon as you make any “modifications” to your RAW file, and saves those “instructions” in the same folder as your RAW file.
Note: A few things to remember.
1.) If you back up your RAW file, back up your .xmp file, too; it’s in the same folder/location as your RAW file.
2.) If you’re working in “Bridge” and can’t see the .xmp file, simply go to “View” Menu -> “Show Hidden Files”.
3.) If you want to start over with your original “as shot” RAW capture, simply “trash” the .xmp file.
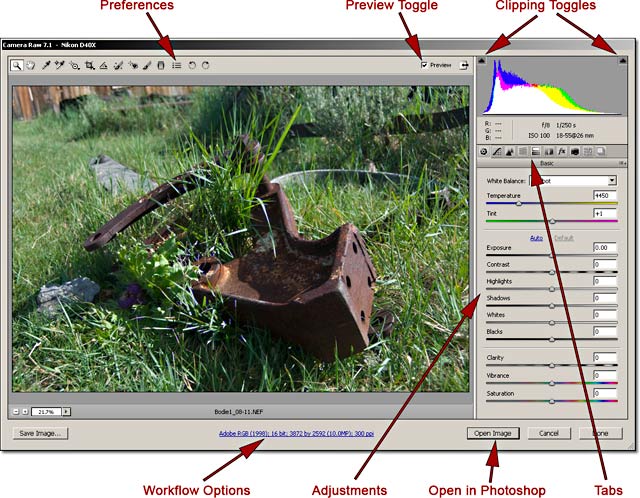
RAW (ACR) to Photoshop Workflow – ACR to Photoshop: What should be done in each program?
Generally, I’d suggest that you make as many global Hue, Saturation and Brightness corrections as you can in ACR, leaving Contrast adjustments, localized corrections, “fine-tuning”, cropping and sharpening to Photoshop.
~ There are actually quite a few advanced tools in the Adobe Camera RAW (ACR) Plug-in. However, both in Workflow and the spirit of K.I.S.S. (Keep It Super Simple), you should avoid using the more advanced functions – at least for now. Grow into the program!
~ You should strike a balance of time spent with your file in both ACR and Photoshop, using the strengths of each program. Typically, I’ll spend 25 to 30% of my “file” time in ACR, with the balance in Photoshop.
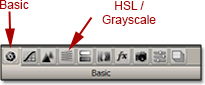
~ You’ll find that ACR is wonderful for global Hue, Saturation and Brightness corrections, using the appropriate sliders in the “Basic” Tab, then moving to the “HSL/Grayscale” Tab to make further critical adjustments.
~ I rarely use any of the various tools and brushes in ACR – 3 reasons:
1) There’s not a true “History” Panel to fall back on if I don’t like what I see.
2) There are no “Layers” in ACR.
3) Photoshop does a much better job of these functions than ACR.
~ Once you are done in ACR with your file, open the image in Photoshop, concentrating on Contrast and Color corrections, both local and global (taking advantage of the power of adjustment layers and layer masks), making any necessary “fine-tuning”, such as cloning and horizon-straightening, and then saving your image as an un-flattened 16-bit Master File (we’ll discuss the concept of Master Files in future articles).
~ Now you can task your Master file for many uses. You can crop, sharpen and convert to 8-bit for printing on my inkjet printer or through a custom lab; you can reduce the size and PPI to save as a JPG for the web, and so on…

How much extra time does it take, and what’s the goal of working in ACR?
While it’s true that you’ll spend a bit more time in your overall Photoshop Workflow by shooting in RAW, it’s really not that much more. You’ll probably spend less time in Photoshop by spending a few more minutes in ACR first, and the results are worth it!
Besides, the goal is NOT to make a perfect image in ACR. The goal is to take advantage of the strengths of both ACR and Photoshop in your overall workflow to optimize your final desired image.
So, the goal is to bring your final RAW image into Photoshop by:
1.) Slightly Over-Saturated – It’s easier to de-saturate in Photoshop.
2.) Slightly Low or “Flat” in Contrast – It’s easier to increase your contrast in Photoshop.
3.) Slightly Under-Exposed – It’s easier to lighten in Photoshop.
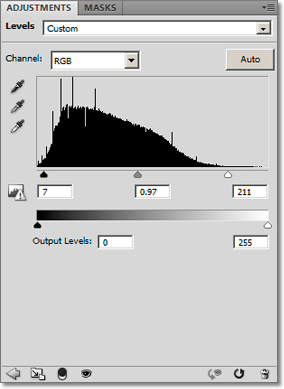
Note: By bringing your file from ACR into Photoshop as suggested, your histogram in Photoshop should reflect it (depending on the subject matter, of course) with a bias of extra pixels to the left hand side, similar to the Levels dialog box shown.
“OK, I’ve got it in Photoshop, now what?”
Here’s where you save your image to begin building your Master File.
~ Notice the Filename and File Extension’s evolution: When you bring the file into Photoshop from ACR, the file extension (.NEF & .CR2 or similar) leads you to believe it’s still a RAW file (for the propeller-heads amongst us, it’s not really – it’s16-bit TIFF).
~ Next, you save your image as a Master File (with the “_M” at the end of the filename) – your image shows up with the “.TIFF” extension.
~ By bringing your file from ACR into Photoshop as suggested, the “.xmp” file is generated.
Until the next column, have fun and stay well!
Go to RAW Fundamentals in Photoshop, Part 2
by John Watts, Watts Digital Imaging
All text & photos / screen shots: © 2013 John Watts, Watts Digital Imaging. All rights reserved.
Leave a Reply