
Ever wonder why that sunset image you made is flat, lifeless, and “looks digital” because of artifacts? Why is it that you can’t get detail in the highlights of that waterfall? Did you make a “boo-boo”, and over-expose that image of your Mother-in-law (uh-oh)?
You should be shooting in Camera RAW for your important work. The results are worth it!
We’ll discuss this critical subject in two articles – Click here for Part 1.
THE ACR WORKSPACE
(ACR for CS6 Shown)
Accessing the ACR Plug-In:
The easiest way to access the Adobe Camera RAW (ACR) Plug-in is to go to the “File” menu ->”Open”in Photoshop. Choose a RAW file, and the ACR Plug-in Workspace will automatically open.
Set your Preferences:
1. In the “Preferences” menu, choose “Apply sharpening to preview images only”.
You should sharpen only in Photoshop (except for the Clarity slider in ACR, discussed later), not by using the sharpening in ACR. The algorithm for sharpening and the techniques used are much better in Photoshop. You’ll only have to set this preference once.
2. In the “Workflow Options” Menu, choose:
“Adobe RGB (1998)” for “Space”,
“16-Bits/Channel” for “Depth”
“300 pixels/inch” for “Resolution”.
For “Size”, choose the size without the “+” or “-“ beside it. This is the native size of your camera sensor. It’s better to use Photoshop, not the RAW plug-in, to enlarge your image to the desired size as the sharpening algorithm in Photoshop is so much better.
Unless you have more than one camera, you’ll only have to do this once.
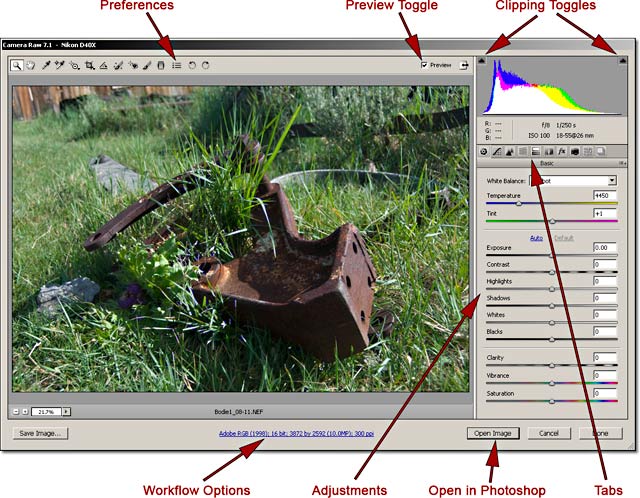
ACR Workspace Features:
Let’s look at some features of the Workspace before working with the adjustments. This list is far from complete. In the spirit of K.I.S.S. (Keep It Super Simple), stick to the basics, master those, and grow into the other functions of ACR.
~ Near the upper right-hand corner, you’ll notice this “Preview” Toggle – use this for before-and-after scenarios. This only previews the tab that you’re currently using, not the overall image.
~ You can check for Clipping by using the “Clipping” Toggles (explained below)
~ All of the most popular Speed Keys and Navigation Tools that are available in Photoshop are also available in ACR.
~ When all of your adjustments are completed in ACR, click on the “Open Image”button to close ACR and open your image in Photoshop.
By the way, what is Clipping?
Clipping is “the unwanted elimination of digital information”. Because a RAW file has so much information, it needs to be optimized. As you do so, you’ll be using the Clipping Warnings in ACR, similar to the ones in Levels.
By making the proper adjustments in ACR with the Clipping Warning turned on, you’ll take advantage of the full range of tonal values available to you in your image. You can set the brightest parts of your image as close to pure white as possible and the darkest parts as close to pure black as possible, without “clipping” pixels.
To Correct for Clipping:
With the Clipping Warnings activated, move the appropriate sliders in the “Exposure / Contrast” group (discussed shortly) until the clipping masks disappear (or as close as you can, if it’s not possible to completely eliminate clipping).
THE “BASIC” TAB:
The “Basic” Tab is the default Tab when ACR opens. It’s where you’ll do the vast majority of your work in ACR by moving the Adjustment Sliders.
~ It’s important to get in the habit of making small adjustments at first, then using the “Preview”toggle to see your results as you go along.
~ You’ll notice that the horizontal line that forms each slider is a visual representation of what that slider can accomplish, color and density-wise. For example, the “Exposure”sliders’ horizontal line goes from dark to light, the “Tint”sliders’ horizontal line goes from green to magenta, and so on.
~ Photoshop has conveniently grouped these adjustment sliders into 3 groups by function:
* Color Balance
* Group Exposure / Contrast Group
* Miscellaneous Group
The “Color Balance” Group:
White Balance: These are presets for the “Temperature” and “Tint” sliders, discussed below. From the drop-down menu, you can choose from a number of presets. This will also give you an idea of how the Temperature” and “Tint” sliders work and interact. Once you move any slider, this changes from “As Shot” to “Custom”.
Temperature: Move this slider to the right to warm up the color of your image (adds a yellow cast), and move it to the left to cool your image down (adds a blue cast).
Tint: Move the slider to the right to increase the overall magenta bias, and to the left to increase the overall green bias.
The “Exposure / Contrast” Group:(Process 2010’s closest equivalent in italics and parentheses)
Auto / Default: It’s been my experience that you get better results with manual adjustments, but you can use these as a guide. Click on the “Auto” button to see if it improves your image: if not, simply click on the “Default” button, and continue with the manual adjustments below.
Exposure: This affects mostly the mid-tones of your image. Move to the left to darken your image, and to the right to lighten.
Contrast: I rarely use this slider. You’ll get better results by adjusting your final contrast in Photoshop. I generally leave it at the default setting.
Highlights: This slider will recover highlights that are washed out. Move the slider to the left to increase the highlight detail (Recovery Slider).
Shadows: Move the slider to the right to open up shadow detail (Fill Light Slider).
Whites: This slider will recover extremely bright details. I use it after using the Highlights slider to “fine-tune” (Recovery Slider).
Blacks: Move the slider to the left to increase the amount of black in your image. Be careful with this one –It’s easy to block out shadow detail if you use too much of it.
Miscellaneous Group:
Clarity: “Edge Sharpening” – In CS6, it also increases Contrast, so be careful!
Vibrance: This is “Saturation on Steroids”, preferred to Saturation below.
Saturation: I rarely use this.
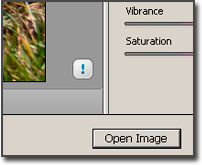
NOTE: For users of previous versions of ACR – Process 2012 (CS6) vs. 2010 (CS5):
If you previously worked on an image in either ACR 6.x or earlier (CS5), then your image will open in the “Process 2010” ton-mapping configuration by default when opened in ACR 7.x (CS6).
To update to “Process 2012”, click on the “exclamation point”icon shown in the image to the right.
If you update, expect your image to change! If this is a problem, just leave your file in “Process 2010”.
By the way, your image will default to “Process 2012” if you’ve never worked on it in an older version of ACR.
Until the next column, have fun and stay well!
by John Watts, Watts Digital Imaging
All text & photos / screen shots: © 2013 John Watts, Watts Digital Imaging. All rights reserved.
Leave a Reply