

by Mary DeHaven
Reprinted from DIGITAL Photographer, a bimonthly print magazine.
If you already have a digital camera with a liquid crystal display (LCD), you know all to well the problems viewing the screen in bright sunlight, especially at the beach when photo opportunities are at a premium. Framing a shot of a washed-out image is a challenge. Conversely, have you been presented the occasion to wield your photographic skill at a nighttime event? Perhaps, you haven’t yet discovered the obstacles your digicam’s LCD screen offers in low-light situations. Depending on your digicam model, you may find that it’s equally difficult seeing your image in a dark room or on a real sunny day.
Of course, there have been attempts to provide some solutions. Some manufacturers have made sunshades for the LCD screen, and this has helped. Nighttime situations, however, hold bigger challenges, and making the job easier can be more than just a shot in the dark.
One sure way to address any LCD framing situation is to buy a digital camera with an optical eyepiece, or viewfinder. Yes, you have to go back to the regular camera basics and look through a viewfinder instead of on the LCD screen that has become so handy when setting up your shots. Another way to help with potential LCD framing problems is to purchase a digicam that offers manual controls in addition to automatic features. Any extra cost of a digicam with manual controls and optical viewfinder will pay for itself later with better images taken in extreme situations. However, even without manual controls, there are devices to employ, if you just some ingenuity.
Setting Up The Image
Naturally Digital – Available natural light and a correct white balance setting on your digicam are often all that you need to capture an effective photo. Before taking your shot, always be sure to assess your needs (the final use of the image) and your situation – look around for immediate resources, such as additional light, another vantage point. The best way to learn is to experiment in a variety of lighting situations.
After you have decided to shoot a scene with or without people, there are some basic things to remember.
You may want to use the built-in flash. But before you do, ask yourself how far away is the subject you wish to shoot? If your flash only covers a distance of 4 feet or 5 feet and the distance to your subject is greater than that, don’t expect adequate illumination of the scene. We have all witnessed people at an event in an auditorium trying to take pictures from the back rows using a flash. They actually expect to get a good image, only to find out otherwise. Your built-in flash is only good for an average distance of 4 feet.
Another consideration when using a flash–watch out for backgrounds or objects that will reflect the flash’s light and cause a white spot in your pictures. This is true using a regular 35mm camera, as well as a digicam.
Don’t expect your digicam to be able to read a distance that is a factor you will control. Learn to walk-off a 4-feet space from your subject to see just how far you can depend on your flash for its illumination. The beauty of a digicam is the ability to take lots of images and experiment with different lighting and setups without paying for processing, as with film.
A portable flash has always been the film-camera photographer’s best friend, especially since it could be moved around to suit any situation. Few digicams have that feature, but I look for it to be included as an option in the future. A special hot shoe with an extension for the flash unit will be required.
If you use a zoom lens on your digicam, remember, just because you can zoom in on an object, doesn’t mean it isn’t far away. Again, your flash unit will only cover the first 4 feet or 5 feet no matter what you zoom-in on.
Plan Your Image
If your digicam has a stationary flash and you want to illuminate a particular scene at night, you must plan carefully the capture of your images. Here’s how:
- 1. Measure or estimate the distance or range your flash will cover and try to stay within those boundaries.
- 2. Check to see the additional light that may be available to enhance your scene, such as overhead incandescent or neon lights, a bright full moon, stage lights or street lights. Using the natural light can give you unusual effects that are just wonderful. Not every scene has to be completely illuminated to take your image. You become an artist when using available light to your advantage to make memorable images.
- 3. Decide how much of the scene you really need, and frame it carefully in your viewfinder or LCD screen before you point and shoot.
The Framing – Just as framing supports a building, it is also vital in your original shot. The task becomes easier when using a digicam’s LCD panel.
Take several test images of the scene from many angles. Remember you have the power of imaging to make people see things from different perspectives. If your digicam has a zoom lens, experiment to see if close-up is better than a standard image without a zoom. Just remember, however, some people tend to get carried away with a zoom lens and forget to see the overall picture.
Using Manual Controls

If you are lucky enough to have manual controls on your digicam, that’s great, but only if you understand how to use them, especially at night or in the dark.
Just as in using a regular film camera, the f-stops offer essentially the same function. The lower the f-stop, the more light you let in. Your digicam with auto-focus requires adequate light and the right kind of contrast between light and dark. If you have aperture control, it allows you to let in more light by opening up the camera lens.
If your digicam lets you set the shutter speed, that will also help you make a good image. Some digicams have an automatic shutter speed that adjusts to the best aperture value. In our case, a slower shutter speed would be selected to take a picture of a dark object that you wanted to brighten up. Some digicams also have a “twilight mode”f that reduces the washing out of colors of a subject in a dark environment. This mode is used when you want the subject to be bright and colorful but don’t want the exposure increase to wash out the colors as it normally might.
Having a manual white balance feature also helps with night photography. Some digicams have a button for manually adjusting white balance to suit an infinite range of lighting conditions. Just push the button, and you’re locked in, until the next time you want to change the setting. All digicams have automatic white balance, but some go a little bit further by giving you indicator symbols for nighttime, with neon or fireworks or sunset or sunrise conditions.
Taking pictures of candles poses a problem, because if you meter the light of the candle itself, the exposure will be in the dark and only the flame will show. If your digicam has a spot meter, or if you have a standard meter to use, meter the candle and then shoot the picture. That way both the candle and flame will show. It takes a bit of time to get used to these features, but it’s well worth learning them to enhance your skills.
Most of these features are only found on higher-priced cameras, whether digital or film. However, when you see the difference these features make, you see that it’s well worth the extra cost.
Manipulating Your Images

Even if your lighting was not exactly right when you took your image, there is software to help correct bad lighting. ImageSuite software from The Imaging Group is my favorite because it is easy to use and does a good job.
After you call up your image, go to the menu bar and chose Image. Your choices will include Enhancements. Click on it and adjust accordingly.
Just recently, I took a sky shot while it was dripping rain. Some of those droplets fell on my lens causing a blur in an otherwise beautiful image. I used ImageSuite and went to the Clone button. Then I clicked onto a part of the image closest to the area I wanted to replace. I then moved my mouse around the droplet area and caused the water spot to disappear and become part of the picture surrounding it. It saved an image from being discarded.
You can also crop an image by clicking onto the dotted rectangle along the side of the menu bar and then reframe the image. Suppose you took a picture of a scene in the backyard and after you saw it, you realized the trash can was sitting along the left side of it. You then could reframe the image, leaving the trash can out, thus making a better image.
If your image was taken in very poor lighting conditions, no amount of enhancement will work. If it’s just poorly lit–there is some light–some software image enhancement MAY work, but you will just have to try it first before you will know.
What If I Don’t Have Any Features On My Digicam?
Do not despair! Even a simple digicam can do amazing things. I recently purchased an Agfa elmage 780c, an inexpensive digicam as a backup to my Sony Mavica MVCFD9l, a top-of-the-line digicam, with all the features. I found the Agfa to be great for portability. The Agfa fits in a small case and can easily be toted around from place to place, whereas the Sony is large and cumbersome at times.
Whenever I go on location to take images, I carry both of them to use for different things. The Agfa takes great night shots on the “three-person” group setting and no flash. It also allows for three flash modes: automatic, no flash, or constant flash. It has a fairly accurate battery-power indicator. It also has four stars that allow the user to choose the level of resolution.
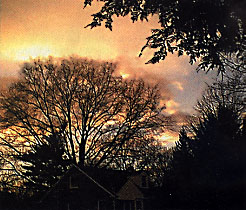
I have been experimenting with the Agfa digicam for various reasons, and I find it fun and easy to use. Here’s something you can try: Go outside just as the sun is setting–and the sky is prettiest–and aim your digicam upwards without using your flash. Take lots of pictures on the highest resolution you can. You’ll be surprised at the results. Most digicams regardless of price or features will do a good job. Even if the resolution is only 640×480, the pictures will come out sharp.
Improved Batteries; More Memory
The down side to any digicam is battery power. Extra features like LCD screens and good flash units take power to run, and they drain a camera’s power supply. If a digicam solely uses “AA” alkaline batteries, you will find it to use those batteries quickly. To avert this problem, try to find a digicam that uses NiMH rechargeable batteries. (Be careful–sometimes using a battery not recommended in a digicam can actually be harmful to it!) It also doesn’t hurt to get an extra set of batteries, so one set charges while you use the others in the digicam.
If you buy a digicam in the low-price range, see if you can add a higher-megabyte storage card to it. With the proper batteries, a 64MB card is all you will probably need to supplement your original memory that came with your camera. Being able to take more pictures before having to download to the computer is a plus, so invest in a highermegabyte memory card.
Assess Your Needs
Ask yourself what are you going to do most with your digicam? If you are content with a 640×480 resolution, because you are only going to send pictures over the Internet (printing them out rarely), then an inexpensive digicam with some features like choice of flash modes and no zoom may be okay for you. However, if you are serious about taking pictures–and you want to take all kinds, including night shots–then invest in a digicam with several resolutions, flash modes and maybe even a zoom lens.
Basically, all digicams will take pictures, but the quality of the product ultimately has to satisfy you. Choose wisely and always ask for a trial period before making your final decision.
Finally, with digicam in hand, and assuming it’s safe to do so, walk down the street at twilight, and take pictures of business districts with neon lights. Capture images of people shopping or going to entertainment venues. Or just point your digicam to the sky and capture the moon and stars. If you plan properly, learn your digicam features, and experiment, I am sure the results will eventually be to your liking.
by Mary DeHaven
Leave a Reply