
NOTE: This article is for older versions of Photoshop
(prior to CS6/CC), but the fundamentals still apply.
|
Purpose: The Clone Stamp Tool and the Healing Brush Tool are used for retouching. These tools take a sample of a portion of your image (the “source”), and “clone” or retouch that sample on another portion of your image (the “destination”). It is useful for removing an unwanted portion of or a defect in your image. This column will focus on the Healing Brush Tool.
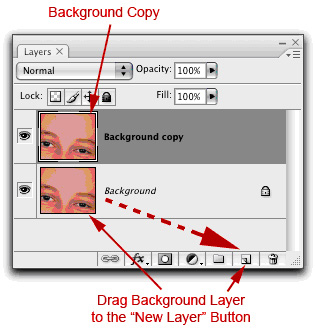
Which to Use: The Clone Stamp Tool takes an exact copy of your source area and pastes it unaltered to your destination area. It is great if you are attempting to reproduce a pattern, such as vegetation, a straight line, texture in a building, and so on. Details in my last column… The Healing Brush Tool, however, takes into account the color, texture, shading, transparency and lighting of your destination area, and attempts to blend in your source area. It is designed for removing blemishes in skin, dust in sky, and other areas where you are trying to blend imperfections out of your image. More details below… Work on a Background Copy I would recommend that you work on a Background Copy of your image when retouching with these tools. There are two reasons for this: 1. You can turn the visibility of the layer on and off by clicking on the eye. This will help you see the results of your retouching. 2. If you make a mistake, simply drag the Background Copy to the Trash Icon. To create a Background Copy, simply drag the Background Layer to the “New Layer” button. The Healing Brush Tool What’s in the Options Bar? Brush Options: When you click on the Brush Options drop-down menu triangle, the dialog box opens up. In addition, you can access this same dialog box by right-mouse clicking in your image when the Healing Brush Tool is selected.
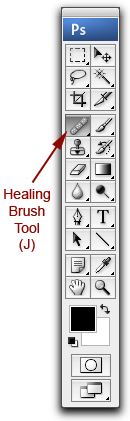
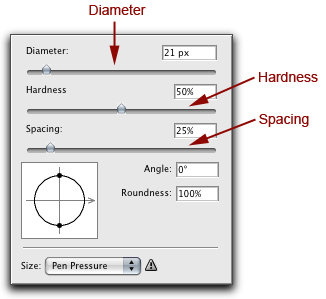
1. Diameter: This defines the size of your brush in pixels. 2. Hardness: Here you can control the amount of anti-aliasing or softness applied to the edge of your brush. I would suggest that you keep your brush hardness low (between 0% to 25% to start) to avoid harsh and unnatural edges. 3. Spacing: This controls the distance between the brush marks in a stroke. It is best to leave this at 25%. 3. Source: This is best left at “Sampled”. 4. Aligned: Select “Aligned” and the sample point will move as you move the mouse. De-selecting “Aligned” will keep your sample point stationary as you move the mouse. Most of the time, it is best to select “Aligned”. It will tend to keep your cloned area looking random and natural. How it Works 1. Choose the Healing Brush Tool from the Tools Palette, or by using the Speed Key “J”. 2. Choose your desired options in the Option Bar. 3. Choose your source or Sample Point, hold down the “Option”(Mac) or “Alt”(Windows) key, and click your mouse once. This sets your sample point. 4. Let up off of the “Option”(Mac) or “Alt”(Windows) key as well as your mouse button. 5. Select your destination area, and click with your left mouse button. Repeat these steps until the process is complete.
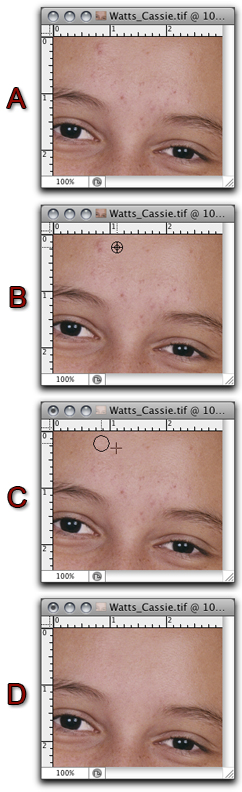
EXAMPLE: In Image A, there are quite a few blemishes that need removing. In Image B, the Sample Point is selected to the right of one of the blemishes and the “crosshair” icon shows the sample point. In Image C, the destination area is selected (the circle), while the “plus-shaped” icon shows the original sample point. After a few clicks, , as well as changing the sample point frequently, the results are shown in Image D. Healing Brush Preview (CS4 and CS5 only) This is such a time-saver! Now you can preview your source or sample area over the destination area BEFORE you commit to it! After choosing your source or sample area, and before you click your left mouse button at the destination area, you will see a preview of your clone in the circle. This works great for aligning objects that were hit and miss in the past, such as straight edges, critical areas, and so on. Some Pointers for Fine-Tuning You will find that by changing your sample point every few clicks and being “random” that your final results will be more natural-looking. Avoid using the Healing Brush near source and destination areas with pixels radically different in color, texture, shading, transparency, and lighting. The tool will have a tendency to try to blend in with the odd pixels, resulting in a very fake look. Until the next time, have fun and stay well! |

by John Watts, Watts Digital Imaging
Leave a Reply