
Photographing horses on the move takes some special skills. Here are some tips to make your horse action shots better.
 At least twice a year, my wife and I pack up our gear, hop into our Jeep and go shoot horses. We live in horse country. We have horses and cattle on our mini-ranch in Conifer, and it gives us great pleasure to break the routine, get away from the studio and office, truck into the mountains, and photograph the North American Trail Riding Conference competitive trail rides. These trail rides, by the way, were the first jobs I got after opening my studio nearly ten years ago. The woman who printed my business cards and stationery was one of the Colorado Trail Ride coordinators.
A typical ride is a weekend event lasting one or two days. Riders are divided into two to three classes, depending on the experience of the rider and the horse. Most trails offer a variety of terrains, including challenges to both horse and rider such as water crossings, rocky inclines and fallen logs across the trail.
While trail rides are not races or endurance rides, they do test the horses’ conditioning and are timed to make sure no one gets too far ahead or behind on the course. Riders are penalized if they fall outside a certain window. The men and women who ride are judged for riding skills and habits, while their mounts are judged on conditioning, training and manners.
Most riders welcome having a photographer at the event. Photographs not only record the ride, but also provide a picture of a favorite horse and a way for the riders to assess their own riding form.
What to shoot
For most riders, the horse is the most important subject. While they don’t want to look stupid or inept, riders care more about how the horse looks than how they look. Here are some tips on how to get the best from the horse:
Shoot from the side. I still like shooting the occasional rider coming up the trail towards me with the fall colors behind him, but trust me, those pictures don’t sell. Shoot from the side, so clients can view as much of the horse as possible. They want to see the legs and the musculature. Most owners also prefer to see the mane side of their horse. But because the side on which the mane falls will not be the same for every horse, you may not always be able to oblige.
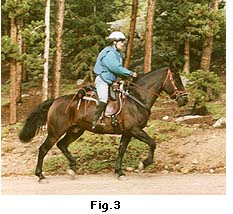
Shoot the trot. When a horse trots, she extends her legs and body. If the horse is in good shape, her muscles will be well defined during the trot. It’s a good opportunity to catch her best aspects.
Shoot when the horse is going up an incline. As in the case of a trot, the horse is working when he’s moving uphill, and his muscles show it. This is also a good time to capture the horse and rider working well together. The rider should be assuming a position, or riding posture, that assists and does not hinder the horse’s efforts to ascend the hill. This coordination is what the judges are looking for. When done right, it makes a beautiful photograph which sells every time. This particular scene also makes a good stock picture. The opposite shot, of course, is the horse going downhill. Only on the rare occasion will you get a horse to look good in this position. One such time may be when a steep incline is made up of very loose soil. Often the horse will almost sit on its haunches as it slides down the incline. Don’t count on capturing such an action-packed moment, however. It’s best to avoid the downhill.
Equipment and Safety
When I first started, I tended to take everything I owned with me. Now I know simple is best. I bring 10 to 20 rolls of film–depending on the number of riders–and two dependable cameras. Other than that, all I bring is a lawn chair, sunscreen and lots of water. Two cameras are a necessity, for when there are more than 36 competitors, a roll change is called for right in the middle of the field. There isn’t time to stop and reload. Sometimes I’m rushed merely switching my lenses from camera to camera.
I like using my 28 to 85 mm zoom lens. It provides flexibility of composition and has saved me many times when footing was a problem. In other words, there are circumstances when only one place to stand is safe. With the zoom, I can use the lens to help me compose the horse and rider within the frame.
Although my cameras can take an auto-winder, I leave that at home, too. During my first ride, I discovered the sound of the autowinder spooked some less experienced horses. That’s also the reason I don’t use a flash. While fill-in flash would produce much better results, it can make both the horse and rider nervous. To explore this dilemma, I’ve tested flash with my own horses. In fact, I routinely use a flash when shooting show horse portraits. In these cases I’ve had only the rare horse panic at the flash. But I’ve decided it isn’t worth risking either making a rider lose control or having a rider lose control for some other reason and blame me as a handy excuse.
While we’re on the subject of spooky horses, it’s good to remember one other thing: You, as the photographer, can be a surprise to the horse. Horses on the trail may shy at objects as alarming as an odd-shaped rock or a fallen log. For some horses, a person appearing suddenly on the trail is the equivalent of a horse appearing suddenly in your house. It’s the last thing a horse may expect. Make sure both the rider and horse are aware of your presence. Don’t hide behind trees or stand on the blind side of brush. Talk to the riding team as they approach. A calm voice will reassure the horse, and may prevent the rider from giving the horse the confusing signals which are common with surprise. Some photographers will place a sign down trail to warn the riders a photographer is up ahead. Prior notice will give the rider time to reassure her horse and be firmly in control by the time they reach you. A photographic assistant can help spread the word. My wife often plays this role. Because my wife and I are well known and, therefore, trusted by the judges, my wife is often called upon to give the riders instructions as they approach an obstacle or a vet judging station (called a “pulse and respiration stop”). At that time, my wife will warn the riders about me as well.
Obstacles are good places for photographs, and I frequently follow the judges in order to photograph a rider working his horse through such a hurdle. The resultant effort often produces noteworthy photographs. The riders appreciate these both as pictures and as records, because they provide visual re-enforcement for a judge’s comments at the end of a ride.
Obstacles are also where the most wrecks occur. At first I didn’t photograph these. I thought no one would buy them, and I didn’t want to embarrass anyone. But I found people actually requested them. They wanted visual proof to show their friends what they had survived.
The dramatic value of pictoral proof was driven home to me after I experienced such a crash myself. A bee or wasp stung my horse just as I was swinging my right leg over his back. Caught unprepared and without any way to grasp control, I bounced from the seat, to the horn (Mexican saddle, VERY BIG!), over the horse’s head, and landed on my face in a very large ant hill. The ant hill actually prevented me from being seriously injured. The large mound of small gravel cushioned my impact, although the ants didn’t appreciate that fact. The gravel also removed much of the skin from the side of my face–the saddle horn having already removed the skin from a very sensitive part of my male anatomy. After gingerly getting to my feet and making sure I had all of my parts (at least still attached), I put my hat back on, careful not to smear the blood running down my face. My first words to my wife weren’t “Get a doctor!” They were “Get the camera!” But I digress.
Safety should always be your main concern, and this fact is stressed constantly to the riders. You should heed the advice as well. Always be aware of where the horses are. It’s very easy to be concentrating on photographing one horse only to have another horse run you over from behind. Also, when photographing an obstacle, make sure you’re not standing smack in the middle of the only other pathway out, in case a horse bolts. (I’ve forgotten this a couple of times with near disastrous results.) Keep in mind, the most important equipment you have are your arms, legs, head and eyes. Don’t risk them trying to get a shot.
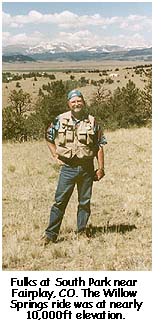
Being in the Rockies, the events I photograph often occur at an elevation between 8000 and 10,000 ft. As any hiker experienced in these parts will tell you, the weather can change quickly. If your event is located in similar circumstances, make sure you’re prepared for sudden storms, swiftly changing temperatures and erratic lighting conditions. I use an ISO 400 speed film for all of my shots–not because of the need to capture a moving object, but because the light can change from bright sun to deep darkness in just a few moments. Using a 400 speed film, I know I’ll always be able to hand-hold the camera. I shot the first of these events using a tripod. I quickly learned thus anchoring myself was the wrong thing to do. Crisply focused landscapes with blurry horses don’t work. And that brings us to part 2 of this article.
by Michael Fulks
Leave a Reply