
“Ok, stay still. Look at the camera. Say cheese.”
“C – H – E – E – S – E.”
Click.

We all have a different idea of what makes a good portrait. If you own a camera, whether it’s a point-and-shoot, disposable medium format, or DSLR, chances are, you’ve taken someone’s portrait. Maybe you’re adept at nature photography or snapping still life images, but have never been comfortable photographing people. Or, maybe you enjoy making pictures of your kids but wish you could make your photos more interesting and unusual. If you simply want to know more about how to take a pleasing portrait, then this article is for you.
Let’s consider retail store portrait studios and similar photography studios. These folks believe that you’ll have a great portrait if they sit your well-groomed child on a box covered with furry material, give him a prop, then get him to look at the camera and smile while they snap five, maybe six frames. So, what’s the problem? Well, for one thing, your child’s portrait ends up looking exactly like every other kid’s portrait. More importantly, what does this kind of picture tell you about the individual? The answer is “Absolutely nothing!” and therein lies the key to creating a successful portrait.
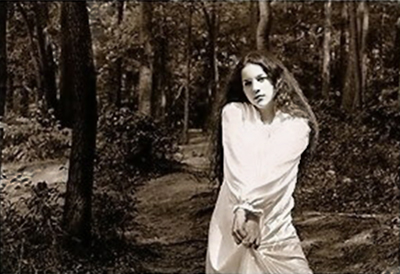
An engaging portrait is one that brings out the personality of the sitter or captures his mood at that moment in time. A good portrait will express an emotion–i.e. joy, melancholy, anger, disappointment, inquisitiveness, etc.
Is there anything wrong with telling someone to look at the camera and say cheese? No, of course not. These images are wonderful. But, as a photographer, you should be aware that they are not the only poses that make interesting portraits–even if you’re photographing children. If “cheesy pictures” are the only kind of photos you make of people, you’re limiting yourself. You’re capable of higher artistry! Let your creativity get the best of you.
To begin, go grab your camera and start experimenting on family, friends and your children! Don’t be afraid to make photo, after photo, after photo. Don’t worry about hair or clothes at first. If you start arranging details like makeup and backdrops, the sitter will begin to feel like she’s on stage. Your assignment is to capture people as they really are. Remember, you’re not working for an advertising agency; you’re practicing on improving your techniques.
Here are some tips to help you take more creative portraits:
1.) Making people feel at ease is paramount. Photographing your subject in his own territory helps, as does using natural settings such as beaches, lakes, forests, old barns, etc.
2.) Take your work outside. Natural light is more pleasing than harsh flashes.
3.) Be aware of lighting. Late afternoon is the best time to photograph, because the light is warm and produces nice textures. Morning works, too. However, avoid noon lighting. It’s much too harsh–unless, of course, you’re going for harsh! (See example.) Overcast days are also good, since they produce even lighting. Don’t be put off by bad weather. You may get a great portrait of your child in the pouring rain.
Stand with your back to the sun, but make sure your subject isn’t squinting. Remember, silhouettes are portraits, too. If you’re at a beach or lake, have your kids play near the water while you photograph into the sun. Or photograph your subject while she’s looking through a window.
If your subject is in deep shade–for example, under a tree–use a fill flash. This is a partial flash. You can make a fill flash by taping a thin sheet of tissue across your flash.
4.) If you’re photographing children and want to use a prop, give some thought to what the prop will be. An old-fashioned teddy bear or antique toy are more pleasing visual companions than a plastic or trendy toy.


5.) Open the lens all the way for a shallow depth of field. Focus on the eyes only. Let the ears and some of the hair remain out of focus.
6.) Experiment with different angles and avoid the straight-on viewpoint.
7.) Get in close. Many beginning portrait photographers stand too far away. Your subject should take up at least seventy-five percent of the frame. If you have a camera that allows you to change lenses, try either a 90mm or 120mm. (The standard 50mm lens your camera came with tends to distort images when you try to get too close. Your subject could end up with nose that looks wider than it really is.)
8.) The back of someone qualifies as a portrait.
9.) Best friends make great models.
10.) Have a conversation with your model first. Click away while you’re talking. For instance, you can ask a child about school and find out they dislike a certain subject. You’ll get a very different portrait than if you discuss the fun time he had at someone’s birthday party.
11.) If you haven’t tried black-and-white, now is the time. Photograph in color if you’re using a DSLR and then change it to black and white in post-processing, so you have all of those wonderful color pixels with which to work.
12.) For all of you who are photographing with black-and-white film and have your own darkroom, try copper or sepia toning your prints.
Most of all, have fun and keep trying until you get images you’ll treasure for a lifetime.
By Marci Cooke
Article and photos: © Marci Cooke. All rights reserved.
Leave a Reply