
Excerpted from Travel Photography: A Guide to Taking Better Pictures
(Reprinted with permission)
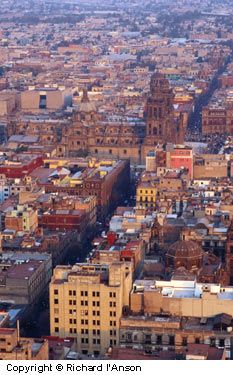
View to Zocalo,
Mexico City
I always take the opportunity to photograph cities from their designated lookouts. The view from the Latin American Tower in Mexico City is a must for any tourist. The city disappears into the haze in all directions but the tower is close enough to the historic center, known as Zocalo, on one side, and the high-rise towers on the other, for a good selection of shots.
Cities offer enormous photographic opportunities. Within all cities you’ll find focal points that present scenes, buildings and activity that typify the country and go way beyond the glossy brochures. After you’ve seen the famous places, spend some time wandering the streets, observe daily life and delve deeper into the city atmosphere.
The key to photographing a city is to walk, walk, and walk.
When you’ve walked everywhere: do it again in a different direction, at a different time of day, in different weather, on a different day of the week. Venture away from the regularly visited areas and you’ll discover lots of people who aren’t tired of having their photo taken.
City tours are offered everywhere and are useful to get a quick overview of a new city and its main sights. However, they have limited use for good photography as they’re usually run in the middle of the day and give very little time at each destination. If you’re budget isn’t too tight forget the bus and do the same thing in a taxi.
Cityscapes
Skylines and city views are great scene setters for your album or slide show, providing a context for the photos that follow. Big cities often have official vantage points on nearby hills or at the top of tall buildings that provide great views of the city. The local postcards and tourist brochures will feature these views, so you can plan the best time to go. These places are easily accessible and you know what you’ll be seeing. After taking in the official views seek out different vantage points to create unique photos. Smaller places may not advertise a lookout, but most taxi drivers will know where you can look over their town. Hotels, of all standards, sometimes have rooftop bars and restaurants, which are easily accessed. Check out a few during the day noting where the sun will set and rise, and return later to the best-placed viewpoint.
Buildings
Tilt your camera up to photograph a building and it will appear to be falling backwards. Converging verticals or linear distortion can be effective when the composition exaggerates the distortion. Looking up at skyscrapers is a good example of this technique. To record buildings faithfully the camera must be level. Photographers specializing in architectural work achieve this with perspective correction (PC) or shift lenses that allow control of the angle of the plane of focus through tilt and shift movements. Perspective correction is also possible without specialist lenses by:
- Finding a viewpoint that is half the height of the building you’re photographing.
- Finding an interesting foreground to fill the bottom half of the frame.
- Moving away from the building and using a telephoto lens.
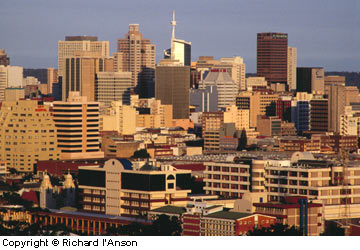
Durban, South Africa
When there are hills near a city there has to be a good view of the skyline from somewhere. With no previously published pictures as a guide, I hired a taxi and explained what I was after. It took a while but eventually we found a piece of open ground with a clear view of the city. The driver had never been there before.
Famous Places
Every country has buildings on its ‘must see’ list. The Taj Mahal, Machu Pichu, the Great Wall, the Pyramids, the Eiffel Tower … places whose image is already deeply etched in our mind’s eye years before we visit them. Photographed millions of times a year by visitors from all over the globe and printed in books, magazines and brochures, on postcards, tea towels, cups and place mats. If you want a real challenge, set yourself the double task of taking pictures of famous places that are as good as the published images, and then create a different photograph to those you’ve seen before.
Sacred Places
Monasteries, temples, churches, mosques and shrines are a focus of day-to-day activity from the smallest village to the biggest city. They are great places to hang around, camera at the ready. Places of worship attract a steady stream of pilgrims and devotees. At the entrances and in the surrounding streets, vendors selling religious paraphernalia, souvenirs and flowers contrast with the usually quiet, calm interiors. Around the buildings look for detail images that have relevance to the religion. Incense sticks and coils, texts and motifs on the walls all make interesting subjects and say something about the place and religion.
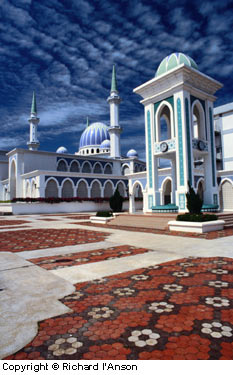
Sultan Ahmed Mosque,
Teluk Chempedak, Malaysia
By including an interesting foreground the film plane can be kept parallel to the buildings and the verticals are kept straight.
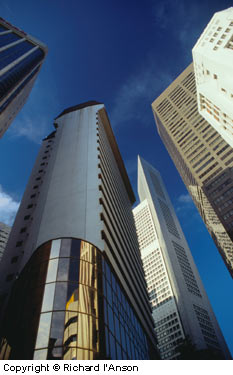
Skyscrapers, Singapore
Converging verticals can be used to good effect by exaggerating them.
Visitors are generally welcome to enter and observe the activity in places of worship, and in return sensitivity and respect are expected. Find out if certain days or times of day are busier than others because you’ll be far less conspicuous in a crowd. Always ask before shooting if there’s any doubt as to whether photography is allowed. Religious ceremonies are not put on for the benefit of tourists and you really should take a step back and consider the situation before jumping in with all flashes blazing. It’s possible to be respectful and still come away with a rewarding experience and images to match.
During ceremonies, especially those indoors, turn off the cameras film winder and flash. Take up a position where you can come and go without disturbing others and that makes the most of any available natural or incandescent light.
Interiors
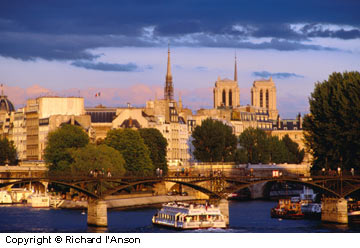
Paris, France
I had almost given up, the wind was cold, the light was dull and I’d been standing around for over an hour hoping the sun would break through the clouds. Fortunately, when it did the color of the light was beautiful and I had the Paris view I had envisaged earlier in the day.
Photographing interiors requires the ability to switch from one technique to another depending on the amount of available light. Individual displays are sometimes lit with spotlights intense enough to allow the camera to be hand-held. Generally though, light levels are too low to photograph interiors with 100 ISO film hand-held. If this is the case, switch to a faster film, use flash or mount your camera on a tripod. Be prepared for all three situations. In many places flash and tripods are prohibited, so there’s no choice but to use fast film or put your camera away. If flash is permitted remember to keep your subject within the range of your unit. The main advantage of a tripod is that you can use your standard fine grain film and get lots of depth of field.
Most interiors are lit predominantly with incandescent light, which records as a yellow-orange colorcast on standard film balanced for daylight. The actual color and strength of the cast depends on the type and mix of artificial lights (see the Incandescent Light section in the Light chapter for more information). This cast creates ambience and shows that it was taken indoors. If you want to record the colors more faithfully use an 82 series color conversion filter or tungsten film. (Unless you plan to take a lot of pictures with tungsten film, it’s impractical to carry on your travels.)
Life on the Streets
An itinerary that only takes in a country’s main sights will leave you with a limited experience and equally limited photo opportunities. Wandering the streets of a new city is one of the great pleasures of travel. In many countries life is lived on the street. Meals are cooked and eaten, clothes, bodies and teeth are washed, games played and business transacted, all in full view of the passing public. As with all people photography you’ll have to develop your own approach to taking pictures of people on the street, but the opportunities are many and varied.
After Dark
Cities and buildings take on a completely different look and feel after dark and the images will add an extra dimension to your collection. The best time to photograph is around 10 to 20 minutes after sunset. By then the incandescent lighting provided by interior, spot and streetlights will be the dominant light source, but there’ll still be some light and color in the sky. When it’s completely dark, concentrate on filling the frame with well-lit subjects and avoid large areas of unlit space. Night photography requires a tripod and cable release, as exposures are generally long. To record detail, overexpose by one and two stops – otherwise the only thing that will come out will be the lights themselves. As with all difficult lighting situations bracketing is recommended.
by Richard I’Anson
Leave a Reply