
One of the confusing aspects that came when the switch to digital photography occurred is the white balance setting on your camera.
We will explain why that setting is necessary and provide tips on using white balance in photography settings to add creativity to your photos. We’ll also look at daylight color temperature
The three primary colors that form white light (Red, Green, and Blue) exist in various proportions in any lighting situation–depending upon the color temperature of the light. When the color temperature is high, more blue light exists. When the color temperature is low, there is more red.
If you have ever experienced photographing with daylight film indoors under incandescent light, the resulting image has a reddish-orange tint. This effect is due to the difference in the color temperature between daylight and incandescent light. Your film was optimized for a daylight color temperature, but incandescent light has a lower color temperature.
Our natural visual system easily adapts to changes in the color temperature of light. When we look at a subject under incandescent light, we perceive natural colors. However, film and digital sensors are not as lenient.
Photographic daylight film is designed to be exposed in light with a color temperature of 5500 K. Indoor film is designed for light with a color temperature of 3400 K (3200 K for professional film).
Shooting indoors under incandescent light produces a reddish-orange tint to the image. Shooting outdoors under shade or an overcast sky produces a bluish tint. Fluorescent lighting produces a greenish cast with daylight film or white balance setting. More on how to master the subject of lighting here
White Balance Photography Using Your Cameras Settings
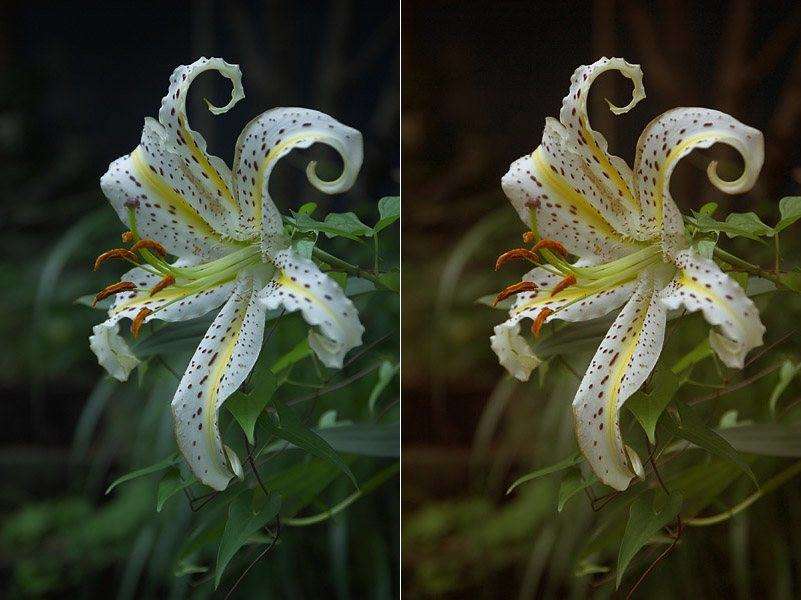
You can verify these results using your digital camera. Set the white balance to daylight (usually a “sun” symbol) and photograph using the lighting mentioned above.
For better comparison, also shoot an indoor shot using your incandescent setting, an outdoor shot using the shade/overcast setting, and a fluorescent lighting shot using your fluorescent setting.
At this point, you may be scratching your head, wondering how light can be described by its color temperature. Imagine a clear incandescent light that’s attached to a dimmer. When the light is initially turned on at low power, the filaments have a red glow.
As more power flows to the bulb, the filaments grow hotter and the lamp becomes brighter with less red. As the color temperature of light increases from low to high temperatures, the color contrast changes in this sequence: red, orange, yellow, white, and blue / bluish white.
The color temperature of light is measured on the Kelvin scale, which we may have used in our high school science classes, but have long forgotten. The scale is an extension of the Celsius scale. It’s based on the color of the light as it is emitted from a hypothetical black body.
The Kelvin scale (abbreviated as “K”) is confusing, because it runs counter to the way in which we use some photographic terms. For example, when photographers talk about adding “warmth” to a scene, they usually mean to add some reddish tones.
Conversely, when photographers talk about “cool” tones, they’re referring to the bluish side of the spectrum. This logic is just the opposite of the Kelvin scale of color temperature.

Consider a Bunsen burner, or log fire. When the fire/flame is at a low temperature, the color of the flame is red. At higher temperature, the flame changes to bluish tones. Hot Kelvin temperatures have a bluish tint to the light. Let’s look at a chart of Kelvin temperatures for various lighting conditions.
Please note that the values are approximations because many factors affect color temperature. In outdoor conditions, the angle of the sun and condition of the sky (clouds, haze, dust particles, etc.) can raise or lower the color temperature. Indoor conditions such as lamp age, voltage, type of reflectors, etc. affect the color temperature of light.
| SOURCE | DEGREES K |
| Artificial Light | |
| Match Flame | 1700 |
| Candle Flame | 1850 |
| 40-Watt Incandescent Tungsten Lamp | 2650 |
| 75-Watt Incandescent Tungsten Lamp | 2820 |
| 100-Watt Incandescent Tungsten Lamp | 2865 |
| 500-Watt Incandescent Tungsten Lamp | 2960 |
| Professional Tungsten Photo Lamp | 3200 |
| Color Photography Studio Tungsten Lamp | 3350 |
| Photoflood or Reflector Flood Lamp | 3400 |
| Daylight Blue Photoflood Lamp | 4800 |
| Daylight (Sunlight is the light of the sun only. Daylight combines sunlight and skylight.) | |
| Sunlight: Sunrise of Sunset | 2000 |
| Sunlight: One Hour After Sunrise | 3500 |
| Sunlight: Early Morning or Late Afternoon | 4300 |
| Average Summer Sunlight at Noon in the Mid-latitudes | 5400 |
| Direct Mid-Summer Sunlight | 5800 |
| Overcast Sky | 6000 |
| Daylight Fluorescent Lamp (see note below) | 6300 |
| Average Summer Sunlight (plus blue skylight) | 6500 |
| Light Summer Shade | 7100 |
| Average Summer Shade | 8000 |
| Summer Skylight (varies) | 9500 – 30,000 |
Note: Fluorescent light does not operate in the same manner as the black body model of Kelvin temperatures. Additionally, there are six different types of fluorescent lamps. White fluorescent lamps, for example, have a color temperature of 5200 K. Thai’s why it’s difficult to photograph under fluorescent lighting, even using a fluorescent filter for your film camera.
Landscape photographers often recommend shooting during the “magic hours” that surround sunrise or sunset. During these periods, the light is incredibly “warm” and flattering to the subject. As we can see from the table above, the color temperature at sunrise (2000 K) changes rapidly as time elapses.
Only an hour later, the color temperature has risen to 3500 K. By mid-morning, the color temperature is at 4300 K. The “warmer” light of sunrise rapidly yields to the “cooler” light of mid-morning.
Why Should You Worry When Your Camera helps You With White Balance Photography?
All of this information about Kelvin temperatures is interesting, but why should you worry about it when you have an Auto White Balance (AWB) mode on your camera? The AWB mode uses your sensor and an external white balance sensor to calculate the white balance for the image.
Usually, the Kelvin temperature range for AWB is 3000 – 7000 K. Using AWB will normally provide a good image. HOWEVER, YOU WILL OBTAIN BETTER RESULTS BY USING THE APPROPRIATE WHITE BALANCE SETTING FOR THE CURRENT COLOR TEMPERATURE OF LIGHT.
Try shooting the same scene with AWB and then with the appropriate white balance setting. In many cases, the differences will be obvious. In some situations, the differences will be subtler.

If you decide to use settings other than the AWB, you should always switch the camera’s white balance back to AWB when you’re finished shooting. Why? Suppose you’re shooting indoors using an incandescent setting. The next day, you look out your window and see a beautiful five-point buck in your back yard.
You grab your camera to take the shot. At this point, you’re not thinking about white balance or the fact that the white balance is set to incandescent. AWB is like the full-auto setting on your camera. You may not use it a lot, but it’s helpful in situations when quick shooting is necessary.
For people shooting in RAW mode, white balance photography may not be as important, because when you convert your image, you can employ any white balance setting. However, if you’re doing batch conversions, you need to select a specific white balance for all of the images or use an “as shot” mode.
Therefore, using the appropriate white balance while shooting may save you quantities of post-processing time.
Check Your own Camera Settings
My Canon EOS digital camera uses a shade color temperature of 7000 K (check your camera manual for the color temperature settings). That’s a good temperature for light shade but not for normal or heavy shade. In those situations, many cameras allow you to input a specific Kelvin temperature to use as a white balance.
If your camera allows you to input Kelvin temperatures, you may want to copy the Kelvin chart in this article, laminate it, and carry it in your camera bag to obtain optimum results.
If you use filters and AWB, you may be canceling out the effect of the filter. An 81 series filter, for example, is used to reduce the bluish light that’s present when you’re shooting in the shade. It makes the final image appear in the same colors you see with your eye.
The AWB setting, however, will neutralize the light balancing effect of the filter, because it’s “correcting” the color temperature of the light within a specific range.
The 81 series filter will work as planned if you use a daylight white balance setting. Note: a polarizer will still work properly with AWB, because the polarizer allows only specific rays of light to enter the lens.
Here’s a technique that allows you to add some creativity to your images and reduces the need for you to carry some filters: First, let’s figure out what the camera is doing when you have a white balance setting of “shade.” We know that the color temperature of shade is hotter than daylight and has a bluish tint to the light recorded on the sensor or film.
When we set the camera white balance to shade, we are telling the camera that we’re shooting under conditions where the light is bluish. The camera responds by adding more reddish (what photographers call warmth) to counteract the bluish light. This is what the 81 series filter does for the film camera.
Addressing Daylight Color Temperature
Now, let’s assume that we’re shooting under normal daylight conditions. If we set the camera to a shade white balance (while shooting in daylight), we trick the camera into adding more “photographic warmth” into the scene.
The camera thinks we’re shooting under shade conditions, even though we’re not. Therefore, it adds more reddish tones to the image. Using a shade or overcast white balance in daylight conditions will eliminate the need for you to carry an 81 series filter.
Check the Kelvin temperature chart, and you’ll notice that overcast conditions are about 6000 K. Light shade conditions are about 7100 K. Therefore, setting your white balance to “overcast” will not add as much warmth as setting your camera to “shade” (while shooting under daylight conditions) will. If you can enter a specific Kelvin temperature for your white balance, you have even more control over the amount of warmth that you add to the scene.
You can also reverse the process. If you want to add “coolness” to the scene, change your white balance setting to incandescent while shooting under daylight conditions. The camera thinks you’re shooting indoors with reddish light, so it adds more blue to compensate.
You always thought your camera was smarter than you. See how easy it is to trick it? Take some time and use your digital camera’s white balance settings to add warmth or coolness when you’re photographing in daylight. You’ll need only a little while to determine your favorite settings to fool your camera.
Knowledge of the color temperature of light and white balance settings can insure getting the optimum results. It also enables you to deceive your camera into giving you results that will enhance your images.
by Jim Altengarten
Leave a Reply