
The Adobe Camera RAW Plug-in (ACR) is a powerful program that gives you the ability to work with Camera RAW files before importing them into Photoshop.
A Camera RAW file contains unprocessed, uncompressed data from your digital camera, along with information about how the image is captured. You can not open a RAW file directly in Photoshop: You must work with it in the ACR plug-in (or a 3rd party plug-in) before bringing it into Photoshop as a TIFF file.
A Camera RAW file is different from a JPEG in many respects, too lengthy to go into here–bottom line, you’ll capture much more information to work with in a RAW file than you will with a JPEG. But it comes with a price: It takes more time to process a RAW file and import it into Photoshop than it does to open a JPEG in Photoshop.
You should be shooting in Camera RAW for your important work –the results are worth it!
Going from RAW (ACR) to Photoshop -How much should you do in each program?
Regardless of the version of Adobe Camera RAW (ACR) that I’m using, I tend to strike a balance, using what I see as the strengths of each program. Generally, my preference is to make as many global Color, Hue and basic Density corrections as I can in ACR, leaving Contrast adjustments, localized corrections, “fine-tuning”, and Sharpening to Photoshop.
I’ve found ACR (while working in 16-bit) is wonderful for global Color, Hue and Density correction, using the appropriate sliders in the “Basic” Tab, then moving to the “HSL/Grayscale” Tab to make further critical adjustments. I’ve found any contrast adjustments in ACR to be tough to work with and not very effective, so I save it for Photoshop.
I also never make selections of any kind in RAW, as I don’t have a true “History” Palette/Panel to fall back on if I don’t like what I see. (There are some improvements in the ACR version that comes with CS4 that help with this, but let’s save that for another day.)
At that point, I open the image in Photoshop, concentrating on Contrast corrections using Levels and/or Curves adjustment layers, making any kind of localized corrections (taking advantage of the power of adjustment layers and layer masks), making any necessary “fine-tuning” such as cloning and horizon-straightening, then saving my image as an un-flattened 16-bit Master File.
Now I can task my Master file for many uses – I can crop, sharpen and convert to 8-bit for printing on my inkjet printer or through a custom lab; I can reduce the size and PPI to save as a JPG for the web, and so on.
Where to Find:
The easiest way to access the Adobe Camera RAW Plug-in is to go to the “File” menu…“Open” in Photoshop–the Camera RAW Plug-in will automatically open.
There are two things that I would recommend you change:
1. In the “Preferences” menu, choose “Apply sharpening to preview images only”. I would recommend sharpening only in Photoshop, not by using the Adobe Camera RAW Plug-in. You will only have to do this once.
2. In the “Workflow Options” Menu, choose “Adobe RGB (1998)” for “Space”, “16-Bits/Channel” for “Depth”, and “300 pixels/inch” for “Resolution”. For “Size”, choose the size without the “+” or “beside it”–this is the native size of your camera sensor: It is better to use Photoshop, not the RAW plug-in, to enlarge your image to the desired size as the sharpening algorithm in Photoshop is so much better.
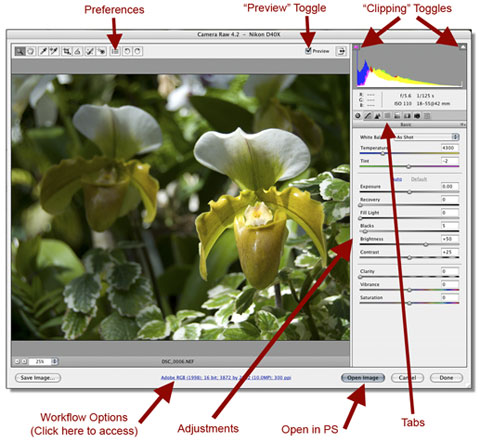
The Camera RAW Dialog Box:
Let’s look at some features of the dialog box before we work with adjustments. This list is far from complete –In the spirit of K.I.S.S. (Keep It Super Simple), Stick to the basics, master those, and grow into the other functions of Adobe Camera RAW.
-
Near the upper right-hand corner, you will notice a “Preview” Toggle –use this for before-and-after scenarios.
-
You can check for Clipping by using the “Clipping” Toggles (more below).
-
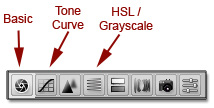
You will notice that there are eight Tabs, each with a different icon. We will only be discussing three: The “Basic”, “HSL / Grayscale” and “Tone Curve” Tab.
Checking for Clipping:
I define Clipping as “the unwanted elimination of digital information”. In the example to the right, highlight clipping is shown as a red mask, and shadow clipping is shown as a blue mask.
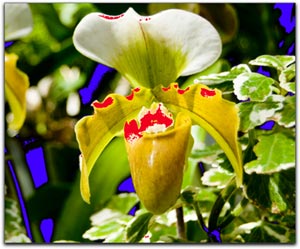
Copyright © John Watts
You can toggle the Clipping Warning on and off two ways:
1. You can hold down the “Option” key in Mac (“Alt” key in
Windows) while moving one of the three adjustment sliders: “Exposure”, “Recovery” or “Blacks”.
2. You can turn the “Clipping” Toggles on by clicking on the square boxes with the triangles in it in the upper corners of the histogram (see diagram on previous page). The square box on the left will turn on the Shadow Clipping Warning, and the square box on the right will turn on the Highlight Clipping Warning. You will know that the clipping toggles are active when the small box has a white pinstripe around it.
To Correct for Clipping: Move the “Exposure”, “Recovery” and/or “Blacks” sliders with the warning activated until the clipping masks disappear, or almost disappear. A little clipping is not a big deal–if there are just a few pixels worth of clipping mask showing, you are done.
The “Basic” Tab:
The “Basic” Tab is where you’ll do most of your work in Camera RAW. It is important to get in the habit of making small adjustments at first, then using the “Preview” toggle to see your results as you go along.
There is an automatic feature available in Camera RAW. It’s worth taking a few seconds to see if the automatic feature gives you your desired results; however, it has been my experience that most of the time you get better results with manual adjustments. You will see two “buttons” underneath the “Tint” slider. Click on the “Auto” button to see if it improves your image: if not, simply click on the “Default” button, and continue with the manual adjustments below.
Photoshop has conveniently arranged these adjustment sliders in the order that you should work. You’ll also notice that the horizontal line that forms each slider is a visual representation of what that slider can accomplish. For example, the “Exposure” sliders” horizontal line goes from dark to light, the “Tint” sliders” horizontal line goes from green to magenta, and so on.
So, let’s look at these individually:
• White Balance: These are presets for the “Temperature” and “Tint” sliders. From the drop-down menu, you can choose from a number of presets. This will also give you an idea of how the Temperature” and “Tint” sliders work and interact.
• Temperature: Move this slider to the right to warm up the color of your image (adds a yellow cast), and move it to the left to cool your image down (adds a blue cast).
• Tint: Move the slider to the right to increase the overall magenta bias, and to the left to increase the overall green bias.
• Exposure: This works great if your exposure is not “spot-on”. Move the slider to the left to decrease your exposure and make your overall image darker, and to the right to increase your exposure and make your overall image lighter.
• Recovery: This control will “recover” highlights that may have gotten lost. Move the slider to the right to increase the highlight detail.
• Fill Light: This control increases shadow detail –Simply move the slider to the right.
• Blacks: Move the slider to the right to increase the amount of black in your image. Be careful with this one –It’s easy to block out shadow detail if you use too much of it.
• Brightness: Just as the name implies, move the slider to the left to decrease brightness, and to the right to increase brightness.
• Contrast: I personally do not normally use this function: I prefer to control contrast with the “Tone Curve” Tab, and/or in Photoshop. I generally leave it at the default setting.
• Clarity: This is one of my favorite functions –think of it as a super-sharpening tool. Move the slider to the right to increase edge sharpening.
• Vibrance: This is another one of my favorite functions –Think of this as a saturation tool on steroids. It can increase your saturation without making your image look over-saturated.
• Saturation: This is another function that I do not normally use: I prefer to control saturation either with the HSL/grayscale Tab, and/or in Photoshop. I generally leave it at the default setting.
The “Tone Curve” Tab:
I would recommend that you use the “Tone Curve” Tab if you need to control contrast in RAW. Be careful–you do not want to increase the contrast level to the point where you cannot decrease it in Photoshop. I’d also recommend that you have the “Clipping” Warnings toggled on as you adjust these, paying particular attention to the highlights.
Rather than repeat myself, the previous 2 columns I wrote for Apogee were on “Using Curves”: The same principles that we discussed in those columns will apply to the “Tone Curve” Tab.
The “HSL/Grayscale” Tab:
This tab has three sub-tabs: “Hue”, “Saturation” and “Luminance”. Under each sub-tab, you have a choice of eight colors to “play” with: there is lots of flexibility here.
Again, I don’t want to repeat myself, as I will be spending a great deal of time on the Hue-Saturation Adjustment Layer in an upcoming column. Again, the same principles will apply.
When You are Done with All of Your Adjustments in RAW:
Click on the “Open Image” button at the bottom to close the Adobe Camera RAW Plug-in and open your image in Photoshop. Once open, save your image immediately as a TIFF, otherwise all of your adjustments will be lost.
A Final Word on RAW:
I know that what I’ve shown you seems like a lot of work, but if you shoot your important images in RAW rather than JPEG, then optimize your images in the Camera RAW Plug-in properly, you will not only save a lot of time in Photoshop, but you’ll be rewarded with absolutely stunning images! Try it for your critical work, you will never go back to JPEG.
by John Watts
Leave a Reply