
NOTE: This article is for older versions of Photoshop
(prior to CS6/CC), but the fundamentals still apply.
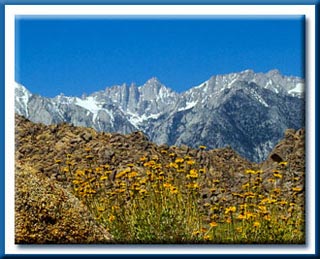
Mt. Whitney, Sierra Nevada Range
Having challenges getting your image sharpened properly in Photoshop? Try using this technique rather than the generic Sharpening tools, which are not as effective and prone to over-sharpening.
In my opinion, over-sharpening is one of the two most abused tools in Photoshop. Give yourself an edge and try this method–it is much harder to accidentally over-sharpen your image.
This is a non-destructive technique. Without getting into total “techno-geek propeller-head” mode, it sharpens just the “Luminance” values of your image, rather than your whole image, resulting in a better end result.
So here’s how you do it…
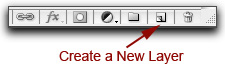
Step 1 – Create a new Background Layer: Drag the Background Layer in the Layers Palette to the “Create a New Layer” button. This creates a new Background Copy.
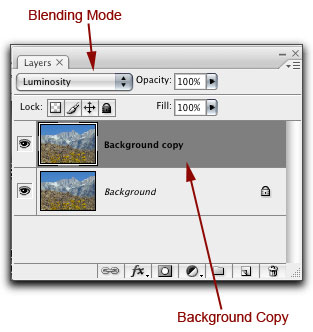
Step 2 – Change the Blend mode: Make sure that your Background Copy layer is highlighted. Then change the Blending Mode to “Luminosity” for this layer.
Step 3 – Go to the
“Filter” Menu -> “Sharpen” -> “Unsharp Mask”
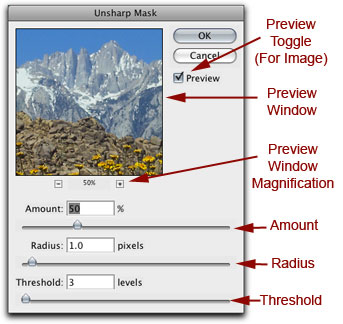
Step 4 – Apply the proper amount of “Unsharp Masking”
Click “OK”.
Here are some “fine-tuning” suggestions:
1. Suggested starting points are: Amount = 50 to 200, Radius = .9 to 1.2, Threshold = 1 to 3. Typically, I leave the Radius at 1.0, Threshold at 3, and I’ll increase the Amount until it looks over-sharpened, and back off a bit.
2. How much is too much? Mostly you’ll have to rely on a bit of trial and error at first, but the trick is to keep things looking natural and not too intense–you’ll gain more experience at this as time goes on. By the way, if your image is not fairly sharp to begin with, you typically cannot use the sharpening features in Photoshop to correct your mistakes.
3. I normally judge the effects of my sharpening with my image at 25% magnification–this is “actual size” (or close to it) on my monitor if the image resolution is 300 PPI. I’ll also set the Preview Pane in the Unsharp Mask Dialogue Box at 50% (default is 100%–press the “minus’ symbol to reduce). Between the two magnifications, I get a real good feel for how the final image is going to look.
4. Use the “Preview” check box in the Unsharp Mask Dialogue Box to judge the effects of the sharpening in your image (This does not “preview” in the Preview pane–see below).
In addition, there are some nifty things that you can do with the Preview Pane in the Unsharp Mask Dialogue Box:
1. You can “preview” in the Preview Pane by holding your cursor over it (the cursor changes to a “hand”), then pressing your left mouse button–pressing it and holding it is the “before” view, releasing the mouse button is the “after” view.
2. You can also put the cursor in the Preview Pane, press and hold down the “space” bar on your keyboard, press and hold down your left mouse button, and drag the view of the preview pane to a more desirable location.
3. With the Unsharp Mask Dialogue Box open, you can put the cursor in your image (a small square “box” will show up as your pointer), place it over an area that you’d like to see in the Preview Pane, and left-click. Voila! That area shows up in the Preview Pane.
And don’t forget: You can selectively sharpen just part of your image by creating a Layer Mask on the Background Copy and “painting out” those areas you do not want to sharpen.
In Part 2 I’ll show you another excellent way to sharpen using the High Pass Filter.
Until the next column, have fun and stay well!
by John Watts, Watts Digital Imaging
All text & photos / screen shots: © 2009 John Watts, Watts Digital Imaging. All rights reserved.
Leave a Reply