
NOTE: This article is for older versions of Photoshop
(prior to CS6/CC), but the fundamentals still apply.
Are you having challenges getting your image sharpened properly in Photoshop?
In Part 1, I talked about one method that I use that involves using the “Unsharp” Mask and Luminosity Blending Mode.
Now I want to show you another one that involves using the High Pass Filter. Both of these techniques are much better than the generic Photoshop Sharpening tools, which are not as effective and prone to over-sharpening, as well as being a bit destructive to your image.
In my opinion, Over-sharpening is one of the two most abused tools in Photoshop. Give yourself an edge and try these methods–it is much harder to accidentally over-sharpen your image.
So, which method should you use? High Pass Filter tends to be much easier and quicker, but is not as accurate. “Unsharp” Mask gives you lots more control, but is a bit harder to use. I tend to use “Unsharp” Mask a bit more than High Pass, but either method will be better than the generic Photoshop sharpening tools.
So here’s the High-Pass Filter method…
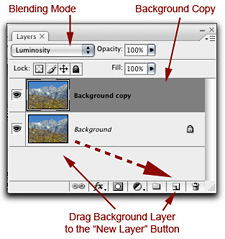
Step 1: Create a New Background Layer. To create a Background Copy, simply drag the Background Layer to the “New Layer” button.
Step 2: Go to
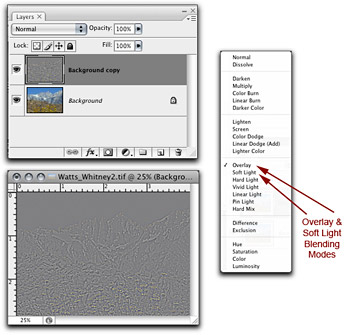
“Filter” menu -> “Other” -> “High Pass”–this brings up the High Pass Dialog Box.
Step 3: Set the Radius to “4.0”, then click “OK”. By the way, the Radius can be adjusted to taste as you gain more experience: I have one client who always starts with a radius of “10″, then adjusts the Opacity to fine-tune (See Step 6 below).
Step 4: You will notice that your image and your background copy thumbnail have a gray overlay. Don’t worry, this is normal and it will disappear in the next step.
Step 5: Change the Blend Mode: Make sure that your Background Copy is highlighted, then change the Blending Mode to “Overlay” or “Soft Light”. The “Overlay” blending mode tends to make your image sharper, and that may be too much. If that is the case, choose “Soft Light”.
Step 6: Change the Opacity, if necessary: Make sure that your Background Copy is highlighted, then change the Opacity Slider to “fine-tune” your sharpening. A higher Opacity percentage equals more sharpening and a smaller opacity percentage equals less sharpening.
And don’t forget: You can selectively sharpen just part of your image by creating a Layer Mask on the Background Copy and “painting out” those areas you do not want to sharpen.
That’s it! Give both methods a try – you’ll never use the generic methods again!
Until the next column, have fun and stay well!
by John Watts, Watts Digital Imaging
Click here to visit Watts Digital Imaging website.
All text & photos / screen shots: © 2009 John Watts, Watts Digital Imaging. All rights reserved.

Leave a Reply