
 In Colorado, we have a saying, “If you don’t like the weather, wait a minute, and it’ll change.” As a wilderness photographer, I’ve spent many hours waiting in all kinds of weather for just the right light before taking a picture.
Being able to react quickly to whatever conditions exist can mean the difference between a productive day and a day devoid of good photos. We’ve all had the experience of planning a great shoot only to be disappointed by what we perceive to be unfavorable weather.
However, by being able to adjust to changing light and weather conditions–including matching them to the appropriate subject–almost any day can be a productive day.
I generally spend three to four days at a time in the wild when I’m on a photo trip, and I plan on encountering about every type of weather there is. To maximize my effectiveness, I’ve learned to adapt my shooting style to the conditions.
If I’m tuned in to only one type of shot, not only may I miss that shot entirely, but I may be missing out on another, equally great photo opportunity right under my nose. Let’s look at a typical Colorado summer day and the types of light we may encounter:
Pre-dawn
My day starts about two hours before sunrise–just enough time for a quick cup of coffee and then it’s off to the first location I scouted the evening before. Shooting may begin a full hour before the sun appears on the horizon.
If you’re observant, you’ll see a deep indigo low in the eastern sky well before sunrise. As the sun nears the horizon, bands of light ranging from yellow to red will appear. This is an excellent time to place a silhouette such as a dying juniper tree or other strong shape in the foreground.
Remember to meter for the light at the horizon or stop down approximately 1 to 1 1/2 stops if you’re using an averaging meter. A spot meter is a good idea for this kind of work, since it’ll let you zero in on the area of color in the scene.
You’ll also find that a tripod and a cable release are essential, because you may be making exposures ranging in length from thirty seconds to five minutes.
Sunrise
After shooting the predawn light, I set up my next shot and wait for the sun to appear. On a clear day, the first rays of the rising sun hitting an object directly opposite it create truly spectacular colors, but the effect lasts only a couple of minutes.
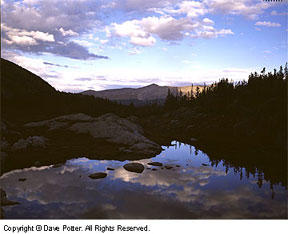
For example, if you’ve planned the location well, a mountain peak that’s gray most of the day will glow with shades of copper, gold, and red beneath the magic of first light. Many alpine lakes and tarns (small lakes) are situated at the base of these peaks and can offer wonderful reflections.
(Remember, the reflection will be about two stops darker then the actual peak, and you’ll need to calculate your exposure by averaging between the peak and the reflection to retain detail in both.)
After the initial burst of color fades, the light will still be warm and colorful. Shadows will be long and textures will be rich. This is an excellent time to photograph the landscape as a grand scenic. The light falling on the landscape at this angle means the contrast range will be lower, making it possible to capture the full tonal range of the scene on film.
Then, I move to a subject that is side-lit to accentuate its texture and form, perhaps moving back to incorporate the long shadows as part of the composition. Or I may choose a tree as a subject and move in close. Not only will the low angle of the sun show off every texture and feature, but the color of the light will be warm, as well.
You can continue shooting until approximately 9 or 9:30 a.m., giving yourself ample time to photograph at least a half dozen completely different subjects. However, after the sun rises above thirty degrees from the horizon, it’ll be too high to make good photographs.
The colors will begin to wash out, and shadows will be too deep to retain detail. I use this time to reload film, have some breakfast, and hike to the next location.
Afternoon
As afternoon approaches, so will a formation of large cumulus clouds on the horizon. These clouds not only add interest to the sky, but can also act as a diffuser over the direct light of the sun. Try to time your exposure so that the sun is behind just the front edge of the cloud.
When this happens, the light will be soft but still nice and bright–an excellent time to show both sky and foreground in the scene. Soon the cloud cover will increase until it completely obscures the sun. Cirrus clouds (thin, light-colored clouds–not the dark, overcast kind) will act as a huge, soft box, diffusing the light.
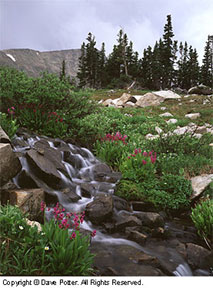
Without any glare from the harsh sun, colors will be more saturated and brighter on film than what our eyes see. This type of light will accentuate color saturation and soften shadows. The time is right to focus your attention on what Elliott Porter called “the intimate landscape.” These are smaller views of the landscape without any horizon in the picture–perhaps a small stream cascading over rocks in the foreground or a meadow filled with wildflowers.
Try using shutter speeds of 1/2 sec or longer to give the water a soft cotton-candy effect. This lighting situation is also when I start pointing my camera towards the ground for close-ups. There, an entire universe waits to be photographed. I like to take my meter reading from a patch of green grass, since I know it’ll match an 18% gray card and give me a correct exposure.
The clouds will continue to build until the inevitable happens–an afternoon thunderstorm. Time to unpack rain protection (for both you and your camera). If you’re above timberline, it’s a good idea to move to a lower elevation and find cover.
Rainstorms
Proper clothing is essential for good wilderness photography. If you’re not warm and comfortable, you won’t be able to concentrate on your work. Along with a good outer shell made of waterproof, breathable fabric, I dress in layers of a synthetic fabric such as polypropylene.
Synthetics will keep you dry by wicking moisture away from your body. They also dry very quickly. Beware of wearing cotton, because it’ll actually draw heat from your body once it becomes wet. (Hypothermia is a very real danger–even in the summer.)
I always carry an assortment of large trashcan liners. These are great for covering a camera on a tripod or as improvised pack covers or ponchos. Using my plastic trash bags, I can leave the camera set up on a tripod while I’m waiting out a rain shower. Waterproof boots are a must for maintaining warm, dry feet. (Even on a “dry” shoot, I typically spend a great deal of time up to my ankles in a stream or walking through wet meadows.)
While it’s unlikely that you’ll shoot during showers, what follows a good rain is almost always exciting. As the rain subsides, the cloud cover will start to break up, letting the sun come through. As the light passes through the moisture in the atmosphere, it takes on a spectacular quality.
Everything will have a sparkle that is evident only under these conditions. The clouds will assume different shapes, and rainbows may appear. Foliage will glisten with raindrops.
Record keeping
All of these transformations happen very quickly and may last only a few minutes. Now is not the time to be fumbling with equipment or contemplating exposure. When the conditions are fleeting at best, you must be able to set up your camera, compose, and calculate exposure within seconds.
The more practice and experience you have under your belt, the greater your chance of capturing the moment. One useful piece of equipment I carry in my pocket is a micro cassette recorder. Although taking notes and keeping track of exposure settings is next to impossible when you’re moving fast in the field, with a micro cassette, you can keep a running commentary of pertinent data.
If the recorder has a voice activation feature, it will start and stop as you speak. Later, when you’re at the light table and reviewing your slides, you can refer back to your choices and identify what works and what doesn’t, thus eliminating making the same mistakes over and over.
Record keeping will also help you get a feel for how your film reacts in different lighting conditions. Film can record only a limited brightness range. What looks good to your eye may not look the same on film.
As you start to photograph in many different situations, you’ll begin to identify which conditions record well. These are typically scenes with a five-stop brightness range when using color film. Anything greater and you’ll start to lose detail in either the shadows or highlights, depending on how you choose to set your camera.
With a spot meter, you can be very precise in reading the difference between highlights and shadows. If the range exceeds the capability of your film, you have to choose where you want to retain detail. I usually decide to expose for the highlights.
Evening
I always leave time at the end of the day to scout my next location and plan my evening shoot. I try to visualize where the sun will set and what may happen when it does. What will I put in the foreground if the clouds light up in the last light of day?
Where will the last rays of the day fall? Is there an alpine tarn or pool of water to catch a reflection? Is there a feature in the landscape that will offer a strong silhouette? All of these questions can be answered and subjects lined up well before the last hour of daylight occurs.
Also, don’t pack up your camera when the sun goes down. Some of the best colors of the day appear in the sky within an hour after sunset. A particularly photogenic phenomenon is the Earth’s shadow. This appears as a deep band of blue just over the horizon in the east, directly opposite the setting sun.
As you’ll be photographing well into the twilight hour, remember to pack a flashlight and headlamp to help you find your way down the trail after dark.
Although your day in the field may not unfold exactly as I’ve described, the preceding scenario is meant to point out that under most types of light and weather conditions, you can find a subject that works.
The important advice to remember is to be flexible, patient, and alert. By protecting yourself from weather extremes and being ready for anything Mother Nature may throw at you, you’ll be in a better position to witness the truly wonderful photographic possibilities her surprises may present and to capture these fleeting moments on film.
by Dave Potter
Leave a Reply