
A great advantage to digital photography is the ability to take photos for both color and black and white output without having to change film or cameras. For a great number of subjects black and white is the better choice.
You may have already discovered that you can change your color image quickly and easily using the Image>Mode>Grayscale commands in Elements. Or perhaps you have been working with the Hue and Saturation Adjustment Layer and simply sliding the Saturation slider to the left to desaturate the image. Both work well and produce acceptable black and white images.
When using black and white film, traditional photographers have long known that it is necessary to go beyond a simple back and white conversion of a scene. For example, clouds in the scene will record better if the photographer has put a yellow or orange filter in front of the lens when shooting. Roses in a garden might also record better using a red filter to create contrast between the red of a rose and the green of the foliage, otherwise, because green and red often record the same value of gray, the red rose might be lost against the green background.
As a digital photographer, when we convert our color photos to black and white, we often find that our scenes can probably be better represented with some adjustment to the relative tones of the subjects in our photo, much like the traditional photographer uses filters. In order to do this we have to use different techniques to convert our color photo into black and white. Changing the Mode to Grayscale or Desaturating the image will not give us that control.
So let’s explore another technique, now being widely used by advanced digital photographers.
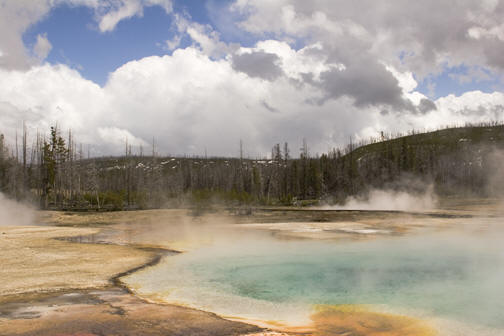
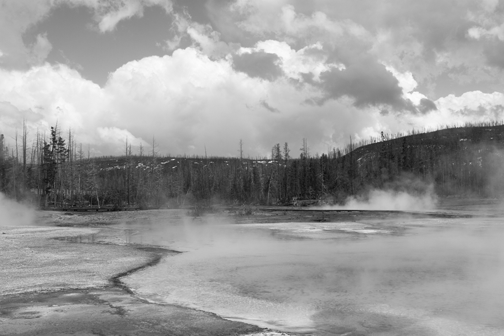
We will be working on this image that was taken in Yellowstone National Park.
Let’s open the image and check out the layers palette. If it is not visible, go to Window in the Tool Bar and make sure Layers is checked.

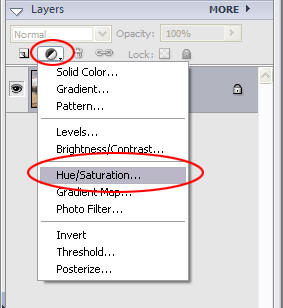
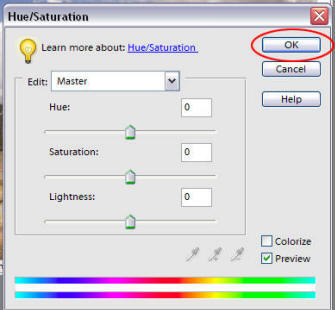
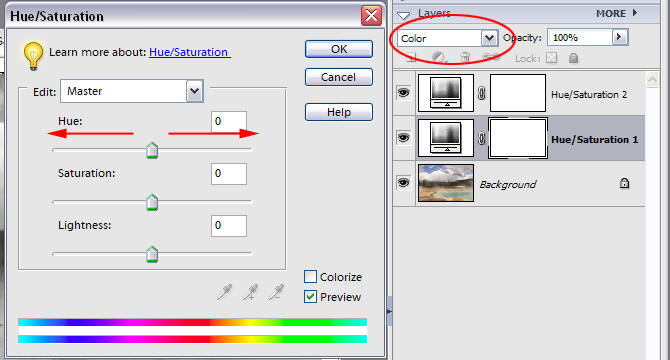
In the Layers palette, create a Hue/Saturation Adjustment Layer. You will not make any adjustments at this time. Just click OK.
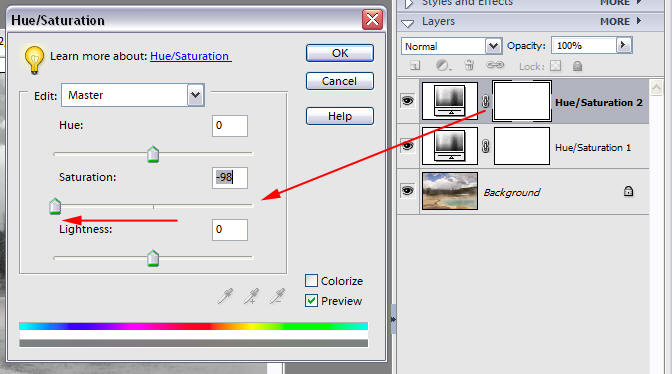
Now create a second Hue/Saturation Adjustment Level just as you did the last one. When the dialog window opens slide the Saturation slider all the way to the left. Note that this last Adjustment Layer should be on the TOP of the layers stack.
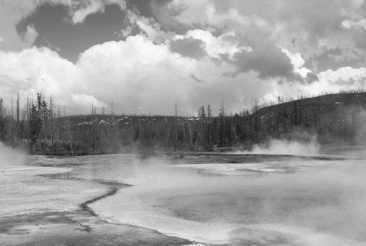
Our picture now looks like this:
Not bad, but it could be better.
Go back to the first Hue/Saturation Adjustment Layer you created. Change the Blending Mode to Color using the drop down menu. (Very important!) Double click on the layer thumbnail to open the Hue/Saturation dialog window. This time move the Hue slider back and forth. Watch how it changes the image as you do this. You should see parts of the picture getting lighter and darker in respect to their surroundings as you do this.
Move this slider around until you get the tonal range that looks good to you. I have chosen to move the slider a little to the left to make the blue of the sky darker. It also made the blue of the pool stand out more.
A tutorial by Michael Fulks

Leave a Reply