

If you have not yet done so, you need to create a copyright template or preset in Photoshop/Bridge or Lightroom, use this as your guide.
We do not import any of our images without attaching our copyright notice to it, and we strongly recommend the same practice for all photographers. There is too much theft out there. “What’s mine is mine, and by the way, what’s yours is mine, too,” seems to be the way the world has been going for quite a few years now.
Your copyright notice is very important. It lets would-be infringers know that you take your copyright seriously. See © is for Copyright, if you haven’t already read it.
This is very important, as there are only three legal forms of a copyright notice, and even seasoned photographers often list their copyright incorrectly. Argh! Also, for those who don’t know how to make the © symbol, directions are here for that, too. Or because of the vagaries of various laptop keyboards, just copy this © and paste it into your own copyright notice(s). Remember (c) is not acceptable as the copyright symbol. You really need that “c” enclosed in a circle … ©!
Making a preset or template for your copyright notice is actually easier than you might think. Macs and PCs use different terms and procedures for executing certain tasks sometimes, but the principles are the same. These directions are for PCs, but those of you with Macs will know what to press or select instead. For the screen shots below, look for the red arrows and/or boxes to show you where to look for this or that feature. For Mac users, if it isn’t there, just click on the red “close” button in the upper left of your window.
NOTE: If you use another program, you can adapt this information to create a copyright template or preset there.
LIGHTROOM DIRECTIONS
If you do not have any images “in” Lightroom, “import” just one from this year. I use quotes, as your photographs are not actually imported into Lightroom or any other imaging program, only thumbnails for the images and the ability to work on the photographs. Your photographs are exactly where you put them, either in a folder in your computer or on your external hard drive. For those to whom this sounds like some obscure language, there are some great tutorials on different functions and aspects of Lightroom by Adobe developer and guru Julieanne Kost listed on our Resources page.
Now that you have at least one image from the current year visible in Lightroom, make sure you are in Library module, grid view — g is the keyboard shortcut —(multiple images showing on “light table” in center), and click on the image to select it. If you have a folder with more than one image, click on any image in the folder. (Figure 1)
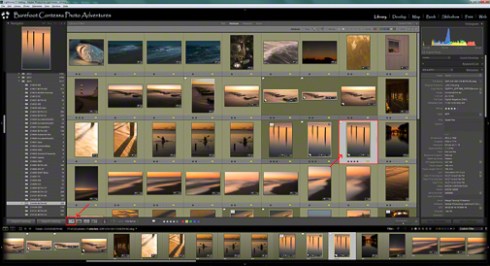
Figure 1
In the right panel (check our Lightroom Introduction on our blog if the panel doesn’t show), scroll down to the Metadata section and make sure it is open (click the triangle to the right of “Metadata” if it is closed). (Figure 2)
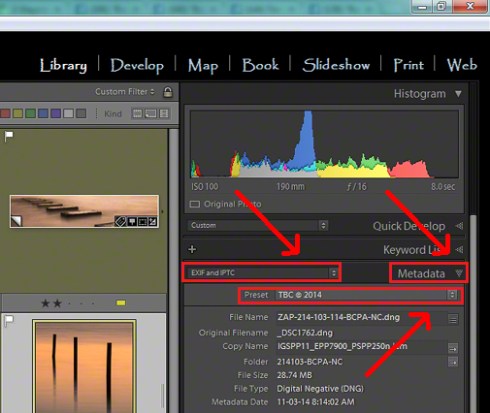
Figure 2
Click on the up-down arrows to the right of the field on the left and select EXIF and IPTC. Now click on the up-down arrows to the right of the field labeled Preset and select Edit Presets … at the bottom. (Figure 2)
If you are making a preset for the first time, None will be listed in the Preset field rather than my TBC © 2014 (now 2016 since January 1). Arnie has his own copyright notice, so we differentiate between the two, but that is not likely to be your scenario.
The fields are already filled in below (Figure 3), because none of our images is without a copyright notice.
Hopefully, you will follow this same example. Be sure to click on the Check None button at the bottom left before you start filling out fields. The critical sections are the ones boxed in red or with red arrows, depending upon the screen shot. The other sections and fields are a matter of personal preferences. Those who come to our workshops get a template/preset they can use as a base. Because screen shots are small, the actual field values are noted below under the blog section FIELDS.
Make sure that only the fields you fill out are checked on the right. It is very important to uncheck fields that are image specific, such as the Title and Keywords fields.
If you lease usage to your images, we highly recommend that you fill out ALL the fields noted below as I have done below (Figure 3).
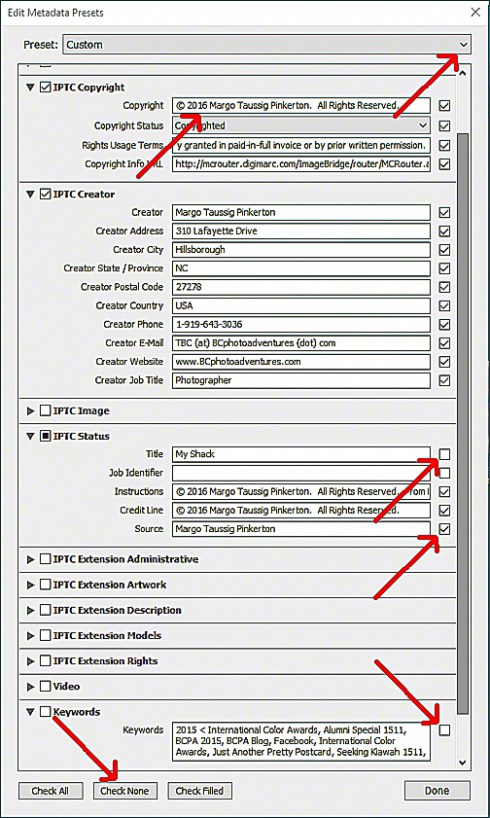
Figure 3
You will now need to Save Current Settings as New Preset… But note that the little New Preset window will normally appear much higher up on the Edit Metadata Presets window; I moved it so it would not obscure the other information. (Figure 4)
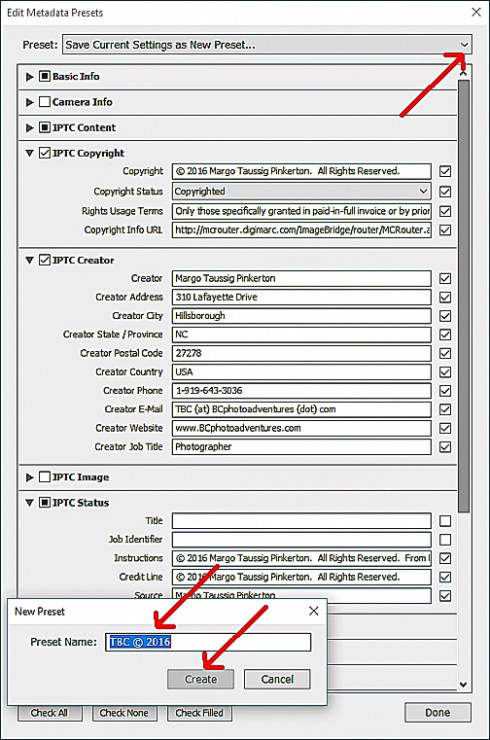
Figure 4
After clicking Create for your new preset, you need to click on Done in the lower Right. Mac users will probably just click on that little red button in the upper left.
For those who have already made a copyright preset, click the down arrow to the right of the Preset field, and select your previous year’s saved preset, in this case, my 2015 one, then mimic, where appropriate, the example below, substituting your own information for mine. (Figure 5). Again, you will find “translations” below in the FIELDS section. As soon as you start to substitute 2016 for your 2015 copyright years, the 2015 preset name will be followed by (edited). That is your cue in any preset to update it with the current settings or create a new preset.
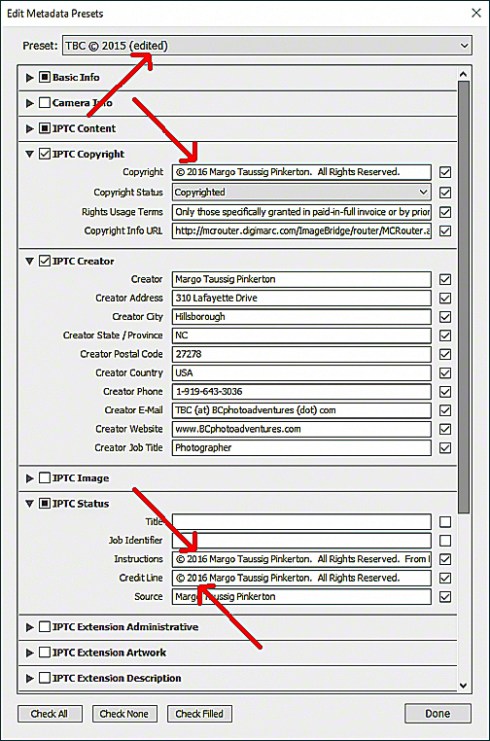
Figure 5
As with a from-scratch preset as noted in Figure 3 above, you will have to use the drop-down arrow at the top of the Edit Metadata Presets window and select Save Current Settings as New Preset.
FIELDS
IPTC Copyright Section
-
Copyright
© 2016 Margo Taussig Pinkerton. All Rights Reserved. -
Copyright Status select
Copyrighted -
Rights Usage Terms
for those who lease usage of their images:
Only those specifically granted in paid-in-full invoice.
for those who merely share on the Internet:
No rights granted without prior written permission. -
Copyright Info URL
Use your website copyright page or your Digimarc link. If you have neither, leave this blank and unchecked.
IPTC Creator Section
At the very least, put some basic contact information.
-
Creator
Margo Taussig Pinkerton -
Address and Phone Information
If you lease usage to your images, we strongly recommend that you fill out these fields. Don’t forget to use initial caps and not abbreviate, except for States/Provinces and countries. Be sure to add country code before telephone number (1- for US, for example). Generally, I do not recommend putting in your cell phone. The idea of Spammers eating up my minutes is not appealing! However, if you share your images in any way electronically, you need to put some form of contact information, and the e-mail form below is a good way to do this. -
Creator E-Mail
Note form to foil Spammers; any real person with a real brain can figure out what your e-mail is, and if they can’t, you don’t want to be dealing with them anyway!
TBC (at) BCphotoadventures (dot) com -
Creator Website
Note the use of capital letters to set off names or parts of a URL.
www.BCphotoadventures.com
IPTC Status Section
-
Instructions
© 2016 Margo Taussig Pinkerton. All Rights Reserved. From Barefoot Contessa Photo Adventures. For usage and fees, please e-mail TBC (at) BCphotoadventures (dot) com or contact us at Your Street, Your Town/City, [2-digit abbreviation for State/Province] [ZIP/Postal Code], [2-digit country code] or at 1 [country code for US]-xxx-xxx-xxxx before 9 p.m. Eastern [or your time zone] Time, ET [or the abbreviation for your time zone].
Best to stay away from standard and daylight savings references, as they change depending upon the time of year, thus the ET above rather than EST or EDT. -
Creditline
© 2016 Margo Taussig Pinkerton. All Rights Reserved.
When you are finished, click on the Done button at the lower right. Macs have a slightly different way of doing this, and you Mac owners will know what it is.
Some of you may have created a copyright template but find in reading this blog that you want/need to make some modifications. Go back to the Edit Metadata Presets window, select the copyright preset in question, make your changes, then click on the drop-down arrow at the top of the window and select Update Preset “[name of your existing preset]”. Then click Done or for Macs, escape.
Up to now, you have only created or modified your copyright preset. It’s time to apply the preset to all your images in that folder. In Library module, grid view, select All your images (CTRL-A for PC and CMD-A for Mac), and in the right panel, just under the Metadata heading, click the up-down arrow beside Preset (Figure 2) and select your own copyright preset.
Ta-daaa! After a moment, you will see your copyright information populate the appropriate fields under the Metadata bar in the right panel. Be sure to both Save (CMD-S or CTRL-S) all the images, then Deselect (CTRL-D or CMD-D) all of them, lest you mistakenly apply your next rating to all your images instead of just one!
Caution! Only do this in Lightroom. Do not use that Deselect shortcut for any other programs, as it may result in deleting selected files! If you do this by mistake, or any other task by mistake, your best friend is Undo (CMD-Z or CTRL-Z) right away! It also works in most other programs.
Now, every time you import your images through Lightroom, you may apply your copyright as part of the import process in the Apply During Import section in the right panel of the Import window.
PHOTOSHOP/ADOBE BRIDGE DIRECTIONS
First, you will need to go into Preferences > Metadata and be sure that IPTC Core is checked. (Figure 6)
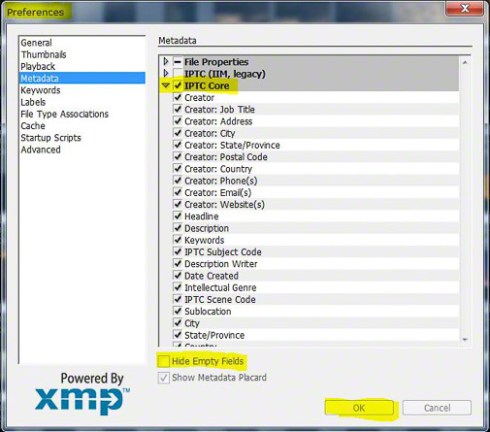
Figure 6
Click on OK or comparable command in Mac.
Now, go to Tools in the Menu bar at the top. (Figure 7)
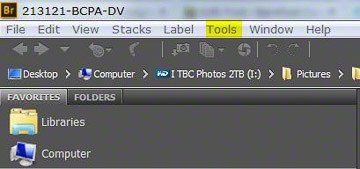
Figure 7
From there, select Create Metadata Template. (Figure 8)
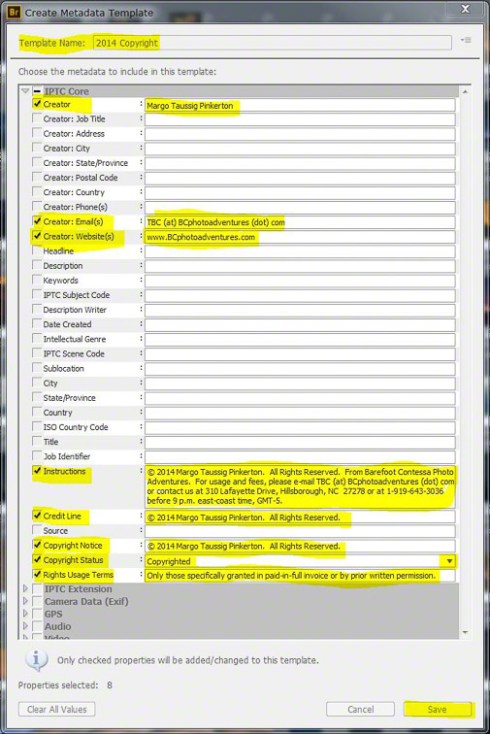
Figure 8
Fill out the fields, the red highlighted ones at a minimum, according to the specs in the Lightroom directions and Figure 8 above. Then click Save and give it a name such as 2016 Copyright.
If you already have a metadata template, update it using the above specs, then click Save. A window will pop up warning you there is already a template of that name. (Figure 9)
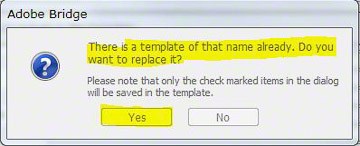
Figure 9
Don’t panic. As long as you are editing the wording in your template, you really do want to override the previous version, so click Yes!
When you bring your photos onto your computer or external hard drive, you can use the Bridge Advanced Dialogue and select the appropriate year template to apply to your files (images). (Figures 10 and 11)

Figure 10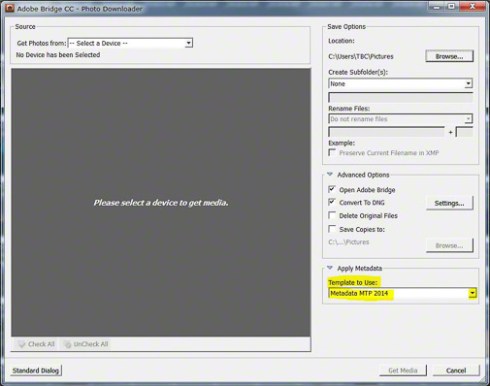
Figure 11
Again … Ta-daaa! You’re all set to go in Photoshop and Bridge!
Don’t forget that before or on January 1 of each year, you should return and edit your preset or template and so that it shows the new year in all the appropriate fields, then save it as a new preset or template, per the instructions above.
Congratulations! You have taken an important step in protecting your images from would-be thieves.
And don’t forget to update or create your copyright template in your camera, too. Don’t know? That’s what your manual is for!
By Margo Taussig Pinkerton
(aka, TBC–The Barefoot Contessa)
Originally published December 2013 and most recently revised January 1, 2016


Leave a Reply