
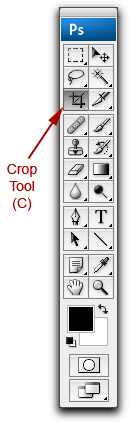
CROP TOOL: Get up-to-date information for Photoshop CS6/CC.
Purpose:
The Crop Tool allows you to crop to a portion of an image to enhance the subject matter, remove an unwanted object, or improve your composition.
Where to Find:
You can find the Crop Tool in the Tools Palette, or by pressing its Speed Key, which is “C”.
What’s in the Options Bar:
The Crop Tool has 2 Option Bars: One before you actually start to “draw” your Crop Marquee onto your image and then one after you “draw “ your Crop Marquee.
Option Bar #1 (before “drawing” the Crop Marquee):

When you click on the Crop Presets drop-down menu triangle, a series of preset crop sizes will show up. Choose one if you desire. You also can save your own preset sizes by filling in the appropriate width, height, resolution and units in this options bar, then going to the “Presets” menu, then going to the “Palette Options” triangle on the top right, and choosing “New Tool Preset…”.
If you would like to “Swap” the Width and Height values, click on the “Swap” button. For instance, the values are currently 8” width by 10” height (a “vertical” crop), but you want 10” width and 8” height (a “horizontal” crop) – click the “Swap” button and this is accomplished easily.
If you want to start all over in filling in your values, or you want to create your Crop “free-form” without any set proportions, click on the “Clear” button.
Option Bar #2 (after “drawing” the Crop Marquee):

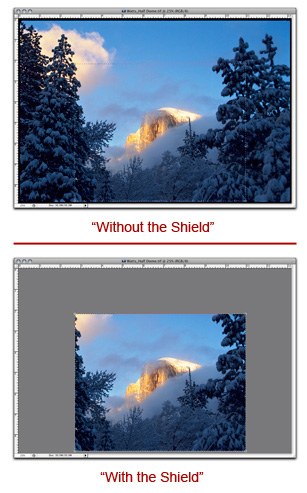
You can visually double-check your crop by putting a Shield around the area to be cropped out. Just check the “Shield” box in Option Bar #2. You can also change the color and opacity of your shield. Double-click on the box with the color in it, and the Color Picker pops up.
Once you’ve got your desired crop, click on the ![]() button in Option Bar #2 or press the “Enter” button on your keyboard to Commit your crop. If you need to start all over, click on the
button in Option Bar #2 or press the “Enter” button on your keyboard to Commit your crop. If you need to start all over, click on the ![]() button or press the “Escape” button on your keyboard to Cancel your crop.
button or press the “Escape” button on your keyboard to Cancel your crop.
How It Works:
1.) In Option Bar #1, select your options.
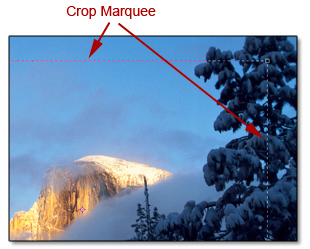
2.) To start, put your mouse cursor in the upper left portion of your image, hold down the left mouse button, and drag down to the bottom right area of your image. Let off of your mouse button. This creates the Crop Marquee.
3.) In Option Bar #2, choose your options.
4.) Once you have the crop the way you want it, Commit your Crop by pressing the ![]() button.
button.
Don’t worry about being too precise at first. Before committing your crop, you can fine-tune your crop by:
Resizing: Put your cursor on one of the boxes in the corners and change the size of the crop marquee. Hold the “Shift” key down to constrain proportions of your crop, if necessary.
Moving: Put your cursor inside the crop marquee, then hold down the left mouse button, and drag the crop area.
Moving minutely: You can do this by using your arrow keys.
Rotating: Put the cursor near one of the boxes in the corner until a curved arrow shows up, hold down the left mouse button, and move clockwise or counterclockwise as desired.
Now you can experiment with the “Rule of Thirds”, horizontal vs. vertical cropping, and multiple crops from the same image. The possibilities are endless, so have fun!
RESIZE YOUR IMAGE
Use this procedure if your image has been flattened and cropped, but the image needs to be resized proportionally. For example: You’ve cropped for 16×20, but want to make an 8×10.
By the way, if you want to resize between non-proportional sizes, such as going from a 16×20 to an 11×14, you will need to re-crop.
How it Works:
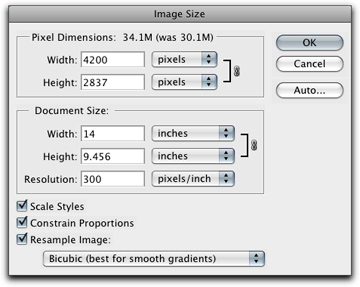
1.) Go to “Image” -> “Image Size”.
2.) Make sure that “Scale Styles”, “Constrain Proportions” and “Resample Image” are all checked.
3.) Resize by entering the desired size in either the “Width” or “Height” boxes. Since “Constrain Proportions” is checked, entering in one box will automatically change the value in the other to keep the proportions the same.
4.) If you are making smaller changes in resizing (7×10 to 9×14), leave the “Resample Image” drop-down menu at “Bicubic”.
5.) If you are making big changes in resizing (8×10 to 16×20 or 16×20 to 8×10), change as follows:
To resize from a smaller image to a larger image, choose “Bicubic–Smoother”.
To resize from a larger image to a smaller image, choose “Bicubic–Sharper”.
6.) Click the “OK” Button.
7.) To Save to Size, go to “File” -> “Save As…”, and rename according to your naming conventions. By moving this slider, you can change the size of your previews in your Content Panel.
Until the next time, have fun and stay well!
by John Watts, Watts Digital Imaging

Leave a Reply