
Landscape photographers are very opinionated when discussing the camera’s depth of field preview button – many professionals applaud its virtues….however, many amateurs say it’s a waste of time.
As opinions go, there is no middle ground. People either love the depth-of-field preview, or they hate it. This article will explain how the depth of field preview operates, its problems, and a few tips for making it work well for you.

How It Works:
Most camera manuals describe only how to use it without explaining its value. An example will help to clarify the situation. Let’s assume that:
1.) You’re using a 200mm lens with a maximum aperture of f2.8.
2.) You want to shoot the scene at f8, because there are elements of the scene you want to be in focus that are at different distances from the camera.
3.) Two elements in the scene are far enough apart that both will not be in focus at f2.8, but they will be in focus at f8.
When you focus your lens on an element in the scene, you’re seeing the scene through the viewfinder at its maximum aperture of f2.8. The camera is designed in this manner for several reasons. Most importantly, it allows the viewfinder to operate at its brightest setting to facilitate your viewing the scene.
It also allows the camera’s auto focus mechanism to obtain enough light to work effectively. If your lens has a maximum aperture of f4, you would view the scene through the viewfinder at that setting, which is one stop darker. If you have lenses with different maximum apertures, try looking through them at the same subject to see if you can discern the one-stop difference in brightness.
In your viewfinder, you can see that the element you focused on is in focus, but how do you know what else in the scene is in focus?
We know that f8 provides more depth of field than f2.8. However, when you look through the viewfinder, you can’t see the additional depth of field, because you see the scene only at f2.8. This is where the depth of field preview saves the day.
The depth-of-field preview manually closes the lens to the selected f-stop. That allows you to see exactly what the lens sees in terms of focus. Since you’re photographing at f8, the depth-of-field preview verifies that both elements will be in focus in the final image.
If you want to try the depth-of-field preview with your camera, follow these steps to see how it operates: Use aperture priority mode and set your camera to the maximum aperture. Use a telephoto lens of 135mm to reduce the effect a wide-angle lens has on depth of field.
Place two objects about two feet apart in a bright room or outside in the sunlight. Focus on the closest object, and press the depth-of-field preview button. What changes in the viewfinder? NOTHING! Since you set the aperture to the maximum number, the depth-of-field preview closed the lens down to the same f-stop. Therefore, you didn’t see any difference when you pressed the button.
Now set the camera to f8. Focus on the closest element. If you have an auto focus camera, set the lens switch to manual. Manually focus the lens just past the closest element, so that the element you initially focused on is slightly out-of-focus.
At this point, both of the elements in the scene should look out-of-focus (because you’re looking at the scene at the camera’s maximum aperture). If either element is in focus, move one object another foot apart. Press the depth of field preview, and both elements should be in focus. (I’ll explain why we focused the camera manually later.)
The Problem Side Of The Depth Of Field Preview
The problem that many people experience with the depth-of-field preview is that the viewfinder gets very dark when they activate it. Why? The viewfinder initially operates at the maximum aperture.
Any time you set the camera to shoot at another f-stop, there will be less light coming into the viewfinder as the lens is manually closed to the selected aperture. Try this exercise. Set your camera to the maximum aperture. Press the depth-of-field preview. Nothing changes.
Keep the depth-of-field preview depressed, and move your dial to the next smallest f-stop (you may need someone to help you). You’ll see a small change. Keep changing the f-stop to smaller openings with the depth-of-field preview depressed. You’ll see the viewfinder grow darker and darker as the aperture becomes smaller and smaller. As you dial to smaller f-stops, you’ll see more in focus in the scene.
Since the depth-of-field preview is the best way to ensure that you know what’s in focus in the scene, here are two tips on how to adjust your eyes to a darker viewfinder:
1.) Initially, practice using the depth-of-field preview in bright light conditions.
When the ambient light level is low, using the depth-of-field preview at small f-tops is more difficult. Wait until your eye can see the differences in bright conditions before trying low light conditions.
2.) Have you ever walked into a movie theater after the show started? It’s dark and you can’t see an available seat. After a moment or two, your eyes adjust. When the viewfinder is very dark with the depth-of-field preview, don’t give up. Give your eyes time to adjust, and the darkness will not be as troublesome.
Tips:
Look at the shot of a wildflower along the central Oregon coast at the beginning of this article. I used a telephoto lens to fill the frame. As you know, that lens choice reduces the depth of field at any given aperture. Therefore, I had to be careful to achieve front-to-back sharpness on the flower. To make the flower stand out, my intent was to have maximum depth of field on the flower, but minimum focus on the background green leaves.
There is one important feature of depth of field that should be considered in your focusing decisions: Approximately one-third of the total depth of field in a scene falls in front of the point of focus; about two-thirds of the depth of field falls behind the point of focus.
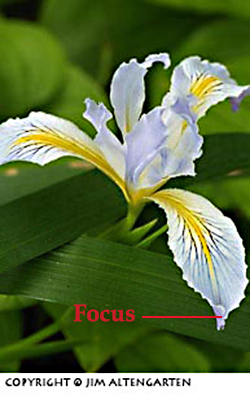
Many people photographing this scene will focus on the front of the closest petal, as shown in the image on the top. They believe that focusing at that point and using a small aperture will ensure that the entire flower is in focus.
There are some problems with this common strategy. Since you’re using a telephoto lens that minimizes depth of field, how can you be sure what f-stop will work? Remember that the smaller the f-stop, the greater chance that diffraction will reduce the quality of the image.
Focusing on the front edge of the petal reduces our depth of field by one-third. The depth of field in front to the point of focus is lost. We’re essentially hoping that the remaining two-thirds of the total depth of field will cover the rest of the flower.
Finally, a very small f-stop number provides a lot of depth of field, but results in a slower shutter speed. Even a slight breeze can cause the flower to be out of focus.
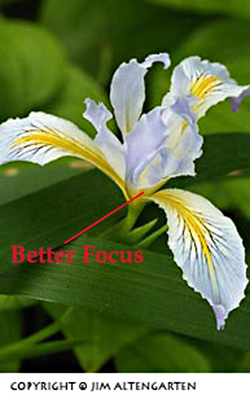
The best strategy is to provide the minimum depth of field that ensures the entire flower is in focus while providing the maximum shutter speed to reduce the chance of blur caused by wind.
Remember one of our original exercises in which you focused on a point somewhere between the two objects in the scene? That’s the strategy we should use in this case. Look at the image on the bottom. The arrow indicates a better point of focus.
The one-third of your depth of field in front of the point of focus should cover the closest petal; the remaining two-thirds will cover the remainder of the flower. How can we be sure? We use our friendly depth-of-field preview.
How do we know the precise point of focus? Remember how we kept the depth-of-field preview depressed and changed our f-stop? That’s what we do in this situation. We determine an initial point of focus based on our one-third/two-thirds guideline.
After that, we keep the depth-of-field preview depressed while changing the f-stop to select the lowest f-stop number that provides the desired depth of field. By achieving the lowest f-stop number that provides the desired depth of field, we’re also achieving the highest shutter speed available.
This discussion has shown the values of the depth-of-field preview and also demonstrated methods of overcoming the difficulties of using this tool. Incorporating some of these strategies should help you with the important area of depth of field in your photographs.
by Jim Altengarten
Leave a Reply