
The use of a flash for macro photography is just as important as using a lens on a camera…and that applies to insect macro photography too of course. It allows for control over the shadows and faster shutter speeds, which results in great colors within the images.
How do you start with using a flash and gain the practical experience necessary to create those stunning photos? This article will get you headed in the right direction.
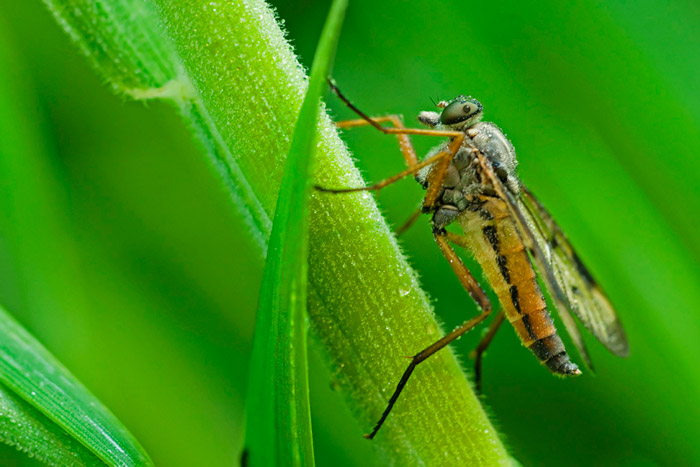
When I started in insect macro photography , I soon discovered that using a flash was going to be necessary. The question was which kind? I’ll answer that question and let you know what works well for me.
All cameras have a flash incorporated in the camera body or you can utilize a camera mounted flash. But… When you are using a macro lens, the distance between the lens and subject is typically 10 cm (approximately 4 inches) or less.
When you use an in-camera flash or a flash mounted on top of your camera the lens is between the flash and the subject. The light from the flash either doesn’t light your subject properly, or the light would be too harsh, and/or the lens will cast dark shadows over the insect.
The ring flash made for macro photography may work well for others, but I found that these produce a flat light on the subject with the shadows falling behind it. This does not allow for a look with a more defined depth of field. I wanted deeper shadows that show greater depth of field.
So with this knowledge I decided to use an external flash connected with a cable to my camera. I use a wireless flash for ease of use – the cable is not an issue for my creativity and free use of the flash. And when you shoot photos of insects, a cable can scare an insect and they will run or fly away.
Novoflex
Omni Bounce
Setup of External Flash
Here is what I have found to be one of the best ways to setup your external flash.
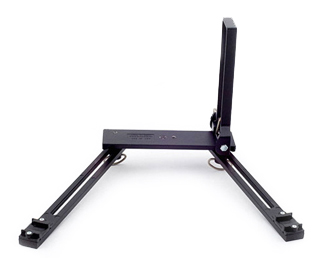
Flash Bracket – Novoflex
Flash brackets are ideal when the camera is handheld. It allows you to work faster and with insects that can certainly be necessary.
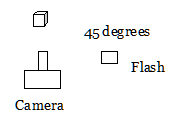
If your camera is mounted on a tripod, you can handhold the flash and experiment with it for the best angle and distance to your subject. Directing the light straight on (front light) would be too harsh, so you’ll want to start at an angle of 45 degrees. This typically creates shadows with more depth of field, while providing nice light on the insect.
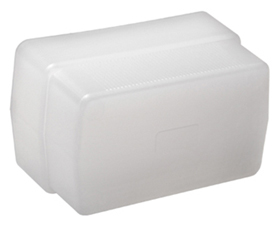
Omni Bounce
The influence of flash light can become sensitive since we are working now on macro photography and are just inches from those insects. In order to eliminate any harsh light and get a nice soft light over your subject, I would encourage you to also use an Omni Bounce diffuser on your flash.
White Balance
In-camera:
When using flash light, the resulting colors of the image are also dependent upon your white balance setting in your camera. Set the white balance of your camera at flash or daylight to achieve more accurate results.
Many people shoot RAW files and edit the white balance in their post-production editing programs, but it is important to set the correct white balance in your camera, where it can register the actual colors of your macro subject.
In the Flash:
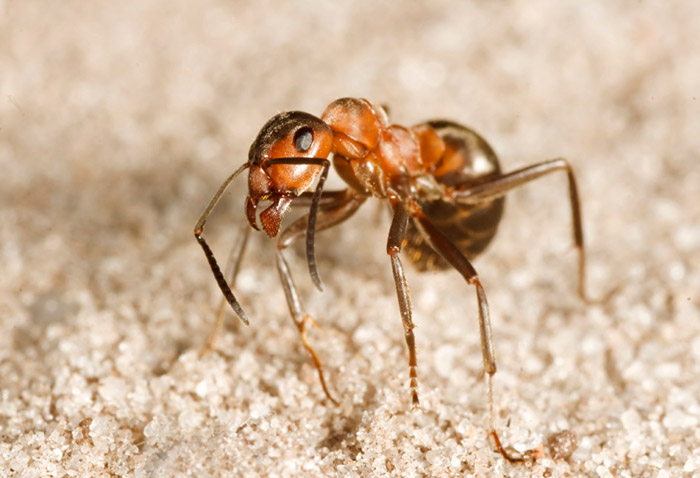
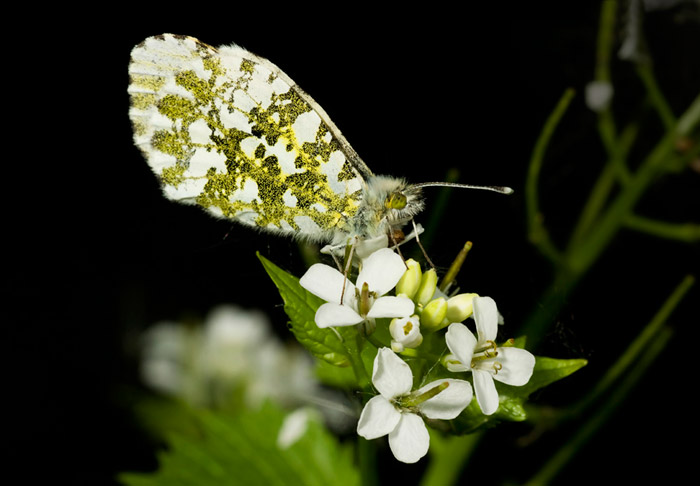
As in this example of insect macro photography: The level of the flash had to be set at the right level so the butterfly above would not be overly lit by the flash. Remember, the color of your subject will influence your flash level selection.
This butterfly is about 30 % white, so I had to set the level of my flash one step lower to compensate for the reflective nature of white. If it would have been a brown or orange butterfly, then I would have increased the level of the flash.
This butterfly was also located within the vegetation, so it was shaded, with little morning light reaching it.
Because of its position, the space around the butterfly is black. If I had shot this photo with the butterfly in an open field, the space around the butterfly would also have been filled with daylight and the greens in the background would have also shown.
This seems a bit strange? Yes? To understand this, do a simple experiment: Take a photo of a flower in a garden in full light and take another photo with the flower low to the ground, hiding it into another plant.
Look at the two photos and you will see a distinct difference in the backgrounds. If you want to create a dark background when there is none, you can use something to block the light to the background.
Strobe Flash For Insect Macro Photography
With a long exposure of 1/10 sec. or more we can use strobe flash. This works only with the flash connected with a cable to the camera. A strobe flash fires several flashes within a short amount of time. You set the flash ratio and the frequency of the flash. This technique provides more light during longer shutter speeds, and if the subject moves, you get a great effect which never could be done with one flash pulse.
Note: See the manual for your own flash, as this option is not available on every flash unit.
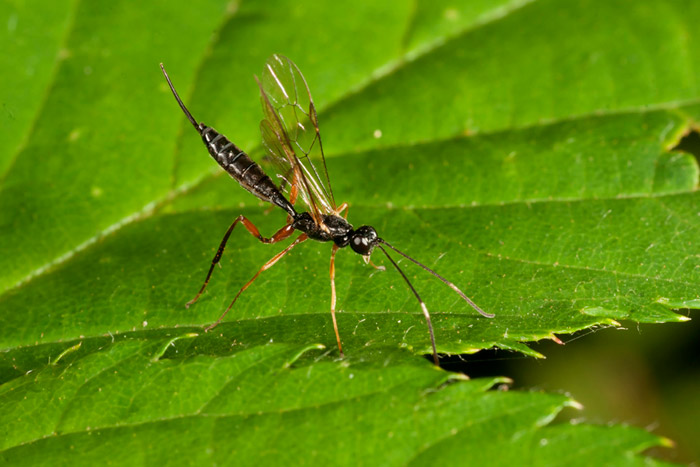
For the parasitic wasp photo above, the strobe flash was set at: 10 Hz / 20 Times. With the flash firing that many times during 1/10 sec., it provided ample light around the wasp and its body is well filled with flash light.
To get experience with a strobe flash, try this in your home on a flower: Use difference setting with the flash and try shooting from different angles and difference distances from the flash to the flower. Each will influence the result. Try it with a variety of subjects with different colors – practice, practice, practice.
Flying Insects
One of the most interesting aspects of using an external flash is shooting photos of flying insects. You can spend a lot of time on this, but the results can be awesome.
First: An essential component to making great images of insects is the understanding of how they react to your presence, their behavior and feeding habits, where your subject is located, etc. If you know this, a part of the photo has already been created.
To shoot insects in flight, use manual focus so the camera will take a photo at the moment you press the shutter button on your camera. This is important because you have to react very quickly. Set the drive mode of your camera to continuous shoot, so when you press the shutter button the camera keeps take as many frames per second that it allows.
If you know you have the proper settings in the camera, don’t stop to check the images – keep concentrating on the insect, or you will lose the opportunity to get more photos. Try to connect and be one with your subject.
ISO
The ISO setting of your camera is an important element for the setting of flash level. When you use ISO 400, you need a lower flash level than with ISO 100.
By a simple test you can see that with ISO 400 the flash light will overexpose the lighter colors of your subject. So with ISO 400, set the level of your flash near to the lowest level.
For example: Take two difference flowers in your home, a white and a red flower. Shoot photos of these flowers with ISO 100 and 400 and play with the flash levels. Take a look at the photographs and examine the results.
The Use of Daylight with Flash Light
A flash helps to create better colors in a photo when you have the right combination of daylight and flashlight. When you have 30 % flashlight and 70 % daylight you have the best combination for a photo.
Start at your own home to learn and understanding the use of external flash. Do it step by step. With practice, you will get better and better.
Enjoy using your flash in macro photography and send me some results of your own experience.
by Edwin Brosens
All text and photos: © Edwin Brosens. All rights reserved.
https://www.apogeephoto.com/macro-photography-guide-to-photographing-bugs/
https://www.apogeephoto.com/practical-microphotography/

Hi Apogee photo .com
I´m interested in the Fill in light) to acquire more inner detail
of my Butterflies and bee´s.The photo´s you show here are exceptional.
Sincerely Robert H.C.