
Part 2 of Flower photography tips . Another equipment option is the extension tube. The tube is a simple spacer that fits between the camera body and the back of the lens. It comes in several sizes, can be used with all lenses, and can be used in combination with other tubes to make the image appear larger on sensor.
USE THE TOOLS OF THE TRADE WELL
(Cont.)
When you use it in combination with a telephoto lens, it allows you to move closer to your subject and increases both the isolation capabilities and the image size.
Find more great tips on improving your flower photography
The teleconverter also increases the magnification of the primary lens–that is, a 200mm lens becomes a 400mm lens with a 2X teleconverter. There are some disadvantages to both tubes and teleconverters. With the larger image comes a loss of light.
There is no noticeable loss of light with a lens filter, but you may sacrifice quality of the image, especially if the lens filter isn’t made of high-quality glass. This loss may be exaggerated when you stack several together.
What lens should you use to get the image to come out the way you perceive it? Unless you know your lenses intimately, there is no easy answer. Each lens in your camera bag has certain advantages and disadvantages for shooting any subject.
Explore the full capabilities of each particular lens you own. How close does it focus? Three feet? Then step back three feet and look through the viewfinder to decide if what you see is the image you want. Not a large enough image?
The subject doesn’t fill the frame? Add a tube. Look again. Still not right? Change lenses, and change your position. Look again. Experiment. Take a few test shots, making notes as to what you wanted to get, what you think you got, and how you did it. Be specific during this period of exploration.
Then look at the images and compare them to your notes. Did you succeed in getting the image you wanted? No? Why not? What could you have done differently? Again, experiment and take notes.

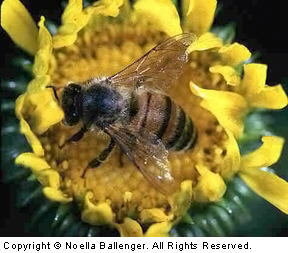
Other than macro lenses, my favorite lens for flower photography is a 300mm lens. It can compress the image from foreground to background, making a few flowers appear as though they were many. It can also be used to add swirls of soft, misty color to help set a mood, or it can isolate a perfect specimen from the rest of a flowerbed or within a wet meadow that defies approach.
SEEK PERFECT EXPOSURE
After deciding what equipment and composition you want to use, your next challenge is exposure. Many photographers are uncertain of what exposure to use–especially when working with some of the specialized equipment available. A review of the simple principles of exposure and depth of field will help.
Basic exposure is determined by the amount of light striking the sensor as it’s reflected off the subject. The sensor is sensitive to light . The ASA/ISO is a rating that is given to the scale of sensitivity. In today’s digital cameras you can set the rating to reflect the light that is present.
An ASA/ISO rating of 200 isn’t as sensitive as one with a rating of 400, but it’s more sensitive than one with a rating of 100. When you (or your automatic camera) set the ASA/ISO rating on your camera’s meter, you’re setting the gauge that will tell your meter how to expose for the light coming off the subject.
One of the best rules to learn and use in photography is based on your ASA/ISO rating. It’s called the Sunny 16 Rule. On a bright, sunny day when the shadows are crisp and dark, proper exposure of your scene will result from setting the shutter speed at the number closest to the ASA/ISO rating you have set, and then moving the f-stop (the lens aperture) to F-16.
For example, if you’re using an ASA/ISO rating of 100, on a bright, sunny day, the correct exposure will be f16 at 1/100. Since the camera doesn’t have a setting of 1/100, you’d choose the next closest one, which would be 1/125th of a second (at f16).
Once you’ve established the basic exposure under bright, sunny conditions, you can adjust the camera for any other variation. You are, in effect, creating a teeter-totter for exposure. In other words, any changes you make to one side of the teeter-totter (i.e. the shutter speed) must also be made to the other side (aperture or f-stop) to maintain balance for good exposure.
Additional lenses will subtract light and must be taken into account when computing basic exposure for a particular setup. For example, if you’re using a 2X teleconverter between your lens and the camera, the loss of light is two full f-stops.
Therefore, instead of the basic exposure being Sunny 16, it would be Sunny 16 minus two full stops–or Sunny 8. (If your camera has a TTL metering system, it will automatically compute any of the adjustments that need to be made.)
As you shoot, bracket your photographs. That is, make additional exposures on either side of what you assume to be the correct exposure. If your meter tells you the correct exposure is a shutter speed of 1/125 at f16, you bracket by keeping the aperture the same and changing the shutter speed, shooting additional shots at f16 at 1/64 and 1/250. Or, you could bracket by keeping the shutter speed the same at 1/125 and taking additional photographs at f22 and f11.
Either way, you’ll have three exposures from which to choose–one at the meter reading, one overexposed, and one underexposed. Sometimes, even though your original exposure was technically correct, you may prefer the effects of the lighter or darker one.
FOLLOW THAT LIGHT
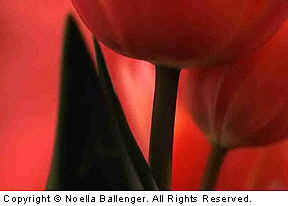
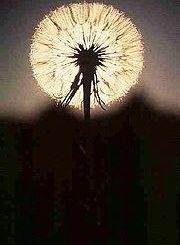
Besides affecting the exposure, light can make the difference between a dramatic or flat photograph. Be aware of light and how it strikes the subject. Is it coming from overhead, from one side or the other, or directly toward you? What is it doing to the subject? How does it affect the mood of the shot? Midday sun coming from directly overhead casts strong light on the top of the subject and casts shadows underneath, making the image appear shapeless and flat. When light comes in low and from the side, the subject appears to have more shape. The contours stand out to give the subject a more three-dimensional look. When light comes from the back of the subject directly toward the camera, the result is a silhouette.
Light has color and character in the early morning when the sun first comes up and again just as the sun goes down. The color of the light tends to be rich, warm, and glowing with golds, oranges, and pinks. In contrast, noon light seems to lack color and has a very harsh, hot appearance. The photograph you take will depend on the light, its color, character, and direction. If you’re looking for a mellow, warm, moody shot, you may want to seek out sunrise or sunset. If, however, you want to say Sun Beating Down On Sunflower, then try using the noonday sun.
One of the most appealing types of lighting is a spotlight effect. For example, a small beam of light shining through the trees, bushes, or even clouds will happen to hit a single flower or a group of leaves in a special way. This spotlight effect can create drama just as effectively as a beam of light hitting a dancer on a stage. Take your exposure measurement on the lighted surface of the subject, and don’t let the meter be fooled by the shadowy area surrounding it. Expose for the light, and bracket for insurance. Don’t worry about the shadows being dark. A spotlight doesn’t show unless the stage is dark.
What’s the best time to take photographs? Anytime! You can use almost any weather condition to your advantage, if you’re prepared. Overcast, cloudy, and light, misty, rainy days are great for flower photography. The light is soft and diffused; colors appear more vivid; and everything seems fresher. On partially cloudy days, watch the sky and wait. As light shafts through the openings between the clouds, the contrast of light and dark plus the dazzling highlights with their resulting color saturation make the waiting worthwhile.
GET FOCUSED
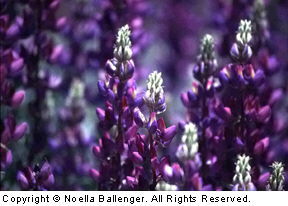
Focusing the camera on a subject creates an area of sharpness and not just a spot. Depth of field is the term that refers to the front-to-back area or zone of focus or sharpness. Zones of focus can be moved through the photograph and placed in the fore, middle, or background areas. The zones can also be expanded or contracted to make a very wide or a very narrow band of sharpness. The focal length of the lens will make a difference in the depth of field. Wide-angle lenses will typically have a wider zone of focus than telephoto lenses.
The f-stop controls the zone of sharpness. Use the f-stop control to change the size of the lens’ aperture. It can be adjusted from very small to very large. A large opening has a number of f4 or f2.8 and a small opening has a number of f16 or f22. (The numbers seem confusing, but if you convert to a fraction–i.e. f4 or ¼ and f16 or 1/16–they seem to make more sense). A simple way to remember this is “fat and fuzzy” or “skinny and sharp.” A large or “fat” opening (f4 or f2.8) causes limited depth of field or a larger zone of fuzziness. A small or “skinny” opening (f16 or f22) causes greater depth of field or a larger zone of sharpness.
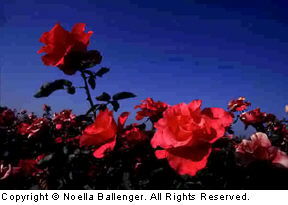
The fat-fuzzy/skinny-sharp rule gives us the answer to one of the most frequently asked questions in flower photography: How do you make a flower pop forward against a rich, solid-color background? To do this, select a subject that’s in the light and stands away from the background. Take a normal to long telephoto lens, and focus on the flower. Determine the exposure (taking care to measure the flower and not the background), and use the largest (fattest) f-stop possible. The background will go out of focus and appear as a solid color in the final image. Try setting up on a flower and shoot it first using this method, then, changing nothing but the aperture and speed (to keep the same good exposure balance). Decide for yourself which one you prefer and under what circumstances.
Don’t stop there! Explore your subject from other points of view and other positions, with other lenses and other formats. Take many photographs of the same subject in many different ways. One shot should never be enough!
by Noella Ballenger
Leave a Reply