
 IDEA: A brief introduction to ON1 to edit bracketed photographs taken in high contrast conditions.
WHO IS THIS FOR?: For photographers interested in trying an easy method of combining three images for a natural look. Photography has many variables, and exact steps in any guide have limitations. Some techniques work well with crop sensors, and others must be altered for full frame sensor cameras. I encourage creative photographers to forge their own path and not get stuck in a recipe.
TOPIC: How frames can be merged in the ON1 Photo RAW software editor. These are the steps I used, and your mileage may vary. In camera, five frames were shot at two stops apart (-4, -2, 0, +2, +4). Three of these five were combined in ON1 Photo RAW, to depict a picture with reasonable dynamic range and tones and a natural range of tonality.
TIME: There are 9 steps. The time involved is about 10-25 minutes depending on your level of skill and knowledge of the ON1 software program.
SOFTWARE TO GET THE JOB DONE: ON1 PHOTO RAW versions including 2018, 2018.5, and ON1 PHOTO RAW 2019.
LEVEL: Intermediate to advanced photographers.
The Process
1. Choose Images
To merge bracketed photos in ON1, start with a series of 5 or 7 RAW images, exposed at 2 stop intervals. From these, chose 3 RAW images, exposed from -2 stops to 0 to +2.
2. Import Images & Create Sub-folder
In ON1, Import this bracketed series of 3 RAW images. Select all of them, and right click them, in the pop-up > Add Subfolder. Copy them to the subfolder that you have named.
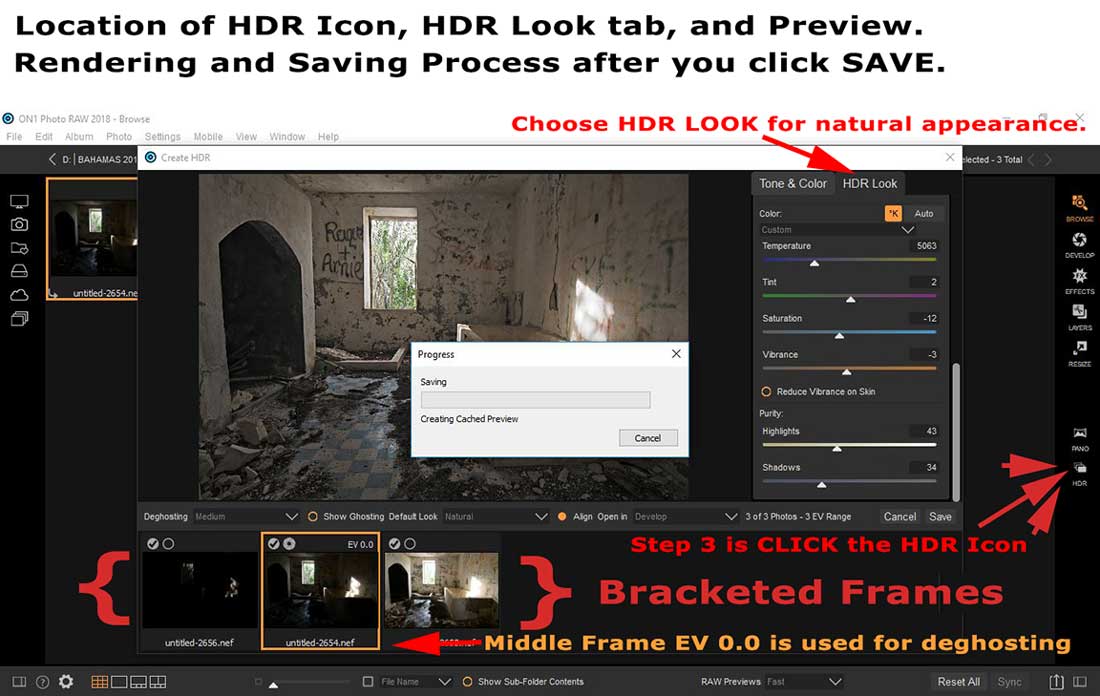
3. Create HDR
Click this new Sub-folder. Find it at the top of your image previews. You’ll see all your bracketed images within the Sub-folder. Select all of them and Click the small HDR icon at lower screen right.
4. DE-Ghosting.
The middle image of the three bracketed shots will have a small aperture icon or diaphragm, labeled EV 0.0. EV stands for Exposure Value. This is the picture that the camera selected as properly exposed.
I picked this as my base image, the picture that looks closest in exposure to the final, but you may choose another image by clicking the aperture on another image. Usually, ON1 is correct and picks the best well-exposed image in the sequence.
This is the image the frame that ON1 uses for DE-ghosting anything that was moving between the frames such as water, trees (creating ghosts in the render). If shots were handheld, camera movement is more likely, so set DE-ghosting to medium or high.
To see the ghosting, click Show ghosting and the preview will show you red areas where movement occurred. My camera was tripod mounted and cable released, and nothing moved in the scene, so I turned DE-ghosting off because this speeds up the processing time. It takes longer to get rid of ghosting.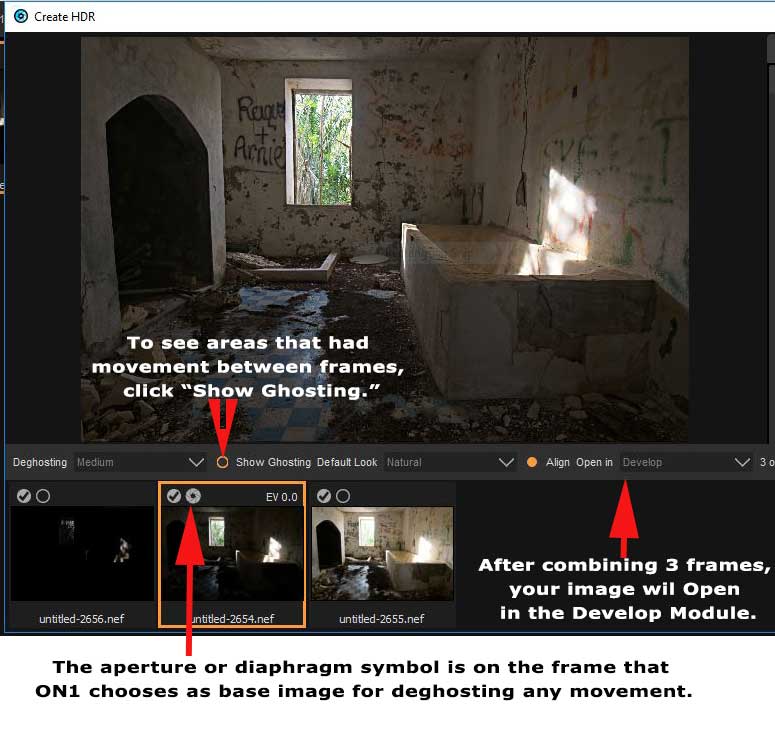
5. Natural HDR
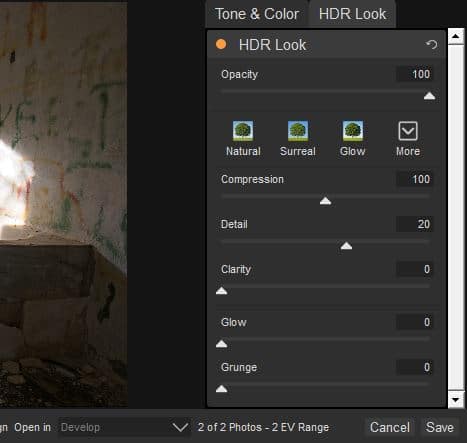
Next, in the “create HDR” window onscreen, take a look at the style options called Natural and Surreal. Using a large amount of compression of the highlights to shadows produces a surreal looking image. I chose “natural” for a small amount of compression from highlights to shadows. I left auto alone and did not use it. ON1 also offers Glow, Subtle and Exaggerated Edges and Tone in the HDR Look tab. Again, I just used natural, but I encourage you to experiment to see what the other settings look like.
6. Tone and Color
In the Create HDR preview window, use the sliders under the Tone and Color tab to edit your image. Pay attention to the Highlight and Shadow “Purity” sliders; these add natural looking nuance to the image.
7. Click Save
A progress box will pop up. After a cached preview, the image renders, deals with layers and saves automatically, so you do not have to worry about saving it. For processing a three frame image, this rendering took under 45 seconds.
8. Develop
After ON1 saves the image, the screen automatically goes to the Develop Module. At screen left, ON1 has built-in presets, which I did not use but see what you think and try a few to see what they do.
9. Effects
Great, well done. To finish, click the Effects Module. In the tab labeled “Overall Settings” you’ll find all your HDR controls again. Now, you can make final edits to the HDR look from natural to surreal, as well as choose the level of tonal compression. This final check is a way to give your image the most natural (or surreal) appearance with compression, detail, clarity, highlights and more. You may add layers and resize your image with those icons at screen right, and the program will do a final render and save your photograph.
Final Note
In addition to RAW files, ON1 software handles these file types: JPEG, TIF, PSD, PSB, PNG, and DNG. I received an ON1 software editing program from the company on my request, as I wanted to write this series of reviews, so ethically, I am biased towards using the program in my workflow. You may have different needs, but there is no risk to downloading the 30-day trial from www.ON1.com in the USA, for their 2019.1 Photo RAW, as the site asks for an email address, your country, gives you the option to opt out of updates, and offers a complete privacy policy.


Leave a Reply