
Copyright © Joe Becker
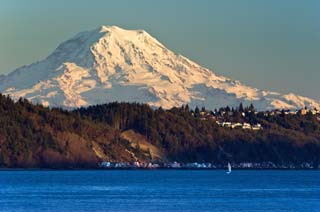
February: Mount Rainier and the Tacoma Narrows, from Gig Harbor, Washington
Most photographers I know, no matter what subject matter they prefer, are similar to me–they have difficulty editing their own work, cannot seem to find much time to take photographs, and have trouble managing a photographically-related project. One way to combat these problems is to take on a time-sensitive self-assignment that requires a lot of editing. The assignment I’m suggesting comes with a reward at the end–a beautiful display to hang on your wall or to give away as a holiday gift, a calendar of your own work.
Creating a calendar can take several weeks to a year. The time necessary is largely dependent on how many seasonal images you need. Many photographers have a multitude of images taken in the spring and summer, fewer from the fall, and far fewer yet from winter, regardless of the type of photography they favor–landscapes, travel shots, portraits, or even pet photography. To create a calendar with images that cover all the seasons, you may have to assign yourself the challenge of taking more fall and winter photographs. It seems we all want to shoot more photographs. We just need a bit of incentive, especially if it’s rainy or cold outside. To finish padding your collection before the New Year, you don’t have much time left, but you probably don’t have to go far to find usable images. Most of us have excellent prospects close to home–ones we’ve always meant to photograph. We just never seemed to have the time. The time is now!
Photo Selection
Even if you have a number of excellent, seasonal photographs from which to choose, selecting just twelve for a calendar is a strong exercise in editing. “Be ruthless in editing” is common advice. We’re encouraged to delete every sub-par image. Yet I seem to have trouble doing it. I just know I’ll need that out-of-focus image of my dog sometime soon! Getting good at editing is largely a matter of practice and giving yourself the perspective of a photographic viewer or client rather than the viewpoint of the image-maker. If you have trouble editing images from a single photographic outing, try choosing just twelve images from your whole collection!
Copyright © Joe Becker
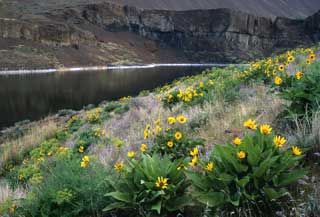
April: Lake Lenore, Washington
Copyright © Joe Becker
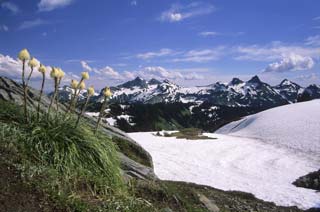
June: Tatoosh Range, Mount Rainier National Park, Washington
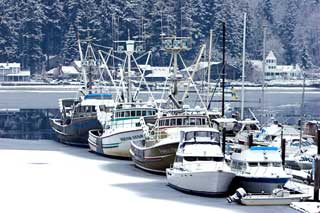
Keywording and metadata can help with editing if you’re using a software program which can use them to sort (such as Adobe Lightroom or Bridge). Metadata is image information that’s stored with the image–such as the camera and lens used, exposure settings, and the date the image was taken. Some metadata are automatically written to an image file by digital cameras when an image is taken. Other metadata can be added later. An example of this latter type is keywords. Keywords describe an image and are typically used for searching image collections. For example, for a picture of snowy boats (such as the December image), you could add keywords such as “snow,” “fishing boat,” “December,” and “winter” to the image when you’re first importing it onto your computer. Then later, when selecting images for your calendar, you could search for all images keyworded with “winter,” and this image would come up in the search. Similarly, you can filter a metadata search on date to help narrow the number of images to edit. You can even combine metadata searches. For example, you could search for all images taken between November 1, 2007 and January 31, 2008, that also have the keyword “snow.” If you already add keywords to your images, you may wish to start keywording for season and month to help you sort potential calendar shots. If you don’t already keyword images, you may wish to start.
Once you’ve selected twelve seasonal images, you need to put the calendar together. Here, you have decisions to make: How many calendars are you planning to make? One for personal use? Several to give as gifts? Five hundred or more to sell? What size calendar do you want? A small desk calendar? An 11 x 17-inch wall calendar? Something even larger? Do you want to print the calendars yourself, use a local service, an internet service, or a full-service printer? Your answers to these questions will determine your next steps.
Copyright © Joe Becker
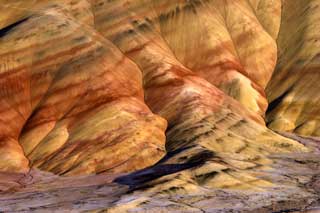
August: Painted Hills, John Day Fossil Beds National Monument, Oregon
Copyright © Joe Becker
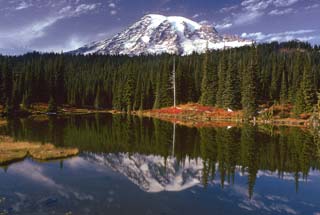
October: Reflection Lakes, Mount Rainier National Park, Washington
Calendar Assembly with Photoshop
If you’re interested in creating only a single calendar or a limited number of copies, you may wish to print them yourself. The advantages of printing them yourself are that you retain full control over the color management, and the cost should be less than having them printed by a commercial service. The disadvantage is that it can be more work. However, the work can be shortened by using ready-made calendar templates for Photoshop. A Google search on “photoshop calendar template” (without the quotes) returns hundreds of thousands of hits. However, I can recommend two in particular that are free, fairly easy to work with, and customizable. If you don’t like these, there certainly may be others that work well for you.
Jeffrey Friedl has created a Photoshop calendar template-building script available at his blog. The script is easy to download and run, and Jeffrey Friedl gives simple installation instructions in his blog. The script reportedly runs in CS2 and CS3 on both Windows and Mac machines. Running the script results in a Photoshop document for one month of a calendar, so you’ll need to run the script twelve times to create a calendar for a full year. It builds calendars in 57 languages, includes both landscape and portrait modes, can have weeks start on Sundays or Mondays, and supports personal annotations for birthdays, holidays, etc. (Personal annotations are supported via a separate, external file. Though a bit cumbersome, excellent directions are given on the blog.) The script provides for several paper sizes: letter size (8.5 x 11 inches), A3 (397 x 420 mm), A4 (210 x 297 mm), and A5 (148 x 210 mm)–all at a resolution of 300 ppi.
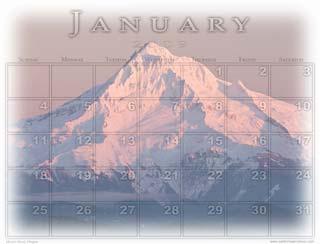
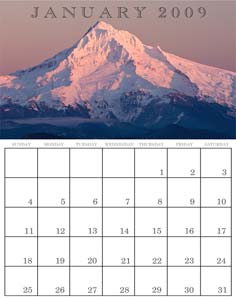
The script creates a Photoshop document with separate layers for the year, month, days of the week, dates, and the calendar grid. If you change the default values, you may wish to make a note of the changes so you can make the same changes for each month. The script also creates a layer named “Paste Your Photo Here,” which shows you exactly where to insert your photo for the month. If you have an image already open in Photoshop when you run the script, Photoshop will automatically insert and resize the photo. For more control, you may wish to crop and resize images yourself by running the script without any other document file open. The default settings place the image in the background of the calendar (see landscape example) for both landscape and portrait modes. However, by inserting an image yourself, you can separate the image from the calendar text (see portrait example), though this only works well for the portrait mode.
Copyright © Joe Becker
Landscape example above.
Portrait example on right.

Copyright © Joe Becker
The other template I recommend is available at Trimoon’s Blog. It was created by Stephen LeQuier, aka Trimoon. Rather than a script, the download from Trimoon is a Photoshop document (a .psd file) containing a full 12-month calendar template with separate layers for each day of the year. Be warned: this file is quite big and takes a long time to load. The individual layers are arranged in layer groups, one for each month, making the document a little less unwieldy than it would be otherwise. Because of all these layers, the template is fully customizable. For example, you can easily change font type, color, or style for a single day, for multiple days in a month, or for all the days of a month (to make changes to more than a single day, select multiple layers before making the change). Again, if you make changes you wish to appear in every month, you should probably take notes so you can make the same changes in each layer group representing the months. To insert an image for each month, Trimoon suggests inserting a separate layer with the image at the bottom of each the layers in that group. The default document is sized for 11×14-inch pages at a resolution of 300 pixels per inch.
Copyright © Joe Becker
Trimoon sample
The trick to using these templates is to keep your workflow organized. First, decide on the size and format you want, then run the script or open the template. If the resulting document is not the right size, resize using the image size dialog. Be sure to constrain proportions to keep the text from distorting. Make any changes or customizations you want to the template, keeping notes where needed so you can make the same changes to the other months, if necessary. Then open your image file for the month you’re working on. Decide how you want the image to fit in the template and what size it should be. Then crop the image file, if necessary to fit that size. Resize the image to 300 ppi and sharpen it appropriately for printing. Then insert the image into the template as a separate layer and move it to the proper position. With that, you’re done with one month. Repeat the process eleven more times to complete your calendar. Finally, print each page. I suggest printing on quality paper with a matte finish. Matte papers are easy to write on, while many other photo papers are not.
Other Methods
If you don’t want to print the calendar yourself, you have many other options. Many Internet services and local photo finishers offer calendar services. Formats and prices vary widely. For example, Shutterfly offers 11 x 17 inch, 12- and 18-month calendars starting at $19.99 (with quantity discounts available). They also offer over 300 borders to choose from for your images. Shutterfly does automatic color enhancement, so this service may work well for you if you don’t do correcting or enhancement in your own photo editing software. Another option is the Costco Photo Center, which offers two sizes, “classic” (8.5 x 11 inches) and “premium” (11.5 x 14 inches), with prices starting at $9.99. If you’re worried about color management, Costco offers downloadable printer profiles for each paper type available at each local store. Typically when you use services such Shutterfly or Costco, the service provides on-line software to guide you as you make your calendar. These services are more convenient than doing it yourself, but you’re limited in size and customization. Depending on the service, reproducing the exact colors of your images may be an issue (particularly if you’re using an un-calibrated monitor).
Copyright © Joe Becker
December: Gig Harbor, Washington
If you need a large number of calendars, one final option is to use a full-service printer, either locally or through the Internet. Cost can be a significant issue when using full-service printers. For example, the local printer I currently use charges approximately $6,600 for a run of 500 17 x 24-inch calendars, or $7,600 for a run of 1,000. As you can see, the more copies you need, the lower the price per copy. Full-service printers also typically provide you with a pre-production proof, so you can check the color of each image and make adjustments, if necessary.
That’s it!
Here’s your assignment: get out and take some new pictures, edit your collection down to twelve seasonal images, and make a calendar. You’ll add some beautiful images to your collection, gain valuable experience in editing and managing a project, and have a beautiful calendar of your work to hang on the wall when you finish.
by Joe Becker
Leave a Reply