
Research your trip: What is appropriate clothing?
When photographing: Remember magazines like dynamic pictures of hikers, so I’ll have to try to charge on ahead to avoid the usual “tushie” perspective.
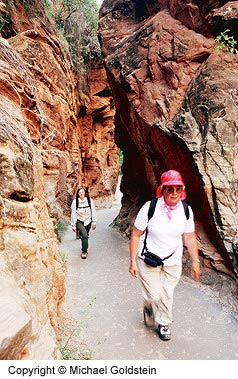
This shot uses the canyon walls as a frame, and the trail as a good leading line. This is part of the West Rim Trail in Zion National Park. The leading hiker is nicely placed to attract the eye to the image, while her red hat made a nice color accent.
The telephone rings, and it’s The Wayfarers, an organization that provides exclusive walking vacations and has operated hikes within Britain for years. As a working travel journalist, I’ve completed four of their walks in the past–in England, Scotland, and Wales–and found them to be marvelous, as well as challenging, experiences. The walks cover many miles each day over a variety of terrain. Adding the complications of altitude changes and unpredictable weather to the demands of doing professional level photography has slowed my progress up the learning curve. The only parts I do easily are sweating and growing blisters.
The Wayfarers recently added a variety of international destinations to their calendar. They’re planning their inaugural walk of “Utah’s Color Country” this spring, and their telephone conversation indicates that they want me to come along.
Appropriate Clothing
I research the weather first and discover it’s going to be hot, hot, hot in Utah. No need for heavy sweaters or waterproof rain pants. (That will be a change from the conditions I find walking in the United Kingdom!) I’ll certainly take my “wicking” polypropylene under-socks that leave my booted feet dry in the warmest weather. I want to prevent blisters. My new “wicking” tee shirts eliminate having a sweat-soaked layer next to my skin. A hat with a large brim will reduce the sunburn problem, and I’ll pack my two lightest pairs of shorts. Modern technical clothing makes outdoor activities more comfortable. A light waterproof shell over one of my new “fleece” sweaters will keep me warm almost down to the frost point. At Bryce Canyon, I’ll be out at dawn, at altitude, where it will be cold. A pair of long poly pants will be useful then, too, and they are almost waterproof.
Pocket Fillers
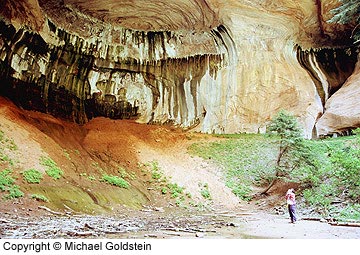
The Double-Arch Alcove, in Kolob Canyon, was a marvellous sight, after walking well over an hour, in high temperatures and humidity, to get there! It requires a very wide-angle lens, to encompass the entire alcove .. even my 24mm zoom was not quite up to the task.
Subjects such as these require something to establish scale, if you are to portray size. In this case, the hiker/photographer serves that purpose nicely, as well as satisfying the requirement of a travel photo, which hopefully makes the viewer want to “be there” as well, as somebody there seems to be having fun!
Placing the light-colored human figure against a darker surface helps it to stand out. The ‘active posture’ of the figure, stretching up to photograph the alcove, gives the image a dynamic feel, as there is interaction between the figure and the scene being photographed.
I always carry a compass (where is sunrise?) and a Swiss Army knife (I like to have scissors for cutting bandages) when I’m hiking, as well as matches. In mountain country, a small mechanical altimeter will help augment my notes on our elevation changes. I always include insect repellent with my equipment, because I’ve found that there are biting bugs everywhere! And, while I’m considering my physical well-being, I bring a basic first–aid kit and a roll of Elastoplast for toe repairs. I toss in a small pair of binoculars, my trusty miniature tape recorder for taking notes, a batch of business cards, and–for this climate–a large water bottle! I also tuck in a jacket or a sweater for weather changes, some suntan lotion, a tube of ointment for my lips, and–of course–spare film. My boots are veterans of many miles, well broken in and trustworthy. Their presence is mandatory.
Load all your necessities into a rucksack, and you’ll forever be looking for lost items. Load up a photo vest’s pockets, instead, and everything is at hand. Interestingly, when you put on the vest, the weight seems to vanish, since it’s well distributed across your shoulders.
Photographic Equipment
Once I’m ready to hike, it’s time to turn my attention to my photographic needs. This will be my first walking assignment since I acquired my “new technology” Nikon F100 and the smart SB-28 flash. The combination is heavier than any I’ve used before, but my “spongy” camera straps (Lowepro products) help reduce the sensation of weight hanging from my neck. However, my advice is, don’t get them wet! The capability of creating faultless fill flash for “people pictures” in the bright sun is not to be missed. Equally important are the abilities to depend on auto exposure with minimal bracketing, to use auto focus when necessary, and to accomplish fast exposure bracketing.
I’ll tote my equipment in a ‘belt bag’ on which I’ll also hang my water bottle. I’ll carry only the flash and my 24-80mm zoom lens (and its polarizer), which should satisfy most walking requirements while leaving me with some energy remaining at the end of the day. My trusty monopod will ensure sharp images and double as a walking stick when I’m descending from altitude. For the tough walks, I’ll pack my old, light Canon A1 with a 24mm lens. (The Canon will serve as backup, should disaster strike the Nikon.) I add in spare batteries, lens cleaning items, more film, and two felt pens. I stick small yellow labels on the top of each film can. I’ll number them as the film is exposed, so I can relate the film’s shots to my notes on each frame later.
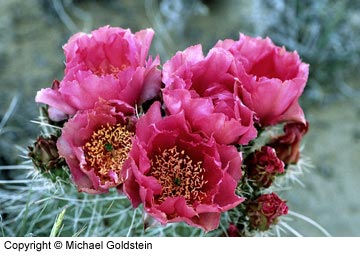
A tripod combined with a versatile film can help captured a variety of scenes, including these prickly pear cactus blossoms.This image was made using a 90mm macro lens, with a polarizing filter.
While many of my cactus blossom images used direct sunlight, this one was done using a large reflector as a diffuser, to create shade. The deep magenta color of the blossoms seems to have migrated toward pink, a phenomenon I attribute to the film’s response to magenta under shaded light. I was aware that shades of blue would migrate on film toward magenta, in direct sunlight, but this was my first experience with magenta migrating toward pink.
Of course, I’ll take the tripod and ball head, various filters, and extra lenses for those moments when I’m blessed with time for “serious photography.” (I’m anticipating enjoying my first-ever opportunity to shoot prickly-pear blossoms.) I’d prefer using Fuji Velvia film for its rich palette, but the slow ISO of 50 is inhibiting for hand-held shots or even monopod work. Instead, I use Kodak Elitechrome 200 when hiking, which gives me almost the same grain structure while providing the extra speed I require.
Finally, I turn my attention to image considerations. Shooting a hike is mostly “grab shooting” with little time to plan. Having a quick-release on my camera and monopod will help me set up really fast. For outdoor “people shots,” I’ll be “quick-draw McGraw” with the flash unit. “Fill flash” will help counter hat-brim shadows, and I’ll dial in one f-stop of negative compensation to retain a feeling of reality in the photographs.
Shot Techniques
I’ve enjoyed plenty of success with “worm’s-eye-view” images, placing my subject against the horizon for dynamic compositions. Group shots are always fun, too, but I have to fill the frame with the group. Magazines like dynamic pictures of hikers, so I’ll have to try to charge on ahead to avoid the usual “tushie” perspective. Hiking shots can easily be boring, so I’ll have to work the usual litany of leading lines, framing techniques, rule-of-thirds, and breaking the horizon. It’s difficult to remember that each shot must appeal to the viewer on its own, without depending on my memories of a wonderful experience to carry its weight.
Finally, I’ll load all this stuff into vest and belt bag, don my boots, and go up and down the highest hill I can find in Toronto for a couple of hours. With all the bugs worked out, I think I’m ready for Utah “color country!”
Click here to check out more of Mike’s trip to “Canyon Country.
by Michael Goldstein
Leave a Reply