
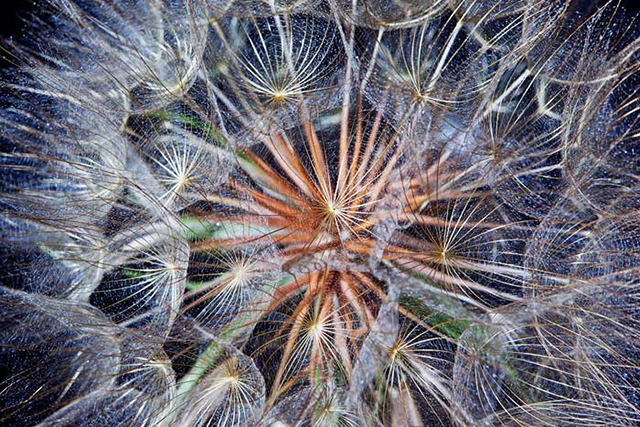
For this shot I wanted as large of a depth of field as I could get. I didn’t have a macro, so I used an extension tube on my 24-70mm lens, and got up very close. I used the zoom lens to find the focus, then fine tuned the focus by using Live View, magnified, and used manual focus to find the exact focus I wanted.
FAST LENSES
Lenses that have larger apertures are considered “Fast lenses” because with a larger aperture (smaller f-number) it delivers more light intensity which allows you to have a faster shutter speed and still get the same exposure as with a smaller aperture and slower shutter speed. They are also produce sharper, distortion-free images because they are marketed towards the professional photographer. Therefore they are manufactured with better quality glass and construction. Fast lenses are great for low light situations where you need to stop the action.
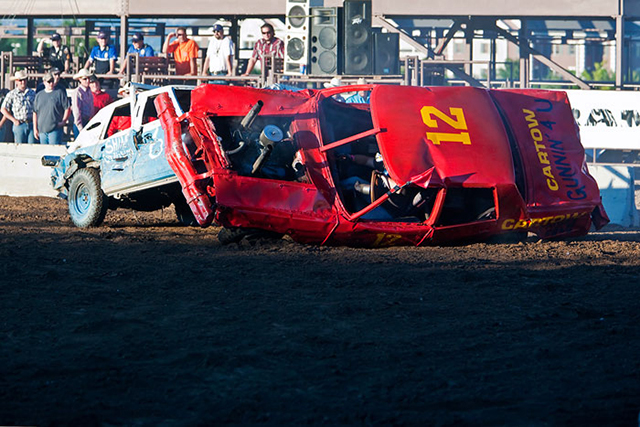
While shooting action shots I used the fastest zoom I had, which allowed me to capture shots that I wouldn’t be able to get with a slower lens, like my 100-400 f/4.5 – 5.6.
FILTERS
You shouldn’t have to clean your camera lenses very often because they should always be covered by a filter. Not only will a filter help improve your images in some ways, it is much less expensive to replace a filter than it is to replace a lens.
UV Filters
UV filters were used in film cameras to reduce haze and to improve contrast by reducing the amount of UV (ultraviolet) rays that hit the film. Because film was sensitive to UV rays, it was important to minimize the amount of UV light that reached the film. Modern DSLR camera sensors are not sensitive to the UV rays, so they aren’t necessary to get quality images. And while they may still be used by many DSLR photographers to protect the more expensive and delicate lenses they cover, they tend to actually decrease image quality by increasing flare and reducing contrast.
Circular Polarizer Filters
The majority of professionals that I know of feel that a circular polarizer filter, which both protects the lens and improves the picture quality in most cases, is a better option than using a UV filter.
Circular polarizer filters work the same way that polarizer sunglasses work. They reduce the haze (sky particulate) by reducing the amount of reflected light, increase the saturation, and sharpen the contrast. They will give skies a richer, deeper blue and will reduce glare off shiny objects (cars, windows, etc.). They will also reduce the light glare and reflections bouncing off the top of water, which will allow you to see under the surface.

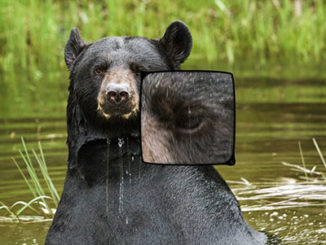
Notice how you are unable to see very much through the reflection on the water.

Notice how much better you can see through the reflection and under the surface of the water, and that the f-number went from f/9 to f/5.6. (down 1 & 1/3 stops). Both photos are RAW – no editing before converting to JPEG.
With a circular polarizer you can control the amount of polarization by turning the lens in a circular rotation. Just turn the filter until you get the amount of polarization you desire. You will only have to turn the filter 180 degrees before it starts to repeat itself.
Note: A polarizer filter may cause a memory problem. If you have the filter set to give you a dark blue sky and forget to return it to the normal position, it may adversely affect the next photos you take.
Some circular polarizer filters will reduce the amount of light that enters the camera, by 1 – 3 stops, depending on the brand and make of the filter. If you get a darker filter, you will have to slow the shutter speed even more, or open the aperture more, or a combination of both. And because of these longer exposures, you need to take care to avoid camera shake if you are hand holding your camera. When you are taking action shots with a polarizer filter on, you will want to make sure that the filter is as clear as possible.
Note: Before you purchase any filters, be sure to check the camera’s filter thread count so it matches the head of the lens—not all are the same.
Teleconverters or Extenders
Not to be confused with Extension Tubes (which I talked about in the last article), teleconverters are small lightweight optics that fit between the camera and the lens, which multiplies the focal length and aberrations of your lens. This gives you an inexpensive way of getting more zoom out of your zoom lenses. They allow you to get in closer and capture more detail on your subject, but at the same time there is a downside to using them. The addition of more glass between the camera and the lens causes the sharpness and contrast quality of a “tack sharp” image to suffer and the larger the extender, the worse the quality will be. The good news–if you have a professional grade lens, with a quality extender, the optical degradation will be negligible, especially with the 1.4x teleconverter as compared to the 2x teleconverter.

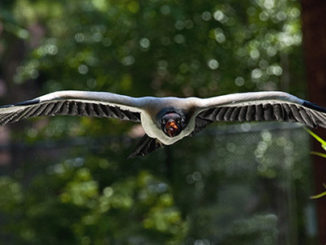
I had taken several shots of this eagle without a teleconverter, but wanted to get a closer shot. I didn’t take all my shots with the teleconverter because I had to manually focus when I had the Extender on this particular lens. Some lenses will still allow you to use Auto Focus while using Extenders. Be sure to check the lens specifications before you buy, if you don’t want to manually focus.
CLEANING YOUR LENSES
Having a clean lens is very important if you want to capture “tack sharp” images, since dirt and scratches will soften and degrade your images. When cleaning the lens of your camera you should always use a cleaning cloth and a good cleaning solution, both of which are created especially for cleaning lenses. Put a drop of cleaning solution on the cloth, not the lens, and then gently wipe the glass in a circular motion from the center to the outside of the lens.
Note: as an added cleaning method, you may also choose to purchase a LensPen (carbon-based optical lens cleaning technology) for removing oily fingerprints and smudges.
ENVIRONMENT
If you are shooting long distance landscapes outdoors, you will want to minimize any fog, dust, or haze in the atmosphere, as they reduce image contrast. One way to reduce the visible haze and dust in the air is to shoot in the mornings. Water vapor evaporation, along with air pollution, will be less likely during this time of the day. You should also check the air quality report for the area in which you plan to shoot. Where I live, quality outdoor photography during the winters months can be limiting. This time of year is notorious for adverse weather inversions, so pollutants remain hanging in the air until the rain or winds can clear them out.
IMAGE COMPRESSION & REVIEWING YOUR IMAGES
Image Compression
In order to get top quality out of your images you should be shooting in RAW. When you shoot in JPEG, your image by definition will be saved using a somewhat inadequate compression method. JPEG images usually are compressed at a 10:1 factor. While there will be little perceptible image quality loss due to compression, there will be some. In order to gain all the sharpness possible, shooting in RAW, then saving in a lossless format such as .TIF, .PSD, or .PNG, will insure that there is no loss of quality in your images.
LCD Image Review
After you take a photograph, the first thing I teach my students to do, is to check the histogram to make sure you have a proper exposure. The next thing you will want to do, if you want “tack sharp” images, is to use the zoom feature when reviewing your images on the DSLR camera’s LCD screen. While this won’t tell you if you have “tack sharp” images (that will have to wait until you can see it on a quality large screen monitor) it will tell you if you have blurry images.
MONITORS & IMAGE EDITING
Monitor
The most overlooked element in being able to create a “tack sharp” photograph is a good monitor. Notice that I said photograph and not image. The image is captured with the camera and lens, but what you do after that is greatly affected by the quality of the monitor you are using. When I first started in photography, I had a small 17 inch monitor that came with a household consumer quality computer. And even though I used the latest Photoshop program to edit my images, two years later when I upgraded to a quality large screen monitor, I noticed that virtually all of the images that I edited previously had to be deleted because I was now able to see that the images were blurry, out of focus, or were edited improperly.
For me the minimum size and quality for a monitor is 24″; 1920 x 1200 resolution; 800:1 contrast ratio.
Sharpening
As mentioned earlier, one element in making an image look “tack sharp” is contrast. When you shoot an image, all of the detail, contrast, and resolution is recorded on the sensor. Once that is done, there is no way to increase the detail of an image. If it’s not there, it’s not there – you can’t create it. Using the post production “unsharp” feature in Photoshop only emphasizes the texture and details by increasing the contrast along adjacent edges. Aa good practice, if you are planning on printing your images and do need to do a bit of sharpening, sharpen them at 50% of the original size. This will give you a better idea what the image will look like at smaller resolutions on the web, or when it is printed.
When you look at an image in Photoshop at 100% you can tell if the image is “tack sharp” by looking to see if the pixels have clean lines and no blur. But this does not reflect what the image will look like when printed. It is generally agreed that if an image looks “tack sharp” at 100% and 300 ppi, it will also be “tack sharp” with fine detail when printed. Always do a test print to be sure that what you see on screen appears the same on paper.
FINAL THOUGHT
Good photography is much more than just getting a “tack sharp” image, so don’t become so consumed by creating a stunningly clear image that you ignore the other elements of good photography–composition, lighting, a point of interest, and inspiring an emotion or feeling in the viewer.
There may be a limited number of times when you will be able to use all of the methods I talked about in these articles simultaneously, but I’ve always maintained that the more knowledge you acquire–the better choices you will be able to make.
Now grab your camera and go out and practice. The more you practice various techniques, the better you’ll get at capturing a “tack sharp” image.
Photos by Brad Sharp
Copyrights on Text and Photos: © 2015 Marla Meier, Apogee Photo Magazine, LLC. All rights reserved.

Leave a Reply