
When I was twenty I bought my first camera (Minolta 5000i), and after some weeks of taking photo after photo after photo, I was still disappointed with my results when it came to making close-ups of my favorite subjects, insects.
Driven by my enthusiasm and determination to capture every detail of these bugs, I went to a local library and found a book on macro photography. Now my images were improving immensely and I was on my way to becoming a macro photographer.
So now it’s time for you to get started—to make equipment decisions, to practice with your camera, to seek your subject, to step in close, and to visit the wondrous world of macro photography. Oh yes, there is also one very important personal quality that you’ll need—patience and a lot of it.
Your experiences may be filled with ups and downs, but the rewards will be well worth all of your time and effort.
© 2010 Edwin Brosens. All rights reserved.
© 2010 Edwin Brosens. All rights reserved.
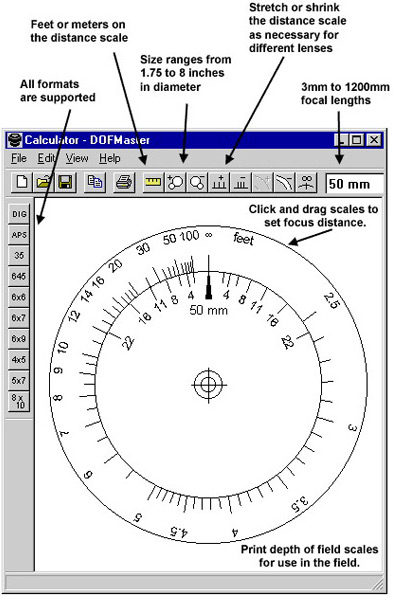
Depth of Field Calculator
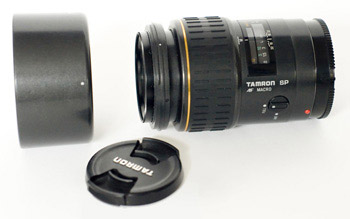
Macro Lenses
Macro photography begins at the maximum magnification you have with a normal lens. If you set your lens at its shortest distance (most lenses have a life size of 1:4) and look at your subject, the insect is still small in the view finder.
A macro lens is essential because it has an extra lens group to correct color and sharpness. Macro lenses deliver a life size ratio of 1:1, meaning that a subject of 1 cm will project as 1 cm on the CCD sensor. Many digital cameras have a magnification of 1.5 X, so this gives you a ratio of 1.5:1, which is useful for shooting insects.
When I’m selecting a brand of lens, I always start with a 90 or 105 mm macro lens. Sigma also has 150 and 180 mm, but these are difficult to use because even a small movement takes the insect out of the view of your camera.
Depth of Field
Depth of Field is the zone, or range of distances, within a scene that will record as sharp.
A Tamron 90 mm macro lens at the shortest distance to the subject (ratio 1:1) gives a depth-of-field of 1.6 mm with an aperture of F/5.6 and 4.6 mm at F/16. You’ll need a high aperture setting of F/16 or higher to get sharp details of an insect, but you’ll also get a large shutter speed.
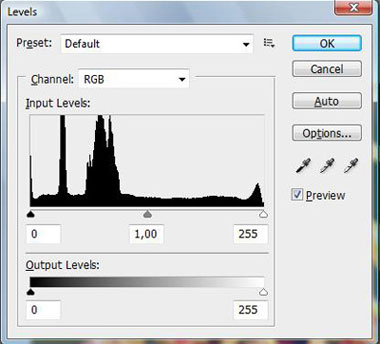
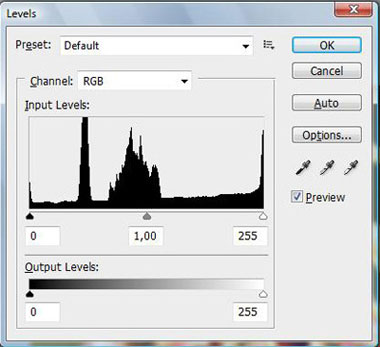
Most people would automatically say, “Oh, then you resolve it with high ISO of 400 or even 800.” But high ISO creates drama in macro photography. The noise will be large, the colors become unreal, and the image loses detail.
My advice: never use a higher ISO than 400; the lower, the better the quality your photos will be. You can use a ninja noise plug-in in Photoshop to reduce the noise when shooting at 200 – 400 ISO.
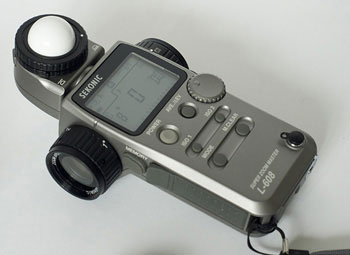
Exposure Metering
Exposure metering is a very important key in photography. You need to understand how to use light. The metering mode selection on a digital camera decides how the cameras exposure sensor will react when a photo is taken.
There are three metering modes available.
1. Center-Weighted Metering mode,
2. Matrix / Multi-segment Metering mode
3. Spot Metering mode
Center-weighted metering mode: this metering mode will not take care of badly exposed corners. It’s more likely to address the average of the entire scene with an emphasis on the center area. Also, the percent of the exposure calculation area grows to 75%.
This means that you’ll want to use it if your subject is centered (basically in portraiture) and no other parts of the background are essential to the message. However, it’s probably the mode used least often.
Professional photographers choose it when Matrix Evaluation fails due to the complexity of the light in the proposed scene; it has the great advantage of no overexposed areas.
Matrix/multi-segment metering mode: the picture area is divided into different sections that are then metered with different cells. For example: the light values from the center and the four other points in the frame are used to determine the exposure.
The center of the picture is given more “weight” than the other parts of the composition because the subject or the position in the frame that’s the most important is in the center. Even in contrast lighting, this method produces correct exposures in many cases.
Spot metering mode: this metering mode can provide excellent results for high-contrast scenes. It archives them by measuring the light in the center of the scene–about 1% to 3.5% of the image area–resulting in under/overexposed corners.
For example, when I’m shooting insects in backlighting, I use this mode to achieve the correct exposure.
Exposure meters, or light meters, are light sensing devices that are good at doing what the human eye can’t–quantifying light. With an exposure meter you can relate the brightness of light reflected from a subject toward the camera, or the brightness of the light illuminating the subject, to the sensitivity of the film.
The meter expresses this relationship in terms of lens openings and shutter speeds.
Flash Technique
The use of a flash unit makes it possible to fill the dark parts of the subject to get a better, brighter image. Dark parts of an image capture the attention of the viewer, losing what the photo is all about. The use of the built-in flash gives you a shadow over the image because the distance between the subject and the front of the lens is short.
So you have to use a separate flash gun (I use a Sony HVL-F58AM) with cable to hold the flash gun near the camera (around 45 degrees from the subject) so the light bathes the subject.
Using a flash gun in macro photography gives hard light, even if we limit the flash level to low, so we have to use a tool. I use Omni-bounce diffuser, so the light on the subject will be nice and soft.
Level: 45 degrees flashlight
Level: direct flash
© 2010 Edwin Brosens. All rights reserved.
Mosquito
Sony Alpha 700 + Novoflex Bellow + Sigma 90/2.8 Macro + Flash + Tripod F/14 @ 1/15 Sec.
Tripods & Cable Releases
Always use a tripod; the last thing you want are photos that aren’t sharp. Large shutter speed is common in macro photography, and with a high ratio of 1:1, handholding the camera is difficult. Many cameras or lenses have an Image Stabilizer, but when you use a tripod, turn it off, because the stabilizer will give movement to your camera and the photo will be blurred.
I would also suggest a tripod with the option of turning the central stick so you can hang the camera below the tripod. This allows you to get close to the ground where you’ll find many of nature’s photo subjects.
A cable release is must have accessory when shooting macro photos, because when you manually press the shutter button of the camera, it moves the camera, resulting in a blurred image.
Using Your Tripod
Before you place the camera on your tripod, quietly and with slow movements, set the tripod in position in front of your subject about one meter away from it (approximately 36-40 inches). Then add the camera with its attached cable release.
At times you’ll be so close to the insect that it will often fly or crawl off into the vegetation. Here in lies the capability to apply patience. Slowly proceed again toward the insect, and continue to move in increments closer and closer, all the while shooting from each of the various distances.
You’ll need plenty of practice before you can master this step with ease, but again, your practice and patience will be paid off with stunning photos.
Note: Before you go out looking for those insects, I would suggest practicing with your camera and the technical aspects of your equipment. Put a small bug sized, non-moving object on a branch, near a flower, or on a leaf and practice, practice, practice.
Shoot from a variety of distances, from different angles and under different lighting conditions. You’ll begin to get comfortable with your camera and get a real feel for the process without having to worry about the subject flying away.
And, you’ll become adept at making the camera setting choices needed or any quick changes required when working in the field.
Where to Find the Subjects
Your yard can be a good place to start if you have one, or visit a local park or nature reserve near your home. Practice as many times as possible during different times of the day and year. This activity is necessary for you to learn the field of macro photography, to know where you’ll find the best light and most interesting subjects.
And if you also would like to try to catch insect behavior in your pictures, you need to learn everything about your subjects ahead of time. Search the internet or your public library for the necessary resources.
© 2010 Edwin Brosens. All rights reserved.
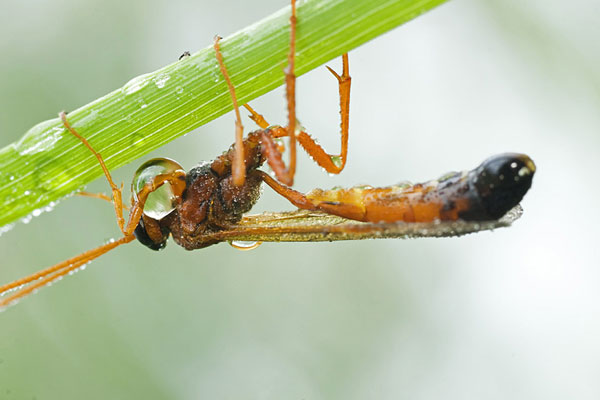
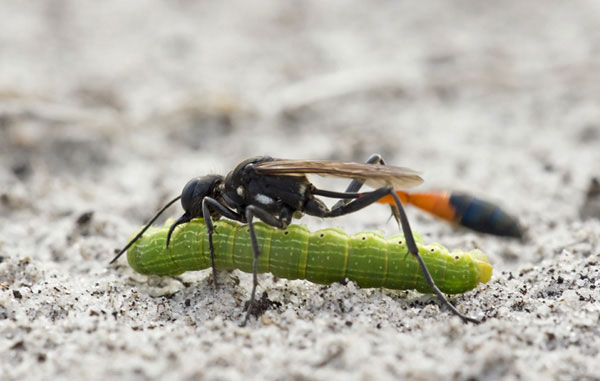
Digger Wasp
Sony Alpha 700 + Sigma 180/3.5 APO Macro + Flash F/14 @ 1/100 Sec.
Macro and insect photography opens an interesting world of colors and detail. You have a chance to see how fragile this small world really is. So grab your camera and your gear and go on an insect photo expedition of your own.
by Edwin Brosens
Article updated: © 2015 Edwin Brosens. All rights reserved.
Leave a Reply