
“…what I found was that article after article written in the most popular magazines had more than a few mistakes and misperceptions parading as fact.
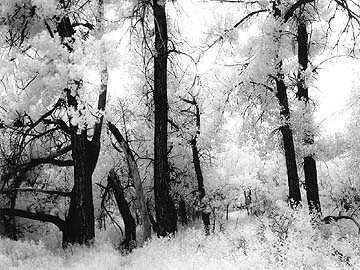
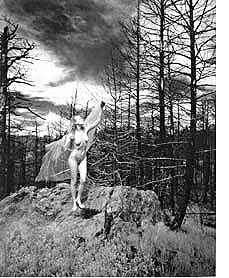
I was first introduced to infrared film by a fellow grad student, Nanako Watanabe, in the early ’70’s. One day she showed me photographs she had taken of a model in the park. The woman shrouded in white was surrounded by white foliage and dense black earth. The prints were grainy and had an otherworldly quality about them. I was immediately hooked.
What followed was several years of experimentation. I tried to learn as much as I could about the film, and as I read and studied and shot rolls upon rolls of the film, I came to realize that had I skipped the reading and studying and gone directly to the shooting part, I would have been far better off. For what I found was that article after article written in the most popular magazines had more than a few mistakes and misperceptions parading as fact.
What I hope to do in this series of articles is present to you a guide to using both Konica and Kodak’s infrared film. I am sure to rankle a few of you out there who have used the film for years and developed your style and way of seeing based upon many of the myths that surround the films. But what I hope is that others of you who have tried a few rolls and given up will take what you read here and give it a try again.
Before I begin, a few words from my soap box: Many photographers read articles on photography to find out how to make a good picture. They are always looking for the magic film, the secret formula, the ultimate device that will turn them into another Ansel Adams. Photography magazines thrive on this impulse. So do manufacturers of photo equipment who hope that they can convince as many consumers as possible that they have what you need to become the next photographic icon.
I hope that you will read this series of articles, not as a formula that will transform you as a photographer, but as a guide that will help you add another controllable, predictable tool for your photographic toolbox that you can use to express and master you own artistic vision.
Because this is what photography as an art is really about. Technique is only secondary to artistic vision. It is a means to an end, not an end in itself. Even a well, exposed, well printed photo of a tree stump, a nude, or an ocean vista may be nothing more that a snapshot.
What will set it apart from everyone else’s stump-nude-vista is that which goes beyond technique. And that element is the unique vision you have as an artist. If there is nothing in that vision that pulls at the viewer, that excites, awes, enrages, enlightens, makes him feel that he has gained something from the viewing of you photograph, then the photograph fails.
Exposure
(…the heat given off by the body and the landscape cannot be photographed. There must be a source of IR light that can be reflected.)
When shooting IR film, the biggest obstacle to getting a good print is exposure. And believe it or not this has been one of the biggest areas of misinformation. Many of the first articles I have read say something like the following: “IR negatives tend to be very dense, with hardly any discernible detail, which makes the printing process very difficult indeed!”
Well I guess so! If the writers’ negatives were that dense I guess they would be hard to print. The question is – Why are they so dense?
Let’s start by explaining what infrared film records. Infrared is not simply infrared. The width of the spectrum is extremely wide. It begins at 700 nm, the extreme edge of the visible spectrum and from there it merges into heat waves. Infrared is broken down into four ranges. The actinic range is the nearest to visible light. These wavelengths are produced by incandescent objects such as the sun or a light bulb. This radiation can also be reflected by objects which are not themselves hot. Good reflectors of this type are green leaves and the human body.
The next range is called the hot-object range. This is the infrared radiation given off by hot irons or electrical appliances having a temperature of about 400C. Next is the calorific range. This non-actinic radiation is produced by objects having a temperature from about 100C to 200C. Finally there is the warm range, non-actinic radiation given off by the human body or the ground. The wavelength involved here is about 9000nm and cannot be recorded by film. (In other words, the heat given off by the body and the landscape cannot be photographed. There must be a source of IR light that can be reflected.)
Konica’s IR film is sensitive to a range from 650 to 800 nm, although it peeks in its sensitivity to IR at about 750nm, only 50 nm above the visible spectrum. Kodak’s film is capable of recording IR from 750 to 900+nm. As you can see, therefore, both films are only capable of recording IR in the first two ranges. Except for the sun or artificial lights, in most infrared photography, all objects will be reflecting IR not emitting it. (I can’t say this enough!) Therefore like ordinary photography we are shooting subjects which reflect light from a source. And that source will be the sun or an artificial light such as tungsten lights or strobes.
Why was there such a difference? Kodak, after all, said use an ISO of 80, but I was getting pretty prints at 800!
My first roll of Kodak Infrared Film was a disaster. At least I know that now. I loaded the film in total darkness, set my camera’s through the lens meter to ISO 80 as was suggested in the literature, put on a red 25 filter, and quickly proceeded to blow the whole roll. I developed it in D76 and when it dried I had a strip of film with curiously clear film base and extremely dense image areas. In fact the image areas were so dense they actually bled out into the edges of the film and between the frames.
I put the strips on a light box, and sure enough, just like the article said, I could just barely make out the details! I printed them and they were difficult to print! But they looked just like the ones in the article. You know, all white, large grain, little or no detail, just lots of contrast. Eureka! I done it right!
After my initial elation, however, doubt began to seep in. Surely this can’t be right. It should not take two minutes exposure on my enlarger to get a viewable print. And there was not the detail and tones I had seen in Nanako’s pictures. I loaded up again, and decided to do a calibration test.
I chose a fairly representative landscape and shot a series of frames from ISO 80 to 2000. After I developed the roll, I looked at the strips and this time there were actually frames that looked like real negatives.
Next I went to do a contact sheet. As I would a normal film I found a time where the film base first appeared as black on the test strip, and then proceeded to do a contact sheet based on that time. If you haven’t done this before, it is based on the theory that a black in your scene should equal or approximate the film base.
If a black in the scene is denser, then the film is overexposed. I knew the sky should be black, so I used that as my black. The result was that ISO from 400 to 1600 fell within the ball park. I printed these as regular 4X5 prints and then evaluated the damage.
Now I was close. All that was lacking was the contrast I thought it needed. So the next roll I developed 33% longer, and this time I had very acceptable images, in terms of contrast range, grain and sharpness. I have since experimented with other developers all aimed at getting the best tonal range and sharpness. I am now using D-19 for Kodak”s film which believe it or not has given me great tonal range and sharp crisp grain. (We will talk about Konica film next time.)
Why was there such a difference? Kodak, after all, said use an ISO of 80, but I was getting pretty prints at 800! At first I thought about altitude. We are at 8200+ feet above sea level. During midday, we use the sunny 22 rule. That is, if your film is rated at ISO 100, then in bright sun you should set your shutter at 100-125 and your aperture at 22, not 16 as you might have learned. But that would only account for part of the difference. What was the rest?
At about this time I bought my first hand-held incident meter. Anxious to shoot some more film I set it to ISO 400 and went out and shot a roll. When I developed it, I was in for a shock. The film was almost clear. It was grossly underexposed. I checked out my equipment but nothing was wrong. So I shot another roll exactly the same, and it was still underexposed. What was wrong?
And then it occurred to me. Light meters are calibrated for visible light. I knew that. When I put on the red filter it increased my exposure by 2 stops. This was beginning to make sense. Maybe to infrared light the red filter is transparent. Was the red filter fooling the meter into overexposing 2 stops when it didn’t need it?
Subsequent tests supported this. In open light, a hand-held meter set at ISO100 did produce the right exposure, while it was 400 through the lens. That mystery was solved, and it proved to be the same when I began to use Konica. (ISO 12-25 with handheld meter, 50-100 thru the lens)
Did I solve the problem once and for all? No. It is not always possible to accurately predict from the amount of visible light as measured by the meters what was available in the IR range. It is always necessary to do some bracketing. Also according to John Wilkerson in his articles that appeared Darkroom & Creative Camera Techniques on the subject, both films react differently from ordinary film to over exposure. He found that as exposure increases tonal values in the zone VIII to IX are pushed into the zone X area much faster then ordinary B/W film, thereby increasing apparent contrast, but causing a loss of detail in zone VIII and above. Thus while a ½ stop plus or minus of bracketing might be used as a further tool in producing a particular look, overexposure generally should be avoided.
Next time we will talk about “the luminance”: what happens when your exposure is right on the money. And we will also talk about the differences between Konica and Kodak films and issues of focusing and development.
Go to Part 2…Infrared Photography, Part 2: How to Correctly Use the Film
Go to Part 3…Infrared Photography Part 3: Focusing with Infrared Film
by Michael Fulks
All text and photos: © Michael Fulks. All Rights Reserved.
I’ve been shooting IR ‘like’ film and IR for 20 yrs. This three part essay is the best descriptive I’ve read.
Jan Normandale