

The Mask
This is Konica IR film. Note the shimmery quality of the skin. (And there are no blood vessels!) Taken by window light.
Last time our conversation centered around two of the misconceptions concerning IR film. One, contrary to popular belief, IR film records light from reflected light sources, for example the sun or some artificial source, and does not record light emitted from the human body or the landscape. Second, we discussed the problems with metering and exposure that have lead many to incorrectly believe that a properly exposed IR negative is very dense and difficult to print. We presented a strategy to help you meter and suggested what to look for in a well developed negative, one that should print with a minimum of hassles.
This time lets talk about the two Infrared films, Kodak and Konica, and give some additional exposure pointers.
You are probably most aware of Kodak’s IR film. In fact, until very recently you may have never even seen an example of Konica’s version of the same. Most IR prints in exhibits and in magazines were made with Kodak and exhibited the characteristic high contrast and extreme grain. While the grain certainly achieved an interesting, artistic effect, many are bothered by it and have tried using the 4X5 version of it with great success. A good example of 4X5 work is Jack Wilkerson’s. As you can see from his photographs, IR prints do not have to be grainy and contrasty, but, in fact, the film is capable of subtle tones and detail.
But 4X5 work is not everyone’s cup of tea and when rumors began to circulate that Konica was making a fine-grain IR film in 120 and 135 sizes, many wanted to try it. Unfortunately Konica wasn’t selling it in the US, which caused many of us to seek ways of importing it and sharing it with others. For several years I was one of the only sources of it in the US.
Konica delivers on the promise of fine grain. I have a 20X24 print made from a 6X6 negative hanging in my studio that has very little grain. I have heard from other of my customers and students who have made even larger prints with wonderful results, (especially of cloudscapes!) But what Konica gave us in fine grain and sharpness, many felt it lost in the IR effect department. However, I believe proper exposure, development and printing will solve many of these complaints.
What many have come to expect from IR film is the white leaves, black skies, and brilliantly white clouds. Unfortunately newcomers to the film may not get this the first time out, primarily due to incorrect exposure. Konica suggests using ISO 25 to begin your tests of this film and because of the latitude of the film, very printable negs will result from your first roll. (Don’t forget our discussion from last time: this is for a hand held meter, not a meter measuring through the filter!) If the negatives do not have the contrast in the skies or leaves you like, begin additional tests by bracketing towards a greater exposure. Remember that IR film does not behave exactly like the usual B/W film when dealing with the lighter tones. Lighter tones, those tones that print near white, tend to be pushed faster towards absolute white, than lower and middle tones. Giving the film slightly more exposure will push the tones of the leaves and clouds more towards a true white, while leaving the rest of the scene alone. You will know you have gone too far when the whites no longer have any detail to them and the scene becomes too contrasty.

This leads us to the discussion of “luminance” The term “luminance” was coined in a class last summer by one of my workshops. In the orientation, I showed infrared nudes by me and previous students, most specifically to show the effects of exposure on the values of the skin tone. The examples showed that as little as ½ stop variance could produce, or not, a quality that I had called opalescent or “marbelesque.” The students were quick to point out that what characterized this effect was that the light source seemed to be coming from a source other than the obvious, in this case the open sky. There seemed to be a luminance about the skin itself. (We know that this is not the case, right?) It became a challenge for everyone the following day to try to capture this effect themselves. When reviewing the contacts and prints during the follow-up, all were happy to report that they had caught it, and sure enough, exposures off one way another lost it, even though the rest of the picture did not show that dramatic a change. Those who had shot Kodak IR film along side the Konica did not experience this same effect mostly because the extreme grain made it harder to see the subtle shifts from tone to tone.
This luminance is a result of the film’s characteristic of dealing with the tones close to white as we discussed above. Caucasian skin will often be the brightest object in your seen and will be rendered white or very near to it. When the film is exposed just right, the tones of the skin from highlight to shadow are compressed giving the body the illusion of glowing. This subtlety requires some finesse when printing as well, as you must be careful to protect it and not use too high a contrast paper that you lose it. This subtlety was further demonstrated when I tried to have several of my negs scanned recently with a CCD scanner. The scanner operator was unable to maintain the “glow” no matter how hard he tried. The scanner was not able to capture the full range needed to represent it. I have had luck however scanning directly from my prints.
I recently heard the complaint that a published photographer was recommending that Konica film not be used with nude work because it made the blood vessels stand out. Again I have found that this is a matter of exposure and capturing the luminance. Konica is not unique in revealing blood vessels. I have many prints from Kodak IR film that shows blood vessels even through all the grain. In fact, a Kodak publication of Infrared Film showed that the film had at one time been used as a diagnostic tool in medicine because it could bring out the blood vessels. By adjusting your exposure you too can get the blood vessels of your favorite model to stand out, in the hands, lower legs, and breasts using Kodak film. In fact, if you can do that, you are very close to an ideal exposure. Sometimes only ½ stop more exposure will give you beautiful tones, and no veins.
If you are not getting the effect you want with Konica try the following: First bracket, see if a little more exposure helps. Next, instead of using a 25 Red filter, try an 89. This is available in gels. It is also opaque, so shooting with a range finder helps. (You will need a gel holder for your camera.) By the way, speaking of filters, one of the advantages of Konica film is that if you take the red filter off, it is a great panchromatic film. Add an orange filter, and you get a wonderful landscape film that creates separations in tone that is unlike another film. An avid user of the film was the late Jack Drose, a Denver photographer, who used the film extensively for his nudes and landscapes, but rarely used a red filter. His photographs are beautiful for their tones; you would never guess they were infrared.

This is a scene taken with a regular panchromatic film on a somewhat hazy day.
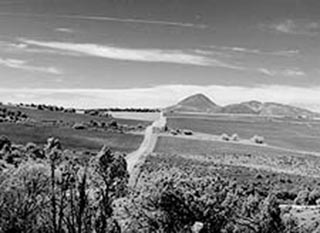
This is the same scene moments later with Konica IR film and a light red filter. Note not only the sky and mountains but how the film separated the tones in the fields along the road.
Also try experimenting with development times and developers. Developing IR films are not much different from traditional BW film. Do remember that Kodak’s film must be loaded and unloaded from your camera in complete darkness. This make take some practice. Be very careful not to put your finger through the shutter of your 35mm camera while you fumble around in the dark. The cassette can be stored in the black plastic canister it came in while you await your chance to develop it. (You can treat Konica like any other BW film; it does not have this problem) I have heard some cautions about choosing a tank to develop in. There has been some mention about certain plastic tanks that are not opaque to IR. I have a variety of brands, and I have not had this problem. Don’t worry, you’ll know if your tank leaks IR.
Handling the film in the darkroom has some special problems. Kodak film is very sensitive to the salts on your skin. If you find after you have developed you film there are fingerprints on it, that is why. It is one of the myths about IR film that these fingerprints are caused by the heat from your hand, not so. You can avoid this problem simply by using cotton gloves when handling the exposed film. I have not had this problem myself with either film, so I can’t say if Konica experiences the same problem. I don’t wear gloves when handling either of the film.
If you are like me and tear the leader off of the front end of the film before you load it on reels, be advised to keep a pair of scissors handy. The Kodak film is very tough.
A problem I have observed with both films is the tendency for air bubbles to adhere to the emulsion surface during development causing “air bells.” I never had a problem with this until I began using these two films. It is especially acute, towards the center of the reel. The solution to the problem is a 1 or 2 minute clear water presoak. And remember after every agitation cycle (if you use the inversion method) rap the tank smartly against the table top to shake loose any bubbles caused by the agitation.
For a developer try Rodinal 1:25 6 minutes at 20 C. if you are using Konica. I have also tried HC110 and had good results as well. D76 is my least favorite. I like Rodinal best because it is easy to use and it is a one shot developer, so I get consistent results. If 6 minutes doesn’t quite work for you try a little longer for more contrast. I use the Ilford favored way of agitating the tank, that is, agitation (inversion) for 10 seconds every minute. For Kodak film, believe it or not, I use D-19. D76 is a favorite of many, but it didn’t do it for me. If you know about D-19 it is generally used as a graphic arts film. That means it tends to be high in contrast and grainy, but in my experimentation this has not been the case. I get good contrast, easy to print negs, with subtle tones, sharp grain and acutance. I have used HC-110 with Kodak as well, it is my next favorite after D-19. For Kodak film check the film insert for dilutions and times.
I was taught to use a clear water stop bath. I have heard several good printers insist that the usual acetic acid stop bath damages the film, causing little flecks of emulsion to loosen from the film base. The results are little black spots on your print. If this is a problem, (it was for me for both of these films) try substituting clear water for the acid.
Fixing and washing are done in a normal manner. When you hang the film to dry the first time, you may be surprised at the film base on Kodak. It is very clear. After you have dried the films it is a good idea to get them under weight for a while, as both Konica and Kodak dry very curly.
Well that about does it. We didn’t cover it, but remember that you have to adjust your focus when shooting infrared film. It doesn’t focus on the same plane as white light. That is what that little red dot on your lens is for. Focus and adjust. Focus and adjust. Pretty soon you won’t have to look down any more you will be able to feel it. Use the smallest aperture you can manage when you shoot, and carry a tripod so that you can shoot at f16 and a shutter speed of 1/8s and not have to worry about the shakes. And if you are shooting models with others, warn them what you are doing. Infrared photographers are soooo slow!
Go to Part 1…Infrared Photography, Part 1: Debunking Myths
Go to Part 3…Infrared Photography Part 3: Focusing with Infrared Film
by Michael Fulks
All text and photos: © Michael Fulks. All Rights Reserved.
Leave a Reply