
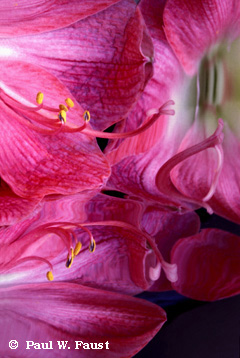
Example 1.
Flowers make one of the best subjects for Mylar® images. An added trick that can be used with this subject is water drops applied with a household spray bottle. Mist both the flower, and the Mylar® surface.
There are many ways to create beautiful images and great abstracts, but one simple technique will do both in either color or black-and-white. If that idea doesn’t get your attention, then consider this: you can usually work the magic for less than twenty-five dollars from the comfort of your own home.
The technique utilizes a simple sheet of Mylar® reflector material, which usually comes in rolls of various widths and lengths. For smaller objects, a twenty-four inch wide roll will do. For larger items, you may want to use a roll that’s thirty-six inches wide or even wider, if you can find it. Any well-stocked arts and crafts store handles Mylar®, or they can order it for you.
There are many ways to set up a subject with Mylar®. The one you choose will depend primarily on how wide your roll of Mylar® is. I use a dinning chair for the twenty-four inch roll, draping down from the backrest over the seat. Then I place the subject on the seat area of the Mylar®, using the backrest area as the background. You’ll need to set up your camera on a good solid tripod and attach whatever lens you have for close-up work. I’ve found that either a macro lens or a close-up filter attachment works well, but a filter is, of course, less expensive than a macro lens, if you don’t already have one. A good zoom lens in the 105mm range also works great. A zoom will allow you to change the focal length to whatever you need to fill the frame. It’s a lot easier than having to move the camera in and out on the tri-pod. A cable release is also an advisable addition.
When you have your set-up ready, fill the frame with the subject and background. The effect you can expect will depend on how you twist and bend the sheet of Mylar® and how close the subject is to its surface. If the subject is too far away, it will appear so small that you may not be able to recognize it. This result can be good or bad, depending on what your subject is. With something like a flower, you may want to see the flower and its reflection (see example #1), or you may want to see only the flower itself and have its reflection become a pure mass of abstract colors behind it. I will usually shoot both ways to achieve two different images from the same set-up.
Moving the Mylar® into a working shape can be the biggest problem of all. Most of the time, it won’t want to stay the way you need it to be, but there are a few ways to get around the problem. One is to tape an edge of the Mylar® to a chair leg or some other area. You can also lay a small object out of sight on the Mylar®. However, any weight whatsoever will make it bend, so this should be done only as a last resort. Objects that are too heavy will put a permanent crease in the sheet that won’t look good in any kind of shot. If you’re going to use a bending technique, place the object under the sheet and not on top. Always try to use the same side of the sheet. That way, any scratches you may cause will be on the back. A few items you can use to make needed bends may include golf balls, plastic cups, film cans, chalkboard erasers, or anything soft. Items you should NOT use include two-sided tape, sharp edged objects, and heavy items.
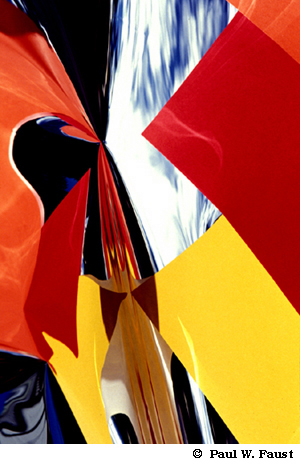
Example 2.
Colored construction paper makes dramatic images of bothshape and color. Paper is one of the best items to use to get the boldest of colors. Both images taken with Fuji Provia 100 film, using a Nikon 8008s camera.
Besides the set-up itself, the other main consideration you’ll need to handle is the lighting. I’ve found one type of lighting to be just as good as another. Il set up outdoors in direct sun to use the extreme contrasts sun will give me. I set up indoors for subjects I want to have soft pastel colors. Let your subject determine what lighting you use, or simply shoot both ways. The most that will happen is that you will learn more, use more film, and possibly end up with twice as many good images.
There is no recipe for the right way to manipulate Mylar®, but there are a few things you’ll need to watch out for when composing an image. First, consider what is going to show up in your reflections. You may find that there will be many objects in them besides your subject. Outdoors, you may find that a chain link fence becomes a part of your background. Indoors, a wall-heating vent may show up out of nowhere. They may not be obvious when you look through your viewfinder, but when your lens stops down to expose the shot, they come out of the woodwork like relatives after you’ve won the lottery. If you have a depth-of-field preview button, use it before you take every exposure. You’ll discover that what was a blur when you were composing the image, turns into the person standing behind you. Since most subjects will only have a one-to-two foot depth-of-field range, you don’t have to use your smallest aperture setting to have everything in focus. A setting of f8 or larger will do better at controlling what might otherwise show up in the background reflection.
Subject matter can be anything and everything under the sun. One of my favorites is colored construction paper from any art supply store (see example #2). You can use it as-is or cut it into any shape imaginable. Then combine the sheet and the shapes. Lay one color and/or shape on top of another, or lay them out in groups with square corners on one side of the image and your cutout shapes on the other side. Combine color papers with other objects such as a flower. You don’t have to show the object itself in the image, other than as a reflection. I’ve found that shooting colored paper is best done outdoors to capture that extra contrast that will make the colors scream.
So, the next time you complain about never having anything new to shoot, try some Mylar® reflections. Your only complaint will be that you never have enough time to shoot all of those items you’ve found around the house to use. With this Mylar® technique, you’re limited only by your own imagination.
By Paul W. Faust
Leave a Reply